
After Effects is excellent with slick, clean, graphic style animation, but few know of its prowess when it comes to frame-by-frame classic animation. In this tutorial, we’ll introduce you to the ways frame by frame animation works in After Effects, using different methods to sell the look.

Getting the Project Files
- Download the project files.
- After the download has finished, be sure to unzip the file if it hasn’t been done for you. You should end up with an After Effects Keyframe Assistant folder.
Project Overview
We’ll be starting from the basics, importing the animation frames, which determines quite a bit of how we approach the project. We’ll be using Keyframe Assistant and learning about frame length and timing to make a solid loop. Then we’ll show how we can add effects to our animation loop to create a shadow for our little running character.
Body
1. OK, so we’ll start with importing files. Hit Command-I (Mac / CTRL I (Windows) to Import files into your project.

2. Navigate to the folder Character Run Frames.
3. Once you open it, you’ll see that there are several image files. Shift-Click to select them all.
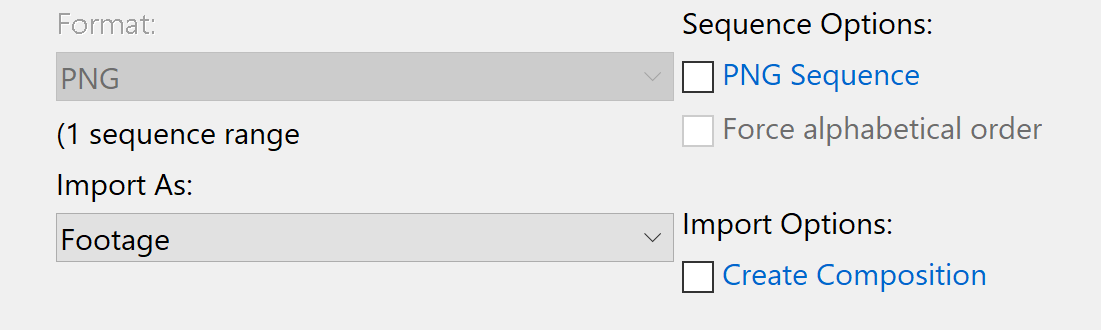
4. In the settings, make sure that the box next to PNG Sequence is unchecked.
5. Also, make sure that theImport As menu is onFootage. Your settings should look like this:
6. As an aside, if we did import the files as a PNG sequence, they would come in together as one layer with all the frames in order. This is a pretty easy and good way to import animation frames; however, it doesn’t allow us to modify each frame, which we need for this project. Feel free to try out that setting on your own, though.
For our purposes, hit Import after all the frames are selected.
7. You’ll see all the frames in your Project window, so with them all still selected, drag them onto the layer stack above the bg layer.
8. The project’s looking a little funky! Don’t worry; we’ll organize all of this. All layers still selected, hit S to open up Scale.
9. Change Scale to 50% on any layer. This will shrink all of the selected layers.
10. Now find the Zoom In (In Time) tool on the bottom of the Timeline.

11. Move the slider all the way to the right. This will allow us to work on the frame by frame Scale in the Timeline.
For those not familiar with the term, a frame is how long an image is displayed on screen. Generally, animation is 24 frames per second or fps. That means every second, 24 images are flashed onscreen.
12. Move the Playhead to00;00;00;02.
13. We still have all our animation layers selected, so with that done, hit ALT-] to shorten all the layers to two frames each. You can also grab the end of a layer and manually shorten it to two frames. TheTimeline should look like this all the way down to the bg layer.
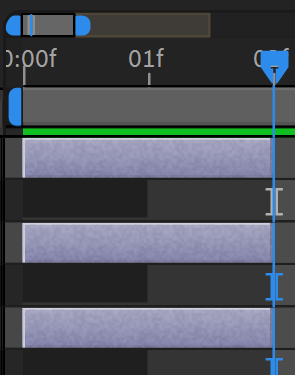
14. Still, have those animation layers selected? Don’t worry if it looks like the figure disappeared; he’s still there! Go up to Animation > Keyframe Assistant > Sequence Layers.

15. Hit OK.
16. All those layers are now in order! Hit theSpacebar to preview the animation. The figure looks like he’s running now! Each layer takes two frames to display, which is called “running on twos.”
17. Those layers are still all selected, right? Right-click on any of them.
18. Hit Pre-compose.
19. Name the Precomp, Running Precomp.
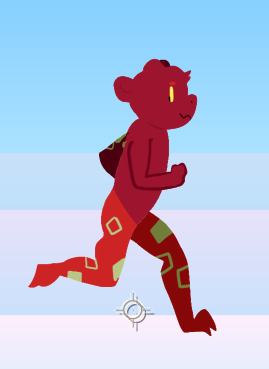
20. Hit OK. Now you have a neat Precomp with all your frames inside! We’ll be adding a shadow to really sell the effect here.
Shadow
1. With the Precomp selected, hit Cmnd-D (Mac) / CTRL D (Windows) to duplicate the Precomp.
2. Select the new layer.
3. Hit Return (Mac) / Enter (Windows) to rename the layer to Shadow.
4. Hit Y to activate thePan Behind tool. 
5. With thePan Behind tool, move theAnchor Point down between the figure’s legs, like so.
6. Press S to open up the Scale attribute.
7. Click the little paper clip icon to unlink the height and width so you can change one without the other being affected.
8. Change the height, the second number, to -40. This will flip the figure upside down and squash it a bit.
9. Hit P for Position.
10. Change the Position to 958,825. This will line the feet up with each other so the shadow looks connected to the figure.
11. With the shadow layer still selected, go up toEffect > Color Correction > Hue/Saturation.
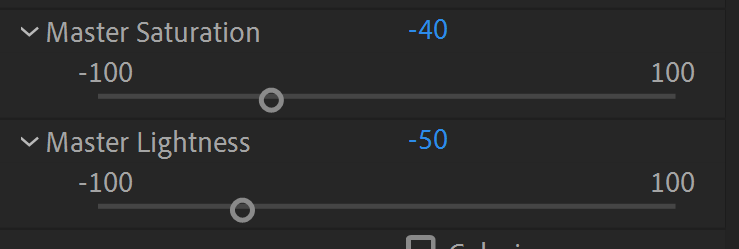
12. In the Effect Controls, alter theMaster Saturation to -40.
13. Change the Master Lightness to-55. Your settings should look like this.
14. Once more, we’ll be adding another effect. Go to Effect > Blur & Sharpen > Gaussian Blur.
15. Change theBlurriness to90.
16. Check the box marked Repeat Edge Pixels, to ensure the total layer is blurred out.
17. Drag and drop the shadow layer beneath your Precomp layer. With that, you’re done!
Conclusion
Now you have your own running animation! You can make the frames even on paper, scan them, and import those frames to After Effects. By making duplicates of your animation loop, you can add all sorts of effects, and Keyframe Assistant allows you to organize your animation frames into sequence easily. Remember a few tips about how frames work, and you’re golden!
Happy animating!
Learn More About Motion Graphics
We offer the best motion graphics training in NYC. Our expert instructors guide you step-by-step through projects with real-world applications. Sign up today and start growing your career!


