
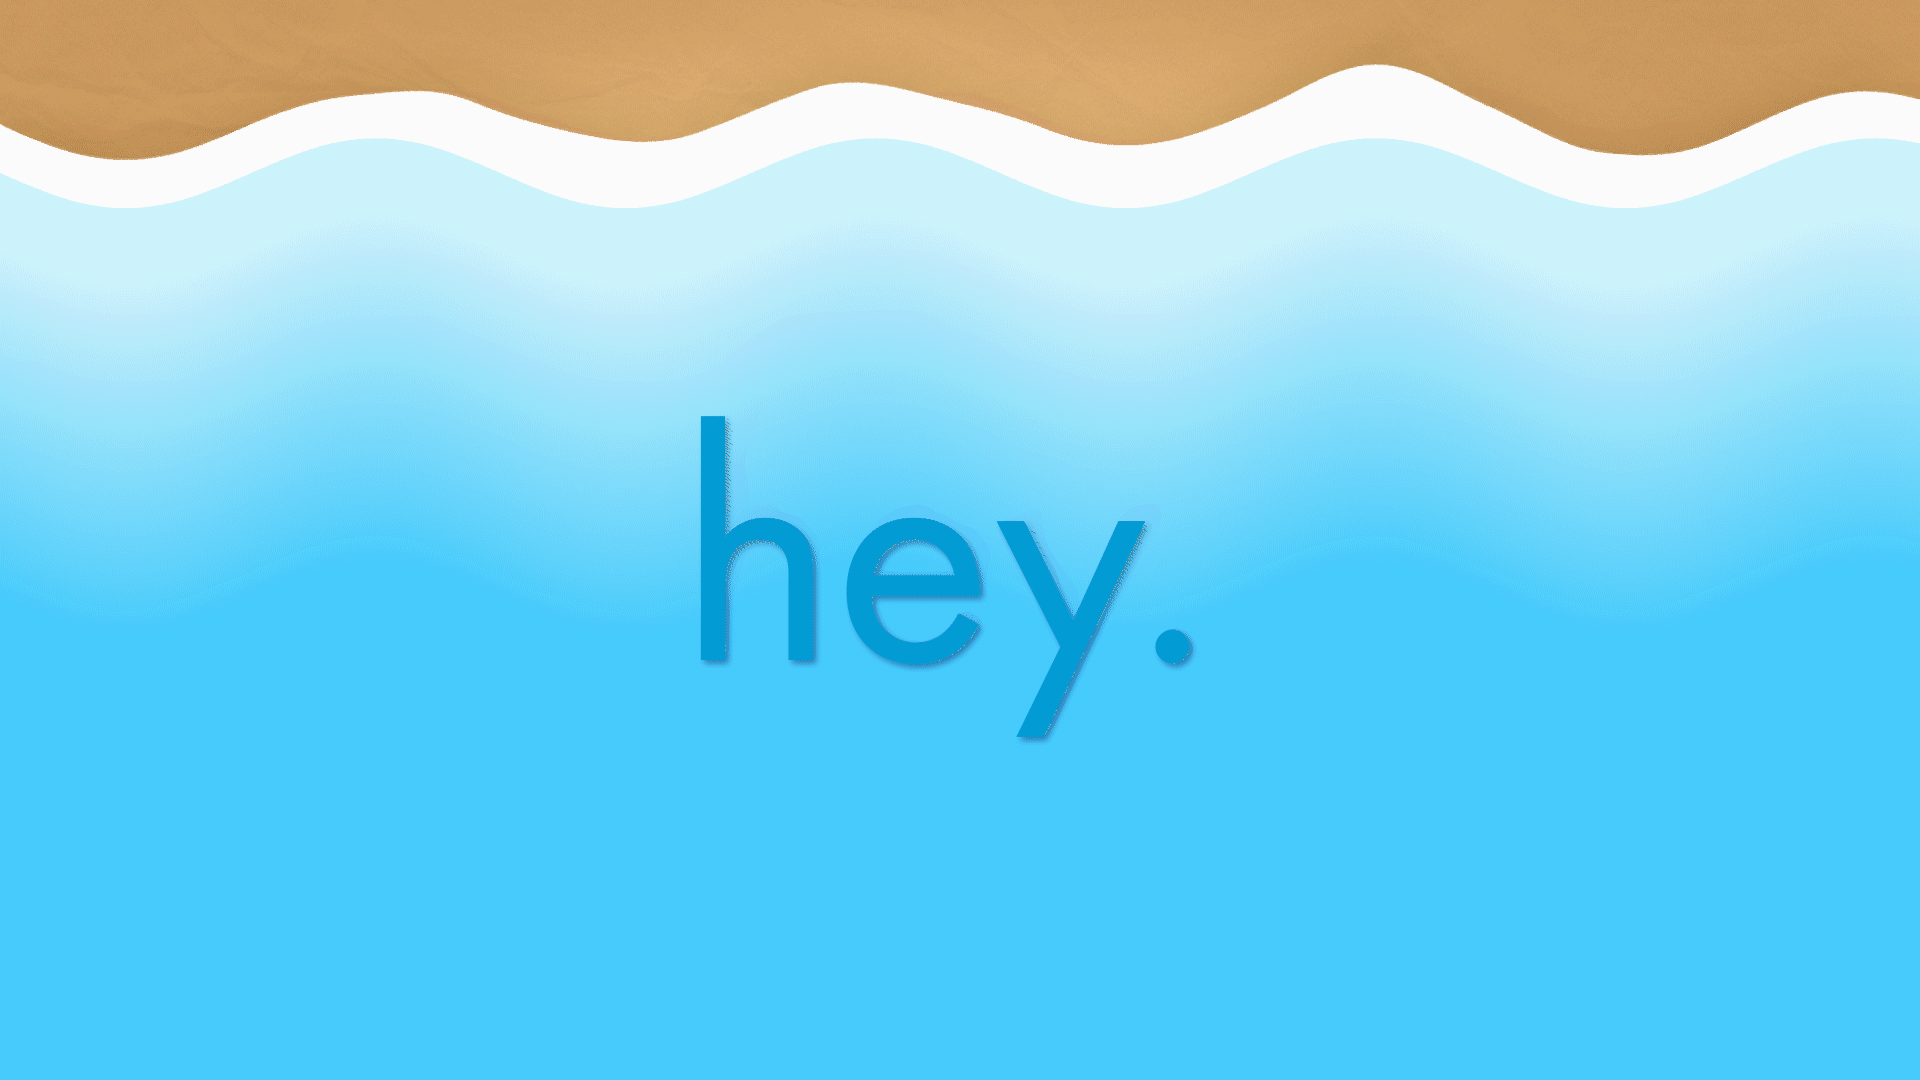
Making liquid and fluid animations in After Effects might seem daunting, but it’s actually much easier than it sounds. After Effects offers a wide variety of Effects that gives users the power to simulate nearly anything. In this tutorial, we’ll be focusing on creating a graphic, “cartoon” style liquid animation with just a few effects
Getting the Project Files
- Download the project files.
- After the download has finished, be sure to unzip the file if it hasn’t been done for you. You should end up with an After Effects Liquid Animation folder.
Overview
This tutorial is going to cover using Wave Warp to simulate liquid motion, as well as using Turbulent Displace and Drop Shadow to really sell the Effect. We’ll also be animating our liquids and a bit of text to create a fun wave animation! This tutorial has a bit more setup done for you in the files so you can focus on making some sweet waves. Let’s get to it!
File Setup and Effects
1. In the file you should see a text layer, with two shape layers beneath that. Beneath those is a vignette layer, another text layer, and a.jpg and solid at the bottom. Don’t be scared off by the number of layers; all we’ll be focusing on is three layers.

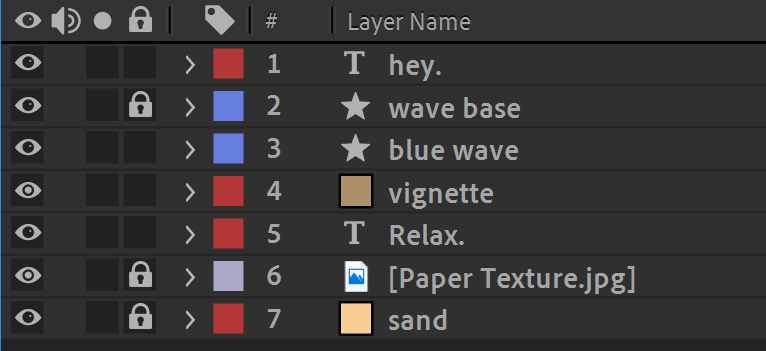
2. Toggle the Visibility of each layer off and on by clicking the little eye icon next to each. This will allow you to identify which layer is which object on the composition.
3. Right off the bat, we’ll be adding our first and most important effect, Wave Warp.
4. Select the blue wave layer.
5. Go up to the Effect panel in the topmost toolbar.

6. Navigate to Effect>Distort>Wave Warp. It should be all the way at the bottom.
7. Click on Wave Warp.
8. A new Effect Control panel should appear on the left. If it doesn’t appear, click on the words Effect Control.
9. In the Effect Control, you should see a Gradient Ramp effect, as well as the Wave Warp you just applied. Ignore the Gradient Ramp as that’s been already applied for you and scroll down to the Wave Warp options.
10. Change Wave Height to 35.
11. Change Wave Width to 250.
12. Now, here’s the cool part. Hit Spacebar on your keyboard to play back your animation. You’ve already made some animated water!
13. In prep for the next step, hit the Visibility icon next to the wave base layer to hide it.
14. Hit the Visibility icon next to the blue wave layer to hide it as well.
15. Waves have foam at their tips, so we’ll be creating a near-identical foam layer beneath our blue wave. We could make a whole new layer from scratch, but let’s utilize the layers we have already. Select the blue wave layer.
16. Hit Cmnd+D (Mac) / Cntrl+D (Windows). This will duplicate your blue wave layer right on top of it.
17. Since it’s invisible at the moment, hit the Visibility icon to turn it on. 
18. In the Effect Control panel for this layer, it’ll have the same effects as the layer it’s duplicated from. Select the Gradient RampEffect.
19. Hit Delete on your keyboard to make the layer one solid color.
20. Go up to Fill in the toolbar. 
21. Click on the box to the right of the word Fill.
22. A color picker appears. Slide the picker to the top left to make it pure white or enter #FFFFFF in the hex code box.
23. Click OK. The layer is now solid white.
24. Select the name of the layer, blue wave 2, in the layer stack.
25. Hit Return (Mac)/ Enter (Windows).
26. Rename the layer to white wave.
27. Click anywhere on the white wave layer in the layer stack and drag it below the blue wave layer.
28. We’ll be adding a pair of effects to the white wave layer to make it behave a little differently than the blue wave layer, and thus appear more organic. Make sure the white wave layer is still selected.
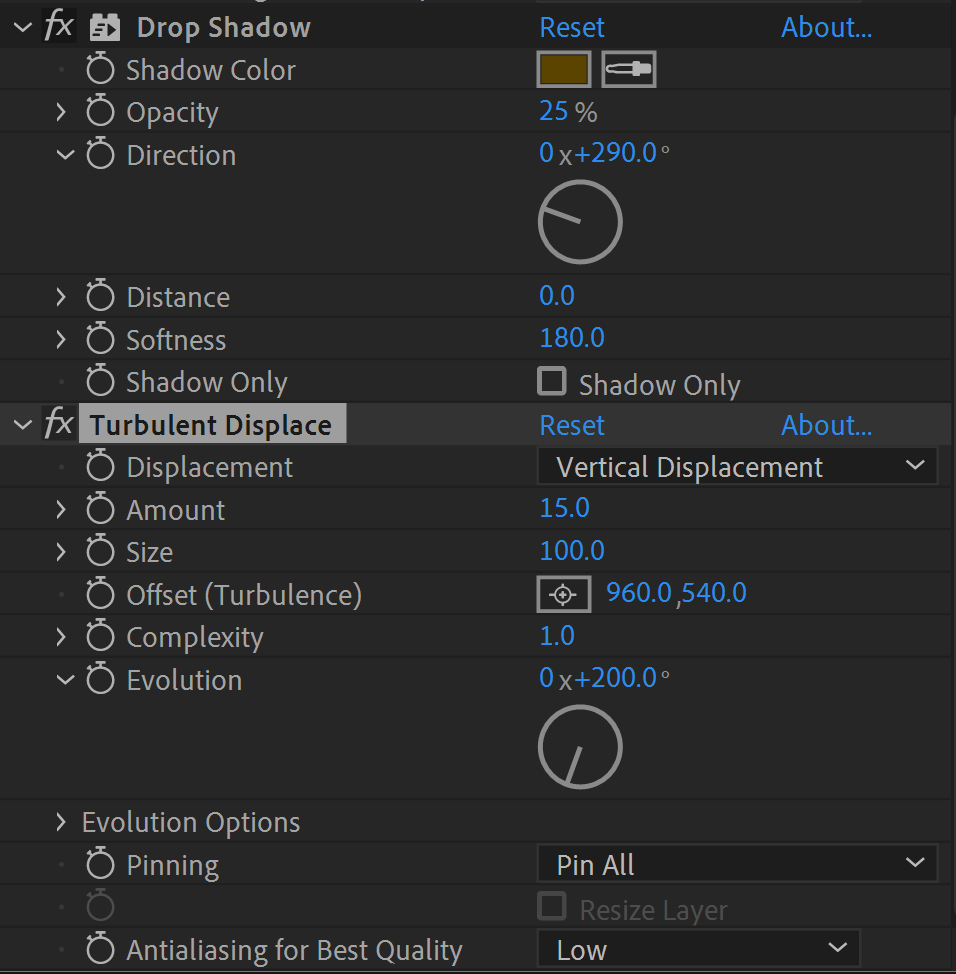
29. Go up to Effect s > Perspective>Drop Shadow.
30. Click Drop Shadow.
31. In the Effect Control panel, click on the box next to Shadow Color.

32. In the hex code box, enter#5B4300 or slide the color picker to a medium-dark brown color.
33. Click OK.
34. Change the Opacity to 25%.
35. Change the Softness to180%.
36. Change Distance to0%.
37. Change the Direction to 290 degrees.
38. Now, let’s add one more effect to give the foam a “blobby” look. Go up to Effect> Distort>Turbulent Displace.
39. Click on Turbulent Displace.
40. In the Effect Controls of the Turbulent Displace, changeAmount to 15.
41. Change Evolution to200 degrees. Your new effects should look like the screenshot below. That’s it for the effects! This was the bulk of the exercise, and now it’s onto a bit of simple animation to finish the project.
Animating the Waves
1. Hit the Visibility icon next to the blue wave layer to turn it back on.
2. Turn on the Visibility of the wave base layer as well.
3. Select the blue wave layer.
4. Press the P key to bring up thePosition attribute.
5. Move the playhead to 00;00;00;25.
6. Click the stopwatch next to the wordPosition to activate keyframing. This will set an initial keyframe wherever the playhead is.
7. Move the playhead to00;02;05;
8. Change the Position to be960,1077.
9. Select both keyframes.
10. Hit F9 to Easy Ease them in so the animation is smooth.
11. Blue wave done! Now select the white wave layer.
12. Like before, hitP to bring up the Position attribute.
13. Move the playhead back to 00;02;05;
14. Click the stopwatch to start keyframing.
15. Change the Position attribute to be 960,470.
16. Move the playhead to 00;02;07; so it’s a little offset from the other wave.
17. Change thePosition attribute to 960,1077.
18. Select both keyframes.
19. Hit F9 again for another Easy Ease.
20. Move the playhead to the beginning, 00;00;00;00.
21. Press the spacebar to play your animation. The waves move in and out!
Text Animation
1. Last detail, we’ll be animating the top text layer so it fades out as the wave rolls down. Select the top text layer.
2. Go up to Effect> Blur & Sharpen > Gaussian Blur.
3. Click on Gaussian Blur.
4. If the playhead is not at the beginning, move it to 00;00;00;00.
5. Click the stopwatch next to Blurriness to activate keyframing.
6. Move the playhead to 00;00;02;08.
7. Change theBlurriness to100.
8. Select both keyframes.
9. Hit F9 to Easy Ease in both.
10. Now we’ll add a fade out as well to the text, and we’ll be done! Bring the playhead back to the beginning. Hit T on your keyboard to bring up Opacity options.
11. Press the stopwatch to start keyframing.
12. Move the playhead to00;00;02;08.
13. Change the Opacity to0%.
14. Select both keyframes.
15. And yes, hit F9 to Easy Ease in both.
16. Finally, move the playhead to 00;00;03;10.
17. Press the N key to trim the timeline so when your animation previews and renders, it’s about three seconds total.
All done! You now have a cool wave animation using just Wave WarpEffect s with a few other effects to sell the look. Try pairing Wave Warp with different shapes and Masks to create different forms of liquid, or changing the color of theSolids you work with. You can even add bubbles with some of After Effects’ SimulateEffect s, or use a Track Matte to contain liquid within text!
Happy animating!
Learn More About Motion Graphics
We offer the best motion graphics training in NYC. Our expert instructors guide you step-by-step through projects with real-world applications. Sign up today and start growing your career!


