
Glitch effects are everywhere these days. For cool cyberpunk and techno looks, you can’t beat a slick glitch effect. There’s several ways to do this but this tutorial is about the most effective, simplest method to achieve the aesthetic. In fact, not only will we give you a cool glitch effect to work with, we’ll even be putting in a glitch-like transition to add some extra punch.

Getting the Project Files
- Download the project files.
- After the download has finished, be sure to unzip the file if it hasn’t been done for you. You should end up with a Premiere Pro Glitch Effect folder.
Overview
The first thing we’ll be doing is adding aVR Chromatic Aberration to an Adjustment Layer already provided for you. We’ll be, of course, modifying some settings and keyframing it. After that is anotherVR Chromatic Aberration added to some footage, keyframing that, then a final Mosaic effect to finish it off.
Let’s get started!

VR Chromatic Aberration
- In the Effects panel, type inVR Chromatic Aberration.
- Drag and drop that effect onto the Adjustment Layer in your project.
- Now, select the Adjustment Layer.
- Go to the Effect Controls panel in the top left and scroll down until you see the new effect that you just applied.
- Move the Playhead on the Timeline to00;00;02;07.
- Ok, here we go! Next to Aberration (Red), hit the diamond shape to start keyframes.
- Change the value to 0.
- Do the same for Aberration (Green), hit the diamond shape for that one.
- Change the value to0.
- Aberration (Blue), once more start keyframing with the diamond shape.
- And of course, change the value to0.
- Move the Playhead to 00;00;02;12.
- Change the value of Aberration (Red) to30.
- Change the value of Aberration (Green) to -80.
- Then change the value of Aberration (Blue) to 15.
- Now move the Playhead to00;00;02;18.
- Change the value of Aberration (Red) to-25.
- Yep, change the value of Aberration (Green) to -10.
- And change the value of Aberration (Blue) to60.
- Move the Playhead to 00;00;02;24.
- Now change the value of Aberration (Red) to0.
- Change the value of Aberration (Green) to0.
- Change the value of Aberration (Blue) to 0. Phew!
- Next to Auto VR Properties, check the box.
- In the dropdown menu that appears, choose the option Stereoscopic (Over/Under).
- Last thing to keyframe now. Move the Playhead back to 00;00;02;07.
- Next toFalloff Invert, click the box. This will set a keyframe for a bit of screen jitter.
- Hit the right arrow key twice to move ahead two frames.
- Once more, click theFalloff Invert box to set another keyframe.
- Repeat the prior two steps until you get to 00;00;02;24;
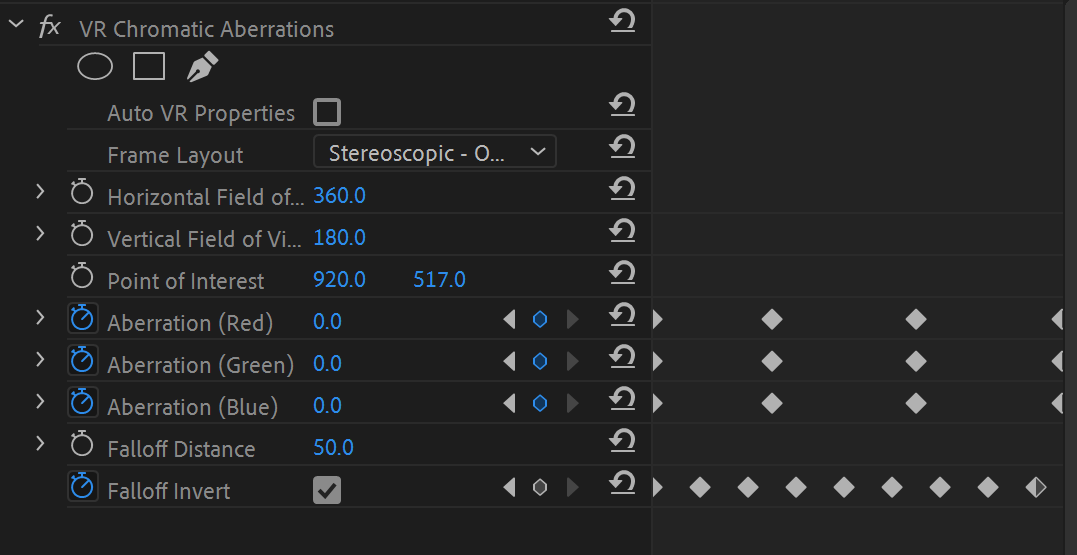
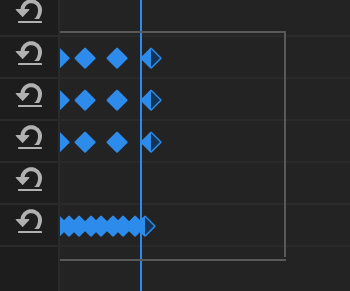
Your Effect Controls will look something like this:
Glitch Effect
- We’ll work on the glitching city footage next. Click theVR Chromatic Aberration s effect name within the Effect Controls panel.
- Hit Cmd-C (Mac) / Cntrl-C (PC) to copy the effect.
- Select theNew York City footage.
- Cmd-V (Mac) / Cntrl-V (PC) to paste the effect.
- Now, in the Effect Controls panel for the New York City footage, theVR Chromatic Aberrations effect will have been pasted to the start of the footage. We want it a bit later, so drag out a selection rectangle over all the effect keyframes, like so:
- Move the Playhead to 00;00;03;06.
- Now, with the effect keyframes selected, drag them by clicking on any highlighted keyframe to where the Playhead is, 00;00;03;06.
- Great. One last effect here, so go to theEffects panel and type in Mosaic.
- Drag and drop the Mosaic effect onto the New York City footage.
- In the Effect Controls panel, make sure the box next to Sharp Colors is checked.
- With the Playhead still at00;00;03;06; change Horizontal Blocks to 500.
- Change Vertical Blocks to 500.
- Move the Playhead to00;00;03;15.
- Change Horizontal Blocks to 20.
- Alter Vertical Blocks to10.
- Move the Playhead to00;03;23.
- Change Horizontal Blocks back to 20.
- Finally, change Vertical Blocks to10.
- Move the Playhead back to the beginning of the project, 00;00;00;00.
- Hit the Spacebar to preview your footage. You’ll see a glitchy transition between clips and a bit of glitching on the second clip. Neat, huh?
Conclusion
Now you have an awesome glitch effect at your disposal! You can change up the color channels on theVR Chromatic Aberration if you’d like to experiment with the effect, add another Mosaic effect, or put in some Gaussian Blur as well. Add a couple of more instances of the effect along the footage Timeline for an extended glitch, or add an Overlay layer of some static footage, to name a few ideas.
Happy editing!
Learn Motion Graphics
We offer the best motion graphics training in NYC. Our expert instructors guide students step-by-step through projects with real-world applications. Classes are available live online and in-person at our Midtown office. Sign up today and start growing your career!


