
Animated Masks are a ubiquitous technique inAfter Effects, using to create all sorts of animated shapes and sly effects, from pouring coffee into a cup to having an animated car disappear into a tunnel. In this tutorial, we’ll be using a simple pair of Masks to pour out water and animated some text.
Getting the Project Files
- Download the project files.
- After the download has finished, be sure to unzip the file if it hasn’t been done for you. You should end up with an After Effects Masked Animation folder.
Project Overview
We’ll first be setting up the animation for the water with a Solid layer and some keyframes. Then we’ll be usingPrecomps and a Mask to make it appear like water. After that we’ll be animating some text using a Mask as well to make it look like it’s appearing from thin air. Finally, we’ll be growing the actual flower using some simple Scale keyframes. Let’s get started!
Water Spout
1. So first things first, we’ll be going up toLayer > New > Shape Layer.
2. Click on Shape Layer.
3. Click and drag out a rectangle the size of the composition window.
4. Go up toFill in the top toolbar.  5. Click the colored box beside the word to bring up a color picker.
6. Change the color to light blue, or use the hex code #53C4FF.
7. Hit Return (Mac) / Enter (PC) with the layer selected to rename it.
8. Name the layer water.
9. With thewater layer now selected, hit R to bring up Rotation. We’ll be using this attribute to rotate the layer in the direction of the spout.
10. Change the Rotation to -30 degrees.
11. Now hit P for the Position attribute.
12. Move the Playhead
5. Click the colored box beside the word to bring up a color picker.
6. Change the color to light blue, or use the hex code #53C4FF.
7. Hit Return (Mac) / Enter (PC) with the layer selected to rename it.
8. Name the layer water.
9. With thewater layer now selected, hit R to bring up Rotation. We’ll be using this attribute to rotate the layer in the direction of the spout.
10. Change the Rotation to -30 degrees.
11. Now hit P for the Position attribute.
12. Move the Playhead  to00;00;00;22.
13. Press the stopwatch
to00;00;00;22.
13. Press the stopwatch  besides the Position attribute to start keyframing.
14. Change the Position of the water layer to 2777, -600 which will move it diagonally off the frame out of sight.
15. Move the Playhead to00;00;01;10
16. Change the Position of the water layer to-930,1616. Since keyframes are enabled, one will automatically appear when you move the layer around.
17. Select both keyframes with Shift-Click.
18. Hit F9 to Easy Ease them. You’ll now have a giant blue rectangle zoom across your screen, but with a Mask, we’ll turn it into a water spout.
19. Right click on your water layer.
20. Select Pre-compose.
21. In the window that appears, name it water precomp.
22. Hit OK.
23. Move the Playhead to 00;00;01;00.
24. We have to be able to see through this layer for the next step, so press T for Opacity.
25. Lower the Opacity to 75%.
26. Here’s where we add the Mask. Click the Pen
besides the Position attribute to start keyframing.
14. Change the Position of the water layer to 2777, -600 which will move it diagonally off the frame out of sight.
15. Move the Playhead to00;00;01;10
16. Change the Position of the water layer to-930,1616. Since keyframes are enabled, one will automatically appear when you move the layer around.
17. Select both keyframes with Shift-Click.
18. Hit F9 to Easy Ease them. You’ll now have a giant blue rectangle zoom across your screen, but with a Mask, we’ll turn it into a water spout.
19. Right click on your water layer.
20. Select Pre-compose.
21. In the window that appears, name it water precomp.
22. Hit OK.
23. Move the Playhead to 00;00;01;00.
24. We have to be able to see through this layer for the next step, so press T for Opacity.
25. Lower the Opacity to 75%.
26. Here’s where we add the Mask. Click the Pen  tool in the toolbar.
27. ThePen tool works by clicking to create individual points. These points then make up shapes. Start by clicking on the watering can’s spout.
28. Then click on the base of the flower. You’ll have made a line so far.
29. Click again to the right of the flower, in a line from the previous point.
30. And finally, click on your initial point on the spout. This will have made a triangle Mask. Everything outside your triangle is now invisible. Cool, huh?
tool in the toolbar.
27. ThePen tool works by clicking to create individual points. These points then make up shapes. Start by clicking on the watering can’s spout.
28. Then click on the base of the flower. You’ll have made a line so far.
29. Click again to the right of the flower, in a line from the previous point.
30. And finally, click on your initial point on the spout. This will have made a triangle Mask. Everything outside your triangle is now invisible. Cool, huh? 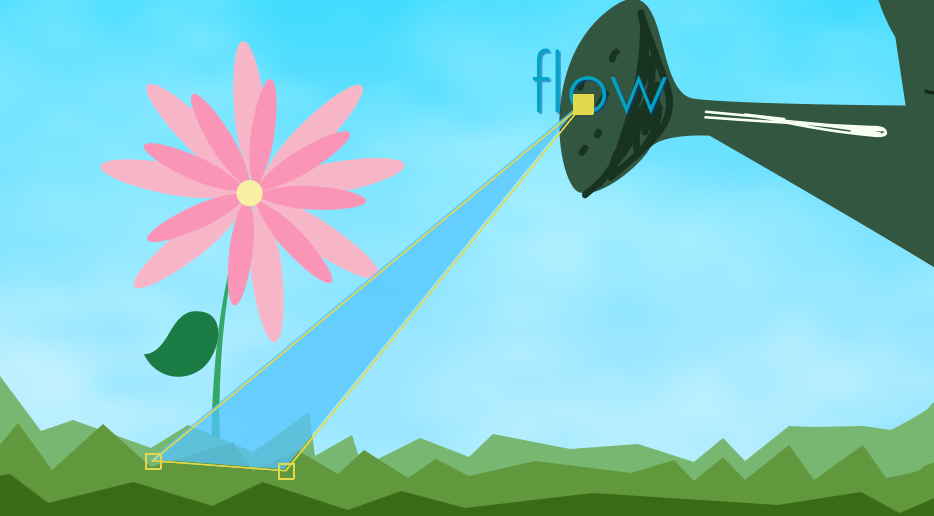 31. With the water layer still selected, hitF to open up Mask Feathering. This determines how soft the edges of the Mask are. We want the water to look a little more natural so we’ll modify this.
32. Change the Mask Feather to 50.
33. One last detail. Click and drag thewater precomp layer beneath the grass foreground layer to add some depth.
34. Move the Playhead to the beginning, 00;00;00;00.
35. Hit Spacebar on your keyboard to preview your animation. Now you have a neat little water spout!
31. With the water layer still selected, hitF to open up Mask Feathering. This determines how soft the edges of the Mask are. We want the water to look a little more natural so we’ll modify this.
32. Change the Mask Feather to 50.
33. One last detail. Click and drag thewater precomp layer beneath the grass foreground layer to add some depth.
34. Move the Playhead to the beginning, 00;00;00;00.
35. Hit Spacebar on your keyboard to preview your animation. Now you have a neat little water spout!

Text Masking
1. We’ll be using a Mask next on the text. Move the Playhead to 00;00;01;22.
2. Select the flow text layer.
3. Hit P to open up Position.
4. Press the stopwatch to activate keyframing.
5. Now just move the Playhead to00;00;02;04.
6. Just change the Position to 1212,510. This will automatically add another keyframe.
7. Select both keyframes with Shift-Click.
8. Hit F9 to Easy Ease the keyframes.
9. Right click on the flow text layer.
10. Select Pre-compose.
11. Name the layer flow text precomp.
12. Hit OK.
13. Move the Playhead back to 00;00;01;22.
14. Now go up to the toolbar and select the Shape  tool.
15. If the Rectangle shape isn’t active, hitQ repeatedly to cycle through the shapes till you get to theRectangle.
16. Click and drag a rectangular shape over the text. You can probably still see the text so—17. In the layer stack for the flow text precomp layer, you can see a box labeledInverted.
tool.
15. If the Rectangle shape isn’t active, hitQ repeatedly to cycle through the shapes till you get to theRectangle.
16. Click and drag a rectangular shape over the text. You can probably still see the text so—17. In the layer stack for the flow text precomp layer, you can see a box labeledInverted.  18. Click the box next to Inverted to invert the Mask, thereby hiding the text.
19. Hit F to open up Mask Feathering.
20. Change Mask Feather to 25.
21. Now if you play back your animation, you’ll see the text slide out of thin air. This is a great transition to smoothly introduce new objects in your composition without it looking jarring.
18. Click the box next to Inverted to invert the Mask, thereby hiding the text.
19. Hit F to open up Mask Feathering.
20. Change Mask Feather to 25.
21. Now if you play back your animation, you’ll see the text slide out of thin air. This is a great transition to smoothly introduce new objects in your composition without it looking jarring.
Flower Growth
1. Last step is pretty simple, we’ll be growing our flower after it gets watered. Move the Playhead to 00;00;01;20. We’re actually going to be animating backwards for this one but it’s easy.
2. Hit S to open up Scale.
3. Click the stopwatch to start keyframes.
4. Now move back to 00;00;01;05.
5. Change the Scale to 0,0.
6. Select both keyframes.
7. Hit F9 to Easy Ease them. All done!
Conclusion
That was pretty simple! The beauty of Animated Masks is their versatility: You can use this on any kind of footage, effect, layer, and in any shape you can draw with the Pen tool. Use a Mask on a particle layer, some video footage, a static image, and experiment with the possibilities! Happy animating!
Learn More About After Effects & Video Editing
We offer the best motion graphics training in NYC. Our expert instructors guide you step-by-step through projects with real-world applications. Sign up today and start growing your career!


