Learn how to create interactive animations using GreenSock's TimelineLite, including how to cover topics such as using progress() to jump to the end of an animation, tweening the clip property, using mouseenter & mouseleave, and accounting for unexpected user interaction.
This exercise is excerpted from Noble Desktop’s past web development training materials created in partnership with GreenSock. It is compatible with GreenSock version 2. To learn current skills in web development, check out our coding bootcamps in NYC and live online.
Topics Covered in This GreenSock Tutorial:
Using Progress() to Jump to the End of the Animation, Tweening the Clip Property, Using Mouseenter & Mouseleave, Accounting for Unexpected User Interaction
Exercise Preview
Photos courtesy of istockphoto: Image #11068094; Roberto Scandola Studio Grafico, Image #21301524

Exercise Overview
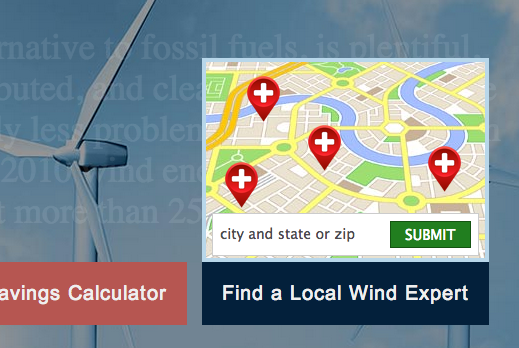
In this exercise, we will add interactivity to the INTO THE WIND animation. We’ll add a second TimelineLite (an animated map with pins) and play it when the user mouses over the Find a Local Wind Expert button.
Previewing the Finished Animation
To take a look at the animation we’ll be building, open up Google Chrome.
-
Hit Cmd–O (Mac) or CTRL–O (Windows), navigate to Desktop > Class Files > yourname-GSAP Class > TimelineLite RollOvers, and double–click on finished.html.
We have skipped over the initial animation sequence we worked on in previous exercises to focus on the rollover effects.
-
Mouse over the Find a Local Wind Expert button and take note of the sequence:
- The map flies up.
- The pins fly down.
- As the form input slides up, the body copy is simultaneously dimmed to put the focus on the map panel.
Looks pretty cool—let’s build this exciting rollover effect from scratch.
Arranging the Testing Environment
In your code editor, open yourname-GSAP Class > TimelineLite RollOvers > start.html (or the entire TimelineLite RollOvers folder if your code editor allows).
-
Preview start.html in a browser.
Our controller is at the top left of the page, the animation we coded in a previous exercise plays, and the map currently shows for the entire duration of the animation.
In order to focus on creating the rollover behavior, we should first set the page to skip the intro animation and also hide the controller. Leave start.html open in your browser, so you can reload the page later to see your code changes.
Switch back to start.html in your code editor.
-
Find the following comment around line 134:
//Fancy Rollover Code -
To hide the controller, add the following bold code below the comment, like so:
//Fancy Rollover Code

TweenLite.set("#controller", {visibility:"hidden"});

var $mapContainer = $("#mapContainer"),
This code should be fairly self-explanatory; we have just used TweenLite’s set() method (which creates a zero-duration tween) to set the visibility of the controller to hidden.
Save the file.
Switch to the browser and reload the page. The controller is indeed hidden!
-
Switch back to your code editor and add the following bold code:
TweenLite.set("#controller", {visibility:"hidden"});
tl.progress(1);
Remember that TimelineLite’s progress() is a value between 0 (the beginning) and 1 (the end), so by immediately setting progress to 1, we will jump to the very end of the animation.
Save the file.
-
Switch to the browser, reload the page, and notice that we bypass the animation.
Now we have a much more pleasant testing environment and we can focus on the elements of the map panel.
Examining the DOM Structure & JavaScript
-
Look at the DOM on lines 29–42, paying special attention to the bold code that shows we have set up a mapContainer that holds a mapPanel div, the map image, four pins with class=
"pin", the form and, finally, the button itself:<div id="mapContainer"> <div id="mapPanel"> <img src="img/map.jpg" height="196" width="279" id="map"> <div class="pin" id="pin1"></div> <div class="pin" id="pin2"></div> <div class="pin" id="pin3"></div> <div class="pin" id="pin4"></div> <div id="form">Code Omitted To Save Space
</div>
   </div>
   <div class="button">Find a Local Wind Expert</div>
</div>
NOTE: It made sense to put all the elements in the mapContainer div to stack everything properly and ensure that the active rollover area would include both the button and the animated map panel.
-
Look at the following code that we’ve provided around lines 139–144:
var $mapContainer = $("#mapContainer"),
    $localExpertBtn = $("#mapContainer.button"),
    $mapPanel = $("#mapPanel"),
    $pins = $(".pin"),
    $form = $("#form"),
    mapTimeline;
Here we created some jQuery references to the elements that we want to animate. We can target several variables: the
$mapContainer, the$localExpertBtn, the$mapPanel (which contains the map image), each of the$pins, and the$form.On the final line we have created a variable, mapTimeline, which will be used to control the rollover animation’s timeline. (Yes, it’s perfectly valid to have more than one TimelineLite on a single page!)
-
Before we can add any functionality, we need to declare the TimelineLite. Add the following bold code beneath the segment we were just looking at:
$form = $("#form"),
   mapTimeline;

mapTimeline = new TimelineLite();
Animating the Button & Map Panel
-
Now that we can start adding tweens to the mapTimeline, let’s add a simple tween that will change the background color of the button from dark salmon to navy blue. Add the following bold code:
mapTimeline = new TimelineLite();

mapTimeline.to($localExpertBtn, 0.5, {backgroundColor:"#03203b"})
This first element in the mapTimeline targets
$localExpertBtn, changing its background color to navy (over the course of 0.5 seconds). Save the file and switch to the browser.
Reload the page and notice that the button’s color immediately transitions to navy. (It’s a very quick change, so you might have to reload the browser again to notice it.)
Switch back to your code editor.
-
Let’s work on revealing the map panel. We want the image to be static and revealed from the bottom up. Let’s use the CSS clip property to accomplish this. Add the following code:
mapTimeline.to($localExpertBtn, 0.5, {backgroundColor:"#03203b"})
           .from($mapPanel, 0.5, {clip:"rect(204px 287px 204px 0px)"})
The CSS Clip Property Explained
The clip property allows us to define a rectangle that limits the visible portion of an element. The rectangle is defined by passing in top, right, bottom, and left coordinates (in that order).
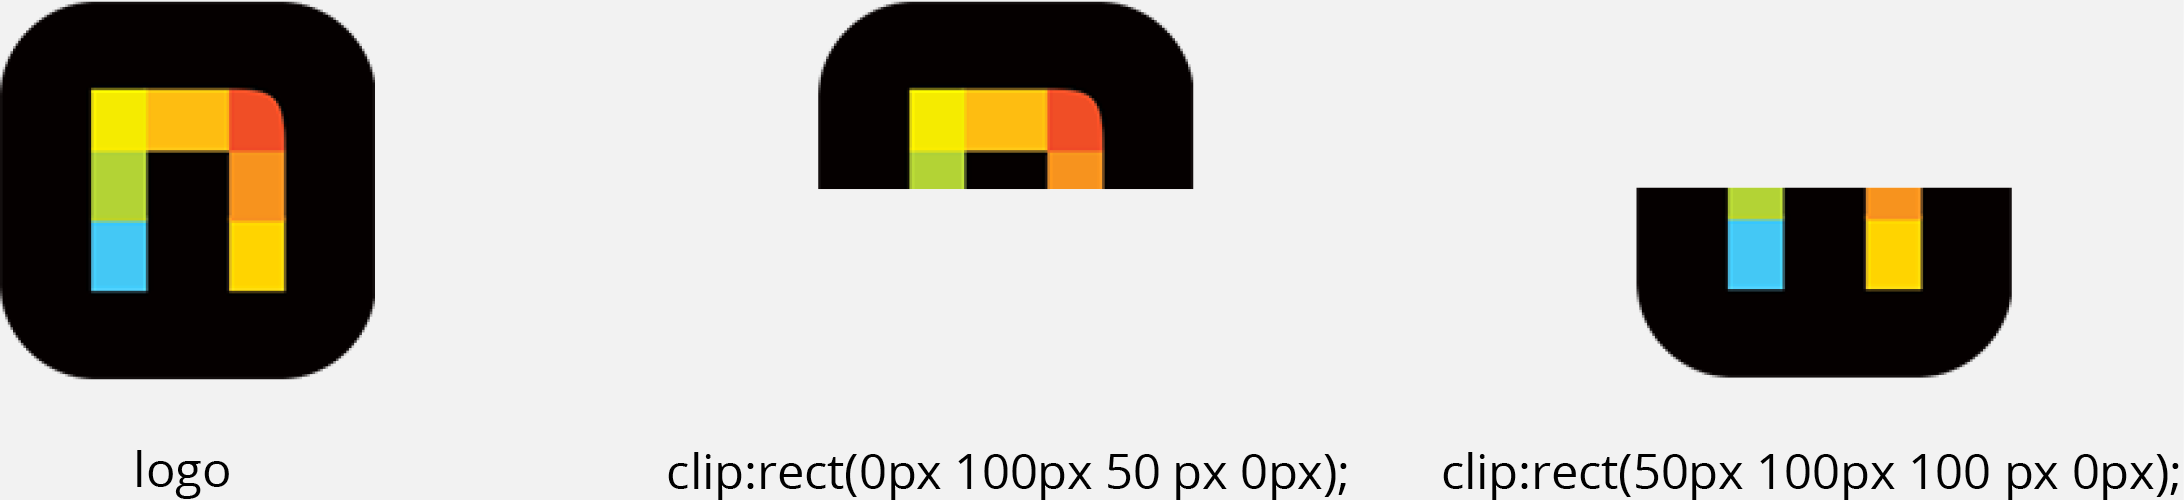
It’s important to note that the element must have an absolute or fixed position declared in the CSS in order for this property to be implemented.
Read more about the CSS clip property at: css-tricks.com/almanac/properties/c/clip
Take a look at the coordinates you just typed. They may seem a bit cryptic at first, but all you really need to understand is that we have set both the top and bottom values to 204px because we want to tween from the bottom edge of the panel.
-
Save the file and reload the browser. Looking good!
Are you wondering how we got this to work by only listing the from() tween, not the to() values? Well, the map image will tween to the full map image because we have defined clip values for the map image in our CSS file. Let’s check it out now.
In your code editor, open TimelineLite RollOvers > css > main.css
-
Find the following around lines 118–126, paying special attention to the bold code:
#mapPanel {
   position:absolute;
   background-color:#b8d7ea;
   width:287px;
   height:204px;
   top:-204px;
   /* top / right / bottom / left */
   clip:rect(0px 287px 204px 0px);
}
Highlighted in bold are the clip values that the map panel tweens to. They are listed in this order: top, right, bottom, left. Notice that the #mapPanel element’s width and height corresponds to the clip values; therefore, we are revealing the entire panel.
-
Switch back to editing start.html.
We want to keep the animation moving at a zippy pace, so let’s make the reveal happen while the button changes color. We can schedule the tween to run at the beginning of the timeline by giving it a position parameter of 0 seconds.
-
In the from() tween around line 149, add the following bold position parameter and make sure not to forget the comma after the {properties}:
.from($mapPanel, 0.5, {clip:"rect(204px 287px 204px 0px)"}, 0) -
Save the file and reload the browser.
It’s a subtle change, but now the two tweens happen at the same time. It’s a good idea to keep the animations as zippy as possible for this sort of interactive behavior so the user doesn’t get frustrated waiting for something to happen.
Fading the Body Copy
While the browser is open, notice that the main copy text adds unnecessary clutter while the map overlaps it. We can easily use TimelineLite to mute the text a bit while the map panel is displaying.
Switch back to start.html in your code editor.
-
At the bottom of the mapTimeline sequence, add the following bold code:
.from($mapPanel, 0.5, {clip:"rect(204px 287px 204px 0px)"}, 0)
.to($mainCopy, 0.5, {opacity:0.1}, 0)
Notice that we are targeting the
$mainCopy variable that we created in a previous exercise. We have also scheduled the tween to start at 0, the very beginning of the mapTimeline, just like the other two tweens in the timeline. -
Save the file and reload the browser. Very nice!
It’s great to know that we can target any element on the page, not just the ones associated with this particular timeline or
$mapContainer.
Animating the Dropped Pins
Let’s work on animating the pins. Remember: they all belong to the pin class and we can target all of them at once with $pins. This would be a good opportunity to use the staggerFrom() method.
Switch back to start.html in your code editor.
-
At the bottom of the mapTimeline sequence, add the bold code shown below:
.to($mainCopy, 0.5, {opacity:0.1}, 0)
.staggerFrom($pins, 0.3, {y:-50, opacity:0}, 0.05)
The code should look pretty familiar by now, but here’s an explanation: we are staggering the appearance of the pins over the course of 0.3 seconds, having them appear from a position of negative 50 (50 pixels above their final position), fading in, and setting the stagger amount—or the time between each pin drop—to 0.05.
-
Save the file and reload the browser. Looking good!
The animation would be even snappier if the pins were already moving before the map was completely revealed. Let’s make it happen.
Switch back to start.html in your code editor.
-
In the staggerFrom() tween that animates the four pins, add the following negative relative position parameter as shown in bold below:
.staggerFrom($pins, 0.3, {y:-50, opacity:0}, 0.05, "-=0.1") Save the file and reload the browser. Now the pins start animating before the map is fully revealed. It’s a subtle change but it really does enhance the overall feel of the rollover animation.
Animating the Form Element
Let’s tween the form next. Switch to start.html in your code editor.
-
At the bottom of the mapTimeline sequence, add the following bold code, making sure to add the ending semi-colon because this is the final tween in the sequence:
.staggerFrom($pins, 0.3, {y:-50, opacity:0}, 0.05, "-=0.1")
.from($form, 0.2, {y:20});
Save the file and reload the browser. Notice that the y value of 20 pushes the form down by adding 20 pixels to its native position. This is the from() position. It then slides up to its original position.
The effect is a bit clunky and could use a subtle fade, though. Let’s add that now. Switch back to start.html in your code editor.
-
Add the following bold code to your
$form tween, so it will tween from an opacity of 0 as it rises from the bottom of the panel:.from($form, 0.2, {y:20, opacity:0}); Save the file and reload the browser. Smooth.
Linking the Rollover Behavior to the Button
The mapTimeline’s tweens look great, but our page currently lacks interactivity. We can ensure that the mapTimeline DOESN’T play until we interact with it by setting its paused state to true. When a user mouses over the button, it will play. Simple!
-
In start.html in your code editor, find the following code around line 146:
mapTimeline = new TimelineLite(); -
Add the following bold code:
mapTimeline = new TimelineLite({paused:true}); Save the file and reload the browser. The timeline is now paused, so nothing will happen on the page. Now let’s trigger the animation to play when a user mouses over the appropriate area.
-
Switch to start.html in your code editor.
We are not actually going to make the button the trigger point of the animation. We are going to target
$mapContainer, which contains the map panel as well as the button. This will allow us to mouse off the button and over the map without triggering an unwanted mouseleave event. -
Add the following bold code beneath the mapTimeline, around line 154:
$mapContainer.mouseenter(function() { mapTimeline.play(); }); $mapContainer.mouseleave(function() { mapTimeline.reverse(); }); }); -
Save the file and reload the browser. Great, the mapTimeline plays when we mouse over the button! Then it disappears when we mouse off.
However, when we mouse off the button or map area, the animation plays in reverse at the exact same speed. Let’s use timeScale() to make the reverse animation a bit zippier so users don’t have to wait an inordinate amount of time for it to close.
Switch to start.html in your code editor.
-
Add the following bold code:
$mapContainer.mouseenter(function() {
   mapTimeline.play().timeScale(1);
});

$mapContainer.mouseleave(function() {
   mapTimeline.reverse().timeScale(3);
});
Save the file and reload the browser. Perfect—when we mouse off the button, the animation reverses at triple-speed.
Switch to start.html in your code editor.
-
Now that we’ve finished the rollover, it might be nice to view the entire INTO THE WIND animation from the beginning. Around line 137, delete this line of code:
tl.progress(1); Save the file and reload the browser. Now we can see the animation from the beginning and then try out our fancy rollover!
A Final Adjustment
Things are looking good, but there’s a small issue we need to address. When working on any type of interactive project, it can be quite a challenge accounting for all the unexpected user interactions.
For instance, if you mouse over the area of the map button while the intro animation (the first timeline) is playing, you can activate the map tween prematurely.
Reload start.html in the browser to preview the animation a few more times while your mouse is in the map area. Hmmm, not great. Let’s fix this.
-
Return to start.html in your code editor.
We are going to wait until the animation is finished playing before enabling the mouseover and mouseout interactivity for the
$mapContainer. To facilitate this behavior, we will use an onComplete callback on the main timeline (tl) to initialize the$mapContainer with its actions. -
Add the following bold code around line 73:
tl = new TimelineLite({onUpdate:updateSlider, onComplete:initMapButton}); -
Next, around line 154, declare the initMapButton() function by wrapping the code we use to assign the mouse events to the
$mapContainer, like so:function initMapButton(){ $mapContainer.mouseenter(function() { mapTimeline.play().timeScale(1); }); $mapContainer.mouseleave(function() { mapTimeline.reverse().timeScale(3); }); } Save the file and preview the page once more in the browser, making sure to mouse over the map area. Fixed! Great work.