Improve your Ruby on Rails skills with our comprehensive tutorial, covering everything from gems, Gemfile, and Gemfile.lock, to adding user authentication and more.
This exercise is excerpted from Noble Desktop’s past web development training materials. Noble Desktop now teaches JavaScript and the MERN Stack in our Full Stack Development Certificate. To learn current skills in web development, check out our coding bootcamps in NYC and live online.
Topics Covered in This Ruby on Rails Tutorial:
What is a Gem?, Gemfile and Gemfile.lock, Installing a New Gem, Adding Sign in & Sign Out Links, Adding Basic User Authentication, Removing the Ability for Users to Register Themselves
Exercise Preview
Exercise Overview
Learning to identify, configure, and utilize Ruby gems is crucial to being an effective Rails developer. In this exercise we will install and configure a gem called devise to quickly add a powerful user authentication system to Flix.

What is a Gem?
So far in this class, we have been focused on the tools that come with Ruby and Rails. And, as you can see, those tools can take you pretty far! However, few if any Rails sites are built using only what comes with Rails; indeed, there seem to be quite a few features (user accounts, Google analytics, ecommerce) that Rails lacks at first glance. Such features can be added to Rails and customized so they work exactly the way you want—but you don’t have to build every last thing yourself!
There are a huge number of gems that are available to extend the functionality of Rails in significant ways. A gem is essentially a plugin for Ruby with some additional code that extends existing Ruby classes and creates new ones.
It’s important to bear in mind that the term gem does NOT specifically refer to plugins for Rails. In fact, Rails itself is packaged as a gem—if you installed Rails on your computer, you’ll remember typing gem install rails.
-
If you completed the previous exercises, you can skip the following sidebar. We recommend you finish the previous exercises before starting this one. If you haven’t finished them, do the following sidebar.
If You Did Not Do the Previous Exercises (3A–6B)
- Close any files you may have open.
- Open the Finder and navigate to Class Files > yourname-Rails Class
- Open Terminal.
- Type
cdand a single space (do NOT press Return yet). - Drag the yourname-Rails Class folder from the Finder to the Terminal window and press ENTER.
- Run
rm -rf flixto delete your copy of the Flix site. - Run
Git clone https://bitbucket.org/Noble Desktop/flix.Gitto copy the Flix Git repository. - Type
cd flixto enter the new directory. - Type
Git checkout 5Cto bring the site up to the end of the previous exercise. - Run
bundleto install any necessary gems. - Run
yarn install—check-filesto install JavaScript dependencies.
Getting Started
Open the Finder and navigate to Class Files > yourname-Rails Class
Open Terminal.
Type
cdand a single space (do NOT press Return yet).Drag the flix folder from the Finder to the Terminal window.
-
Make sure you’re in Terminal and hit Return to change into the new folder.
Let’s add the gem to our existing Rails app.
Gemfile & Gemfile.lock
We suggest opening the flix folder in your code editor if it allows you to (like Sublime Text does).
-
In your code editor, open flix > Gemfile
NOTE: There is another file called Gemfile.lock. They are two different things; make sure you’re opening the one without the extension, plain old Gemfile.
-
Once the file is open, let’s take a look at its contents. There are already a few gems specified along with (in many cases) the specific version number of the gem. These gems were put in the file automatically by Rails when we first created our site.
Just as Ruby and Rails are constantly growing and evolving, gems are constantly being developed as well. Although Ruby code strives to be modular and avoid conflicts, some gems necessarily rely upon other gems—so it’s important to keep them all up-to-date.
The purpose of the Gemfile is to manage these dependencies. All gems required by a Rails app must be specified in the Gemfile. Whenever you install a new gem, you must add its name to this file.
-
Starting around line 6, observe the following code that shows that when you add a gem, you are allowed to specify the version of each gem if you want to be fancy:
# Use Puma as the app server
gem 'puma', '~> 5.0'
The
~>means to use, in this case, version5.0or higher, but less than 6.0. But it’s not required to specify the exact version; that’s the job of the companion file, Gemfile.lock. Let’s check it out now. Open flix > Gemfile.lock
-
Notice that this file contains much more information than Gemfile. This file is automatically generated and updated by Rails. You should never update it by hand.
Gemfile.lock keeps track of the precise versions and dependencies of every gem you install. Even if you move the app to another computer or server in the future, you can always bring up the exact same stable Rails environment really quickly because this file will make sure each and every required gem is installed. You can rely on it to keep you safe from version conflicts; what a great and helpful feature!
Installing a New Gem
Let’s look at how to add a new gem and incorporate its functionality into the Flix application. There are many popular and high-quality gems out there, so it’s hard to choose just one to incorporate; we’ll be looking at one called devise. It provides real account-based user authentication, a core feature for many modern websites.
Before adding any gem, it’s a good idea to check out its README, particularly the installation instructions. This can almost always be found on the gem’s GitHub page.
-
Switch to the browser and navigate to GitHub.com/heartcombo/devise
Keep in mind that devise is a complex gem with many features. Right now we just need the basics, so we will scroll past many information without pausing to read it. If you plan to use devise, we recommend you read the rest of the info later.
Scroll down the page to the README.md section, then scroll further down to the Getting started headline.
There are some simple installation instructions here; notice several gray-background boxes containing snippets of code that tell you exactly what to type to install the gem (or you could even copy and paste the snippets if desired.) We will be referring to these gray-background boxes as we install the gem.
-
The first step to installing a gem is always adding the gem to Gemfile. Copy the first snippet of code in a gray-background box, which does just that. It reads:
gem 'devise' Keep the page open in the browser but switch to Gemfile in your code editor (NOT Gemfile.lock).
-
After the
sqlite3gem paste the new code (this is to help us keep organized—it doesn’t really matter where you put it):gem 'devise' -
It’s best practice to add a comment before each gem to clarify its role in the application. Rails has commented all of its gems by default. Add the following:
# Use devise for user authentication
gem 'devise'
Save the file.
-
Switch to the Terminal and type the following:
bundle -
Let’s take a minute to demystify the
bundlecommand we’ve run throughout the class. Bundler is the piece of the puzzle that keeps the installed gems in sync with the gem set. When you runbundle, you are instructing bundler to read the Gemfile and install any gems that are missing. Bundler will:- Inspect whatever is in Gemfile.lock and (always!) fetch the correct versions.
- Update Gemfile.lock with information about the newly installed gems.
- Fetch any dependencies of new gems (that is, other gems that your new gem might rely on that haven’t been explicitly requested in the Gemfile).
-
To further understand the
bundlecommand, take a look at Terminal’s output.For gems that have been installed previously, Terminal prints something like
Using webpacker (4.0.7). For newly installed gems (notice there are five!) it prints something likeInstalling devise (4.6.2).Bundler is so useful! We didn’t have to specify which version of devise to install. Moreover, it automatically installed some additional gems on which devise relies: bcrypt, orm_adapter, responders, and warden. We didn’t have to hunt these gems down, or read their installation instructions; bundler took care of all this for us.
What would happen if we were already using one of those gems in the app?
- If we had a version compatible with devise, bundler would have just installed the latest version of the devise gem.
- If we had a version conflict (an outdated version of bcrypt, for instance), bundler would have fetched an the msost recent version of devise that was compatible.
- If bundler couldn’t work it all out (for example, if Gemfile.lock specified to only use an older version of bcrypt), bundler would have thrown an error saying it could not install devise, thus preserving the existing stable Rails environment.
Switch to the browser. You should still be viewing the README for devise.
-
Copy the contents of the second gray-background box in Getting started, which read as follows:
rails generate devise:install Switch to the Terminal.
-
Paste the code and hit Return.
Terminal will print that
devisehas created two files:config/initializers/devise.rbandconfig/locales/devise.en.ymland provide a number of notes (it is always a good idea to read these notes!). Switch to the browser. You should still be viewing the README for devise.
-
Notice the contents of the next gray-background box:
rails generate devise MODELWe can see that the next step is to create a user model to be managed by devise. In this case, MODEL is a placeholder for the name of the model we want to create.
Switch to the Terminal.
-
To keep things simple, the name of our devise model object is simply going to be user. Type the following:
rails generate devise userOnce you press Return, Terminal will create several files and a migration.
-
Type the following in Terminal to apply the change to the database:
rails db:migrateTerminal will print that it has created a table for
:usersand added a couple of indexes to that table.
Adding Sign in & Sign Out Links
-
In Terminal, type the following:
rails server Open the browser window so we can check out the login page that the devise gem has created for us.
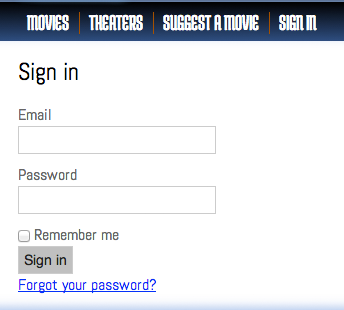
Navigate to localhost:,000/users/sign_in
Notice what a great login page we have already, complete with Sign In, Sign up, and Forgot your password? functionality. We haven’t coded this page for you; the page has been generated automatically simply by installing the devise gem and creating a devise model called
user.What name should we use to sign in? We don’t have any users yet, so we’ll have to create the first account now. Click the Sign up link.
-
In the Sign up form, enter an email and password (must be 8 characters) you will remember at a later point. You can type your own or use these examples:
Email: test@example.com Password: testtest Click the Sign up button to submit the information. You should be redirected to the index and receive a green-background alert that says
Welcome! You have signed up successfully.Take a look at the MY ACCOUNT link in the Flix navbar. The button does not work.
Let’s get it functioning correctly; in fact, let’s change it to say Sign In or Sign Out as appropriate. Switch to your code editor.
Open app > views > layouts > application.html.erb
-
Find the following section of code around line 43:
<li class="last"> <a href="login.html"><span>My Account</span></a> </li> -
Replace the existing link with the following code:
<li class="last">
   <% if user_signed_in? %>

   <% end %>
</li>
NOTE: If you’re wondering where this
user_signed_in?is coming from, switch back to GitHub.com/plataformatec/devise in the browser. Notice that directly below the Getting Started section is a heading Controller filters and helpers followed by a list of the most useful helpers that come along with this gem. The developers have listed the helpers in an approximate order of usefulness, anduser_signed_in?is in the second gray-background box. -
Add the following bold code:
<% if user_signed_in? %>
   <%= link_to "<span>Sign Out</span>".html_safe, %>
<% end %>
This code means that the
Sign Outlink should appear if the user is signed in. -
Switch to Terminal and hit CTRL–C to shut down the server.
We want the text Sign Out to
link_tosomewhere, but we haven’t entered the path yet. How do we know what routes are available now that we’ve installed the devise gem? By usingrake routes, of course. -
Type the following in Terminal:
rails routes -
Notice that Terminal prints many new routes that weren’t previously available. Scroll up to the top of the list Terminal just printed. We are particularly interested in the third route:
destroy_user_session DELETE /users/sign_out(.:format) devise/sessions#destroyNOTE: This is a
DELETEroute, so we will have to explicitly mention that in the code. It’s always a good idea to check the prefix column (where Terminal listsDELETE,GET, etc. next to the route) to see what type of route it is. Switch to application.html.erb in your code editor.
-
Add the following bold code to add the
deleteroute to the Sign Out link (keep it all on a single line):<% if user_signed_in? %> <%= link_to "<span>Sign Out</span>".html_safe, destroy_user_session_path, method: :delete %> <% end %> -
What if a user is not signed in? Let’s add an
elsestatement for that. Add the following bold code:<% if user_signed_in? %> <%= link_to "<span>Sign Out</span>".html_safe, destroy_user_session_path, method: :delete %> <% else %> <%= link_to "<span>Sign In</span>".html_safe, %> <% end %> -
Where should it link? Switch to Terminal. You should still be able to see the list of routes produced by
rails routes, so take a look at this line:new_user_session GET /users/sign_in(.:format) devise/sessions#newThis is a
GETroute, so we won’t have to specify that in the code (it won’t hurt anything if we do list the method, like we did a moment ago formethod: :delete, but it’s not at all necessary for agetroute.) Switch to application.html.erb in your code editor.
-
Add the following bold code:
<% else %>
   <%= link_to "<span>Sign In</span>".html_safe, new_user_session_path %>
<% end %>
Save the file.
-
In Terminal, type the following:
rails server Switch to the browser. If you’re still on the error page hit the Back button.
Refresh the page and you should now see a Sign Out button in the navbar.
Click the Sign Out button and you should see a green-background alert that reads
Signed out successfully.-
Sign in as follows:
- Click the Sign In link in the navbar.
- Enter the email and password you used to create the account.
- Click the Log in button.
You should see a green-background alert that reads
Signed in successfully. Great, we can sign in and sign out!
Adding Basic User Authentication
Right now a user can access the site the same way with or without an account; let’s make it so only users with accounts can edit movies.
As listed on the devise GitHub page, there is a helper called authenticate_user that will make a page require user authentication. Let’s put it to work!
Switch to your code editor.
Open app > controllers > movies_controller.rb
-
Add the following bold code on the third line of the document:
class MoviesController < ApplicationController
   before_action :set_movie, only: [:show, :edit, :update]
   before_action :authenticate_user!
Save the file.
Switch to the browser viewing the Flix site and click Sign Out.
Attempt to access the Movies tab (or any part of the site) and notice that a red-background error comes up:
You need to sign in or sign up before continuing. We can see that the user authentication is working correctly.-
Enter your email and password to sign in to Flix again. You should be able to view all the pages once signed in.
What if we only wanted to have security on the New Movie and Edit pages? We want anyone to be able to browse the pages, but only allow authorized people to edit the content.
We might open up the movies_controller file and list all the pages that would require user authentication, but there are rather many of them, so that’s an error-prone approach. Instead, it’s much safer to use a white-list strategy. We should list the pages where user authentication WON’T be required!
Switch to movies_controller.rb in your code editor.
-
Add the following bold code:
class MoviesController < ApplicationController
   before_action :set_movie, only: [:show, :edit, :update]
   before_action :authenticate_user!, except: [:index, :show]
The
indexandshowpages are the only ones that should be visible to non-account-havers, so it’s much quicker to use a white-list strategy in this case. Save the file.
Switch to the browser viewing the Flix site and click Sign Out.
Try viewing the index and movie detail pages—they should display correctly without prompting you to sign in.
View a movie detail page and attempt to click the Edit This Movie button. When you attempt to go to the edit page, you’ll be prompted to log in. This is the exact behavior we want for Flix user authentication.
Sign in. You’ll be redirected to the edit page for the movie you selected, super!
Removing the Ability for Users to Register Themselves
There is one big flaw in the way our user authentication works: right now anyone can set up an account! We want to make sure only authorized people can make an account. We will have to edit the user model that devise built for us earlier.
Switch to your code editor.
-
Open app > models > user.rb and take a look at these lines:
devise :database_authenticatable, :registerable,
       :recoverable, :rememberable, :validatable
These are all properties of
devise, and you can read all about them in the documentation if you desire; there’s a ton of information about what all these terms mean. We’re not going to worry about that now—we just need to remove one! -
Delete the word :registerable, so the code reads as follows:
devise :database_authenticatable,
       :recoverable, :rememberable, :validatable
Save the file.
Switch to the browser.
Click the Sign Out button if you are currently signed in.
-
Click the Sign In button and notice that the Sign up link has disappeared.
Phew, the Flix site is much safer now. From now on, accounts will have to be created through some other means: we could build a secure form, create them directly through the Rails console, or take any number of approaches. For now it is sufficient to have one user account that is safe and can manage the application.
Back in Terminal hit CTRL–C to shut down the server.
A Final Word on Gems
If you are coming to Rails from content management systems like WordPress or Drupal, devise may seem pretty bare-bones. Yet it’s an incredibly deep and secure login system and far more extensible than what you might find in stock content management systems.
It’s important to remember that Rails is built with developers in mind, and gems are no exception. The philosophy behind a well-crafted gem is that should be incredibly fast and easy to implement the most basic functionality that everybody wants (in this case: logging in and out, signing up, forgetting a password) without restricting the individual’s ability to customize the gem as needed for an application.
You should expect, whenever you install a gem, that you’ll have to do some reading about its features and the way it integrates with Rails—the benefits of gems are flexibility, agility and precision. With a good gem, some reading and a bit of coding on your own, you can create the exact application functionality you need!