Dive into the comprehensive Premiere Pro tutorial, covering topics such as Proxy workflow, Ultra High Definition (4,000 and 8,000), and Ingest Workflow, along with practical exercises for a hands-on learning approach.
This exercise is excerpted from Noble Desktop’s Adobe Premiere Pro training materials and is compatible with Premiere Pro updates through 2023. To learn current skills in Premiere Pro with hands-on training, check out our Premiere Pro Bootcamp, Video Editing Certificate, and video editing classes in-person and live online.
Topics Covered in This Premiere Pro Tutorial:
Proxy Workflow, Ultra High Definition (4,000 and 8,000), Ingest Workflow
Exercise Preview
Exercise Overview
In this exercise you will create proxy files for use in a workflow that uses UHD (Ultra High Definition) footage. UHD is the term used to refer to any video files that is above the 1920 X 1080 dimensions of FHD (Full High Definition) footage. Usually, you will hear UHD footage referred to by its more common names 4,000 and 8,000, but any video larger than the 1080 HD standard can be referred to as ultra high def.

What Are Proxy Files?
The pixel dimensions of 4,000 Ultra high def footage are twice as large as the 1080 high def standard (and 8,000 footage is even larger). 4,000 video is 4096 X 2160 pixels, while HD is 1920 X 1080 pixels.
The larger frame size also comes with a larger file size and requires greater system resources to work with during the editing process. The greater computing requirements of working with UHD footage makes many current computers, especially laptops, unable to work with the larger footage. If your computer cannot handle the stress of working on UHD footage directly, the proxy workflow can make the editing process more manageable.
In a proxy workflow, lower resolution files are used as a stand–in during the editing process. Then the larger UHD files are swapped in for the final export. Proxy files can be created automatically by Premiere Pro during the import process, manually by the user, and sometimes even by the camera that shot the video itself. While technically, a proxy workflow can be used with any type of footage, it is most commonly used when working with UHD footage, especially on older computers.
Once the proxy function is enabled, you work with the clips in your project just like normal. While working in the Source and Project panels, proxies will be used for editing and preview and when you export the sequence Premiere Pro will use the high resolution original media to do the rendering. This workflow is intended to save system resources while working on projects but not negatively impact the final export.
Downloading the Class Files
4,000 video files are very large, so we made a separate download just for these files.
- Go to Noble Desktop.com/download
- Enter the code pp-2102-15-4,000
- If you haven’t already, click Start Download.
- After the .zip file has finished downloading, be sure to unzip the file if it hasn’t been done for you. You should end up with a Working with UHD Footage folder.
- Drag the downloaded folder into your Class Files > Premiere Pro Class folder.
Getting Started
- In Premiere Pro, if you have a project open, choose File > Close All Projects.
- Choose File > Open Project.
- Navigate to Desktop > Class Files > Premiere Pro Class > Working with UHD Footage.
- Double–click on Hospital Scene—Start.prproj to open it.
-
Choose Window > Workspaces > Editing.
This project has a 01—wideo bin with one video file already in it.
- Go to File > Save As.
Name the file Your Name—Hospital Scene and save it to Premiere Pro Class > Working with UHD Footage
Using Ingest to Create Proxy Files
Using the Ingest command, Premiere Pro with a little help from Adobe Media Encoder will automatically create proxy files whenever you import your video. You enable the options you want, and Media Encoder will transcode the your footage in the background.
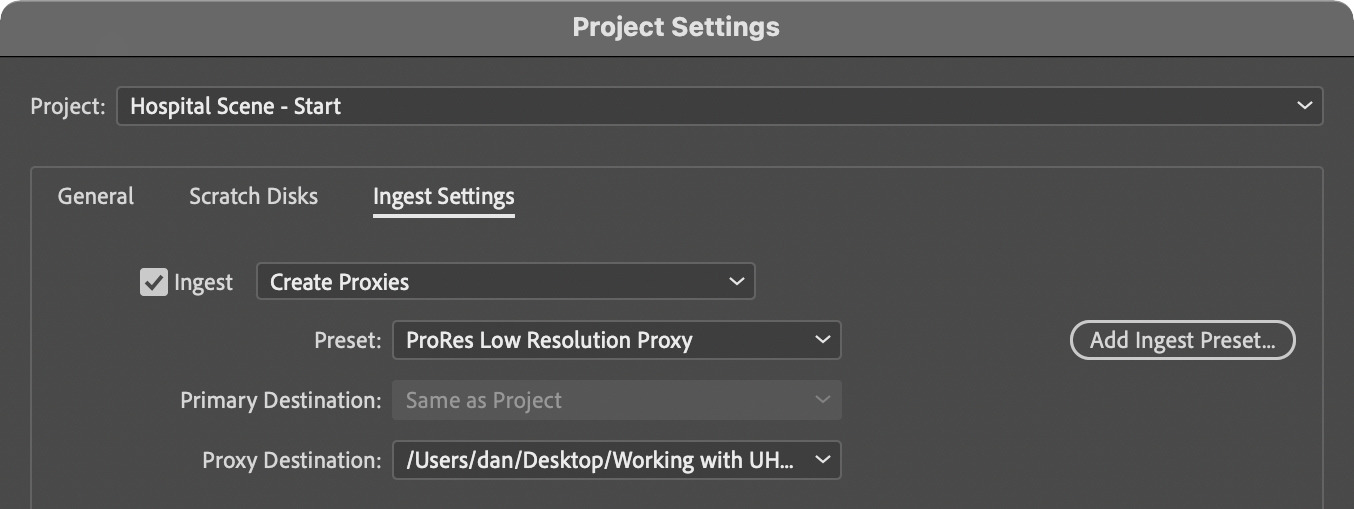
Choose File > Project Settings > Ingest Settings.
Check on Ingest.
Change the Ingest menu to Create Proxies.
-
Set Preset to ProRes Low Resolution Proxy. This preset is intended for 4,000 footage such as the video used in this project.
NOTE: The different presets for low, medium, and high resolution are intended for video with different frame sizes. It is a rule of thumb to use a proxy file with dimensions that are half the size of your original media size. Check the Summary section at the bottom of the dialog for notes about the intended use for each preset. The choices you make in the dialog box will depend on your specific workflow.
In the Proxy Destination menu, select Choose Destination.
-
Navigate to Desktop > Class Files > Premiere Pro Class > Working with UHD Footage > Media > video > proxies and click Choose to pick this location.
NOTE: It is a common practice to place proxies next to their source media in a sub–folder named proxies. We’ve already created this folder for you.
-
Click OK to close the Project Settings.
Every video file you import from now on will automatically trigger the proxy creation process.
In the Project panel, click on the 01—video bin to highlight it.
Choose File > Import or press Cmd–I (Mac) or CTRL–I (Windows).
-
Navigate to Working with UHD Footage > Media > video and double–click on Hospital Scene—Shot 08 Two Shot.mp4 to import it.
NOTE: Premiere Pro will open Adobe Media Encoder and use it to create the proxy video.
Once Media Encoder is done, switch back to Premiere Pro.
Manually Creating Proxy Files
If you have already imported your files into a Premiere Pro project, you can manually create proxy files to make working with UHD footage easier.
- If necessary, click on the arrow next to the 01—video bin to open it.
Drag the Hospital Scene—Shot 01 exterior.mp4 into the empty Timeline panel to create a new sequence.
Locate the Hospital Scene—Shot 01 exterior sequence in the 01—video bin and drag it out of the bin.
- Click on the sequence name to make it editable, and rename it to Bad News—Main.
- Click on any empty area of the Project panel to finalize the change.
In the Project panel, locate the Hospital Scene—Shot 01 exterior.mp4 clip, the one you just created the sequence from.
CTRL–click (Mac) or Right–click (Windows) on the clip and choose Proxy > Create Proxies.
Change Format to QuickTime.
Set Preset to ProRes Low Resolution Proxy
-
For Destination, select Next to Original Media, in Proxy Folder. This will put the next proxy file into the same Proxies folder that the Ingest function is targeting.
NOTE: If you have multiple files that you need to create proxies for just select them all and use the process you just did. If you already have proxy files (either through manual creation or perhaps they were generated by your camera) you can CTRL–click (Mac) or Right–click (Windows) on the clip and choose Proxy > Attach Proxies.
Click OK.
Enabling Proxies
Even though the project has the ingest function enabled and set to create proxies, and even though you have manually created a proxy file, the application is not displaying them in either the Source or Program panels.
At the bottom right of the Program panel, click the + button to open the Button Editor.
Locate the Toggle Proxies
 button, drag it to the Transport Controls so it’s the last button on the right.
Click OK to close the button editor.
-
Click on the Toggle Proxies button you just added to the Program panel to enable proxies to be used in both the Program and Source panels.
NOTE: Proxies can also be enabled in Preferences. Choose Premiere Pro > Preferences > Media (Mac) or Edit > Preferences > Media (Windows) and check on Enable Proxies. The preference and the button we added do the same thing. They both set the same preference, so use whichever method you prefer.
-
Choose File > Save or Cmd–S (Mac) or CTRL–S (Windows) to save your project.
You can now continue to edit the clips and export your sequence as normal, or close the project.