Delve into our comprehensive JavaScript & jQuery tutorial, where we explore how to dynamically update webpage content without reloading the page, covering key concepts such as checking the functionality of the select menu and changing values dynamically.
This exercise is excerpted from Noble Desktop’s past JavaScript training materials. Noble Desktop now teaches JavaScript and the MERN Stack in our Full Stack Development Certificate. To learn current skills in web development, check out our coding bootcamps in NYC and live online.
Topics Covered in This JavaScript & JQuery Tutorial:
Checking the Functionality of the Select Menu, Getting the Chosen Value, Dynamically Changing the State Name Value, Dynamically Changing the Rest of the Values
Exercise Preview
Exercise Overview
In this exercise, you will use JavaScript objects to dynamically update content without having to reload the page. In other words, we’ll have a single page where when the user makes a selection, the information on the page will update without having to reload.

Getting Started
- Open your code editor if it isn’t already open.
- Close any files you may have open.
- For this exercise we’ll be working with the State-Facts folder located in Desktop > Class Files > yourname-JavaScript jQuery Class. You may want to open that folder in your code editor if it allows you to (like Visual Studio Code does).
- Open index.html from the State-Facts folder.
-
Preview index.html in Chrome. (We’ll be using its DevTools later.)
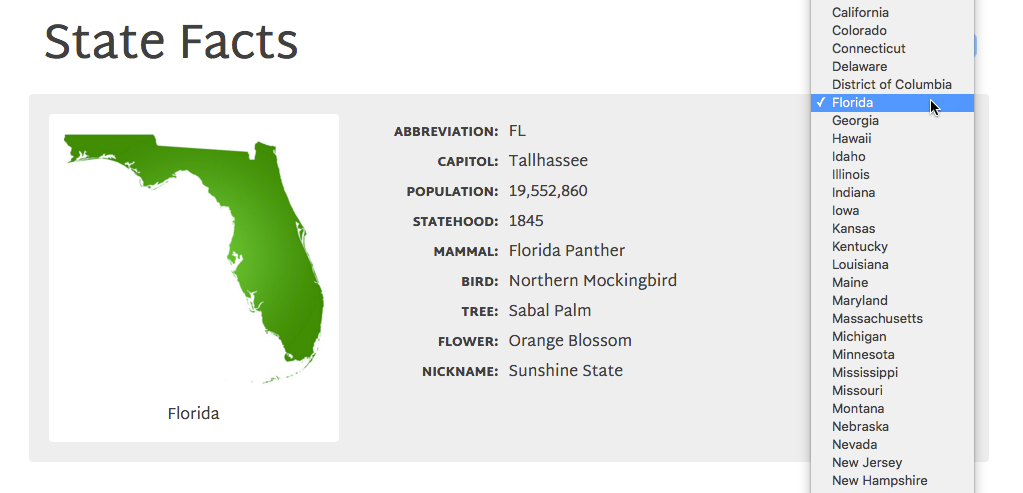
What we want to do is create a finished webpage where the user can click on the Choose a State menu at the top right, choose a state, and see the info for it (without loading a new page).
Leave the page open in Chrome so we can come back to it later.
Checking the Functionality of the Select Menu
- Return to index.html in your code editor.
- On line 16, find the select tag which contains the menu. Notice there is an option with a value attribute for each state. We will get the value from the option the user has chosen and we’ll use that value to access stored data for each state.
-
Before we do that, we should take a look at the select menu in Chrome’s Console to check that it’s working the way we think it is. Switch to Chrome.
You should still have index.html open.
- Open the Console by hitting Cmd–Opt–J (Mac) or CTRL–Shift–J (Windows).
-
It will be a good idea to save the state list select menu to a variable so we can access it more easily. In the Console, type:
var stateList = document.getElementById('state-list'); - Hit Return (Mac) or Enter (Windows).
- To ensure it worked, type
stateList;and hit Return (Mac) or Enter (Windows). -
In the Console, the select menu will appear. Click the arrow to the left of the code to expand it and notice all the options.
NOTE: If you’d like to clear the Console before continuing, hit Cmd–K (Mac) or CTRL–L (Windows).
-
Back in the Console add the bold code shown below. Use Shift–Return (Mac) or Shift–Enter (Windows) to get to the next line without running the JavaScript.
stateList.onchange = function() { console.log('changed!'); }; - Hit Return (Mac) or Enter (Windows) to apply it.
-
Test it out by going to the state menu on the page and choosing a state.
In the Console you should see changed! appear. Each time you choose a state from the menu, the number beside changed! will increase to indicate how many times the message was logged.
- Return to index.html in your code editor.
-
Add the following bold code before the closing
</body>tag (around line 92):</div> <script> document.getElementById('state-list').onchange = function() { }; </script> </body> Save the file.
Getting the Chosen Value
Now we want to get the value that the user chose. Let’s figure out how to do that.
Switch back to Chrome but do not reload index.html.
-
In the Console, type the following and then hit Return (Mac) or Enter (Windows):
console.dir(stateList); - Click the arrow next to select#state-list to expand it.
-
Scroll down to find value. That’s what we need to get.
NOTE: The value will be a 2-letter abbreviation of whichever state you chose such as value=
"ak"or value="nj". Return to index.html in your code editor.
-
Around line 94, type the bold test code shown below:
<script>
   document.getElementById('state-list').onchange = function() {
      console.log(value);
   };
</script>
Save the file.
Switch back to Chrome and reload index.html.
Choose a state from the menu. Oh no, we get an error: Uncaught ReferenceError: value is not defined.
-
Switch back to your code editor. The problem is that when we added value within console.log(), the browser assumes it is referring to the global object/window, which is not what we want. We need to specify that we want to get the state-list’s value.
There are a couple of different ways to accomplish this. You could once again write
document.getElementById('state-list').value;but that’s really verbose and unnecessary.Instead, we can say we want to get the value of the object we’re currently working in. JavaScript has a keyword called this which we can use. We could try to write
console.log(this.value);but then the browser would assume this refers to the Console. Instead, let’s assign this to a variable so we can be sure that we’re working with state-list. -
Add the following code in bold:
document.getElementById('state-list').onchange = function() { var selected = this.value; console.log(value); }; -
Edit the code to use the selected variable to easily target the state-list:
document.getElementById('state-list').onchange = function() {
   var selected = this.value;
   console.log(selected);
};
Save the file.
Go to Chrome and reload index.html.
-
Choose a few states from the menu. You should see the abbreviation for each state you chose appear in the Console. Great!
The JavaScript Keyword This
In JavaScript, we use the keyword this much the way we use the demonstrative “this” in everyday natural language. Demonstratives like “this, ” “these, ” or “those” are used to show the relative distance between the speaker and the noun. As a result—in JavaScript, as in natural language—you must be careful to think about how “this” is determined. In the global context (outside of any function), this refers to the global object but an event property like onchange or onclick is owned by the HTML element it belongs to, therefore in that context this refers to the HTML element.
You can learn more about the JavaScript keyword this at tinyurl.com/javascript-keyword-this
Dynamically Changing the State Name Value
In an earlier exercise we used the value and textContent of an option tag to make changes to an image and some text on screen. In that exercise we were limited in the amount of data that we could retrieve (an option element only has two pieces of data that we can use). In this exercise, we’ll refer to an object that stores lots more information about each state. Now when our user chooses a state, we’ll provide them with much more information than we were able to before.
Let’s take a look at the object we’ll pull our data from.
-
In your code editor, go into State-Facts > js and open state-data.js.
In this huge file, we’ve declared an object that we can access by referencing the variable stateData. As you can see on line 1, the variable’s value is wrapped in
{}, which indicates that the value is an object.Inside the object are the state abbreviations, which are also objects that hold more key-value pairs for us to access. Once we call the state abbreviation, we can refer to the name of the property we need such as name, abbr, capitol, etc.
In your code editor, switch back to index.html.
Let’s start by changing the name under the map image. Around line 76, find the info-name paragraph. Let’s set this to whichever state the user chooses.
-
Above the
<script>tag, around line 92, link to the stateData JavaScript file as shown in bold:</div> <script src="js/state-data.js"></script> <script>NOTE: We now have access to everything in the stateData object! Let’s take a look around our new object.
-
Around line 96, change the code to log our new stateData object, as shown below in bold:
document.getElementById('state-list').onchange = function() { var selected = this.value; console.log(stateData); }; - Save the file, switch to Chrome, and reload index.html.
-
Choose a state from the menu. In the Console you should see something like this:
Object {usa: Object, al: Object, ak: Object, az: Object, ar: Object…}Any time we choose a state from the menu, the browser gives us the whole stateData object. While this demonstrates that we’ve successfully pulled in the stateData object, we need to narrow this selection to just the state we’ve chosen.
-
Back in your code editor, add the following bold code:
document.getElementById('state-list').onchange = function() { var selected = this.value; console.log(stateData[selected]); }; - Save the file, switch to Chrome, and reload index.html.
-
Choose a state from the menu. You should see something like this (depending on the state you chose):
Object {name: "Kansas", abbr: "KS", capitol: "Topeka", pop: "3,090,416", statehood: "1861"…}We’re making progress. When we choose a state from the menu, we’re grabbing all of the data from the corresponding state in the stateData object.
NOTE: The stateData object is a collection of states. We’re accessing one state at a time by calling stateData[selected]. We used this syntax with arrays earlier, where we grabbed all the elements of an array (myArray) and then grabbed just a single element from the array (myArray[0]).
-
We’re still grabbing too much data. We’d like to get just the name, or just the capitol of a given state, rather than all of the state’s data. Let’s narrow our selection down a little further.
Back in your code editor, add the following bold code:
document.getElementById('state-list').onchange = function() { var selected = this.value; console.log(stateData[selected].name); }; - Save the file, switch to Chrome, and reload index.html.
- Choose a few states from the menu.
- In the Console, you should see the name of each state you selected. Excellent! Now let’s do something with our data.
- Return to your code editor.
-
Delete the console.log() part of the line, including the end parenthesis so you end up with the following:
document.getElementById('state-list').onchange = function() { var selected = this.value; stateData[selected].name; }; -
Set the info-name paragraph to use that text by adding the following bold code:
document.getElementById('state-list').onchange = function() { var selected = this.value; document.getElementById('info-name').textContent = stateData[selected].name; }; - Save the file.
- Switch back to Chrome and reload index.html.
Choose a state from the menu and notice the state name below the map image changes. This name is the only thing that should change right now.
Dynamically Changing the Rest of the Values
- Switch back to your code editor.
-
The easiest way for us to set the other values is by copying/pasting the code we already wrote. Copy the following line (around line 96):
document.getElementById('info-name').textContent = stateData[selected].name; - Paste a copy as a new line, directly below.
-
The next value is the state abbreviation. Edit the code as shown:
document.getElementById('info-name').textContent = stateData[selected].name;
document.getElementById('info-abbreviation').textContent = stateData[selected].abbr;
NOTE: In state-data.js, each state in the parent stateData object has a key named abbr that stores a value for the state abbreviation.
- Save the file.
- Switch back to Chrome and reload index.html.
- Choose a state from the menu. Now you should see the state’s abbreviation appear next to ABBREVIATION along with the state’s name under the map image.
- Return to your code editor.
- Copy the info-abbreviation line (around line 97).
- Paste it as a new line directly below.
-
As shown in bold, edit the pasted line of code so it will get the state capitol:
document.getElementById('info-name').textContent = stateData[selected].name;
document.getElementById('info-abbreviation').textContent = stateData[selected].abbr;
document.getElementById('info-capitol').textContent = stateData[selected].capitol;
NOTE: Remember you can find the IDs in index.html around line 75 (for the image) and lines 80–88 (for the other properties). The property names for the stateData object can be found in state-data.js.
- Save the file, switch back to Chrome, and reload index.html.
- Choose a state from the menu. Notice that the capitol also updates!
- Switch back to your code editor.
- Now that we can see how this works, we’ll save some time by using some provided code. Go to State-Facts > snippets and open change-function-code.txt.
- Copy all the code.
- Close the file. If you aren’t already in index.html, switch to it.
- Select the three lines you already wrote.
- Paste the new code over the three lines you already wrote.
- Save the file, switch back to Chrome, and reload index.html.
- Choose a state from the menu and you should see all the text info update. Yay!
- The only thing left to change is the map image. To see where all the state images are stored, switch to the Desktop.
- Go into the state-facts folder, then open the img folder to see all the state images. They have been conveniently named with the state abbreviations.
- Switch back to index.html in your code editor.
-
Add the following bold code to get the state image to change:
var selected = this.value; document.getElementById('info-pic').src = 'img/' + selected + '.jpg'; document.getElementById('info-name').textContent = stateData[selected].name; - Save the file, switch back to Chrome, and reload index.html.
-
Choose a state from the menu and you should see the state image change, along with the rest of the info.
Enjoy your dynamically updating State Facts page!
NOTE: If you want to refer to our final code example, go to Desktop > Class Files > yourname-JavaScript jQuery Class > Done-Files > State-Facts.
