Master creating HTML Emails with this comprehensive tutorial that covers email-friendly CSS practices, streamlining your workflow, and ensuring optimal formatting across all email clients.
This exercise is excerpted from Noble Desktop’s HTML Email training materials and is compatible with updates through 2021. To continue learning HTML Email with hands-on training, check out our coding bootcamps in NYC and live online.
Topics Covered in This HTML Email Tutorial:
Email-friendly CSS, Streamlining Your Workflow with Embedded CSS, Closing the Gap Below Images
Exercise Preview
Exercise Overview
Not all CSS will work consistently across all email clients. In this exercise, we will show you how to use CSS to style the content in our email, making sure that we use email-friendly rules and formatting.

-
If you completed the previous exercise, events-issue21-summer.html should still be open, and you can skip the following sidebar. If you closed events-issue21-summer.html, re-open it now. We recommend you finish the previous exercise (1C) before starting this one. If you haven’t finished it, do the following sidebar.
If You Did Not Do the Previous Exercise (1C)
- Close any files you may have open.
- On the Desktop, go to Class Files > yourname-HTML Email Class.
- Delete the Jive Factory folder if it exists.
- Duplicate the Jive Factory Ready for Styling folder.
- Rename the folder to Jive Factory.
-
We’ll start by adding a background color to the event content. Find the event table row around line 27 and add the following property (in bold):
<!—start event listing—>
<table width="644" cellpadding="0" cellspacing="0" border="1">
   <tr bgcolor="#4d4d4d">
      <td align="right" valign="top" width="130">
NOTE: Background color could also be applied with CSS, but for HTML emails, we almost always opt for the HTML version for consistency across email clients.
Working with Embedded CSS Styles
To style the heading and paragraph text we’ll use CSS, but instead of writing inline styles as we did in an earlier exercise, we will write embedded styles for the page in the head of the document.
Styles must be inlined in order for the newsletter to render correctly in Gmail, but there are many free online tools for converting embedded styles to inline styles, which will make our workflow easier. We’ll write embedded styles now and inline them later as part of our preflight process before we run tests.
-
Add a style tag inside the head of the document like so:
<head> <meta charset="UTF-8"> <title>Summer Events at The Jive Factory</title> <style> </style> </head> -
Inside the style tag, style all the headings in the newsletter by adding the following new CSS rule shown in bold:
<style>
   h1 {
      font-family: Arial, Helvetica, sans-serif;
      font-size: 18px;
      color: #ffffff;
   }
</style>
NOTE: Remember that we recommend sticking with longhand hexadecimal values in the CSS for best results across the major email clients.
-
While we’re here, let’s style all paragraphs as well. Add the following new rule (in bold) below the h1 rule:
h1 { font-family: Arial, Helvetica, sans-serif; font-size: 18px; color: #ffffff; } p { font-family: Arial, Helvetica, sans-serif; font-size: 14px; line-height: 24px; color: #ffffff; } -
Save the file and preview the page in a browser. It’s starting to look better but we need some padding around the text to make it more legible.
Some email clients strip out cellpadding, so a safer way to add padding is with CSS. Let’s add a class to the event table so we can target its content with CSS.
Return to your code editor and find the event table (around line 39).
-
Add the following class to the table tag:
<!—start event listing—> <table class="event" width="644" cellpadding="0" cellspacing="0" border="1"> <tr bgcolor="#4d4d4d"> -
Now that we have a class assigned to the table, we can write a rule to target all the table cells of these particular tables. Below the p rule, write the following new rule (around line 18):
p {
   font-family: Arial, Helvetica, sans-serif;
   font-size: 14px;
   line-height: 24px;
   color: #ffffff;
}
.event td {
   padding: 20px 15px 10px;
}
NOTE: This CSS shorthand says to put 20 pixels of padding on the top, 15 pixels on the left and right, and 10 pixels of padding on the bottom of the table cell.
-
Let’s take a closer look at the code we just added. .event td is a selector that targets all td tags if they are inside of a table where the class is set to event.
These types of selectors are called descendant (or nested) selectors because they target a child element if it sits inside a specific parent. Later on, we’ll use an online utility that will take this complex rule and inline this style everywhere it is necessary.
Save the file and preview the page in a browser. The spacing has been vastly improved but the default margins on the paragraphs and headings are not exactly what we want.
-
Return to your code editor and add the following new property declaration for the h1 rule, as shown in bold below:
h1 { font-family: Arial, Helvetica, sans-serif; font-size: 18px; color: #ffffff; margin: 0 10px; } -
Add the same new margin property for the paragraph rule as well:
p {
   font-family: Arial, Helvetica, sans-serif;
   font-size: 14px;
   line-height: 24px;
   color: #ffffff;
   margin: 0 10px;
}
Save the file and preview the page in a browser to see these subtle adjustments.
Adding Flair to the Headings
The intro phrase of each event heading (such as Local Showcase:) is supposed to be gold. Return to your code editor so we can create a class style for this.
-
Using a class selector, create a new rule below the p rule as follows:
p {Code Omitted To Save Space
margin: 0 10px;
}
.intro {
   color: #fcb802;
}
We want to add this class to the introductory phrase of all the headings. We only have one so far, but we plan to add more down the road. Around line 57, find the Local Showcase: The Autumn Spirit Experiment heading.
-
Wrap the first part of the heading in a span tag with the class set to intro:
<h1><span class="intro"> Local Showcase:</span> The Autumn Spirit Experiment</h1> -
Let’s also make the ticket prices stand out more by making them bold. Create a new rule in the embedded styles:
.intro {
   color: #fcb802;
}
.tickets {
   font-weight: bold;
}
Find the paragraph around line 62 that says $5 adv / $7-day of show.
-
Add the new tickets class to the paragraph as shown below:
<pclass="tickets">$5 adv / $7-day of show</p> Save the file and preview the page in a browser. Lovely, but notice the pesky gaps above and below the banner image, the Events This Week image, and the events table.
Closing the Gap
-
Let’s get rid of the gaps. Return to your code editor.
If you recall from an earlier exercise, we saw that images are displayed inline and, like text, are vertically aligned to the text baseline. This alignment creates extra, unfilled space below them. One easy fix for this issue is to tell the browser to render images as block elements rather than inline elements to avoid this vertical alignment issue altogether.
-
Add the following new rule (in bold) below the p rule.
p {Code Omitted To Save Space
margin: 0 10px;
}
img {
   display: block;
}
Save the file and preview it in a browser to see how well this removes the gaps around the Events This Week image.
Styling the Date in the Left Column
Return to your code editor.
-
The date of the show in the left column is so important, it should be larger. Around line 58, wrap the date in a span tag with a class of date, as follows:
<p> Friday<br> <span class="date"> July 13</span><br> 8:30–11:00pm </p> -
Add the following new rule (in bold) below the .intro rule:
.intro {
   color: #fcb802;
}
.date {
   font-size: 18px;
   font-weight: bold;
}
Save the file and preview the page in a browser to see that the date now really pops.
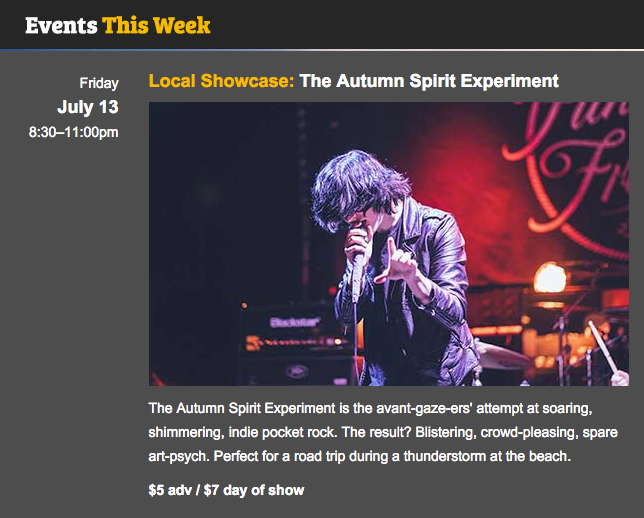
Adding a Band Photo
Return to your code editor.
-
Let’s add a photo of the band to the event table. We’ll put it above the paragraph that describes the band. Around line 68, add the following bold code above the p tag:
<h1><span class="intro">Local Showcase: </span>The Autumn Spirit Experiment</h1>
<img src="images/autumn-experiment.jpg" height="284" width="480">
<p>The Autumn Spirit Experiment is the avant-gaze-ers' attempt at soaring, shimmering, indie pocket rock. The result? Blistering,
Save your file and preview the page in a browser. Nice, but it could use some margin on the bottom.
Return to your code editor.
-
Below the .event td rule, add the following new rule:
.event td {
   padding: 20px 15px 10px;
}
.event img {
   margin-bottom: 10px;
}
Save the file and preview the page in a browser. Better spacing!
Removing the Table Borders
Now that we’ve finished the layout, we can remove all of the ugly borders we’ve been using to see our nested table structure.
-
Return to your code editor and open the Find and Replace feature (your menu options may be named differently depending on your code editor):
- In Visual Studio Code: choose Edit > Replace.
- For other code editors: try Cmd–F (Mac) or CTRL–F (Windows).
-
Enter the following (the Find and Replace labels may be named differently in your code editor):
Find: border="1"Replace: border="0" Proceed to Replace All, and a total of 4 replacements should be made.
Save the file and reload the browser. Much nicer!
Setting the Page Background Color
- We’re ready to change the background color of the large parent table back to black. Return to your code editor.
-
Find the parent table’s td tag (around line 44). There should be a helpful comment tag waiting for you:
<td align="center"> <!—add bgcolor="#00,000" here—> -
Edit the td tag to add the following attribute (in bold), as shown:
<td align="center" bgcolor="#00,000"> - You can also delete the comment, as it’s no longer necessary.
Save the file and preview the page in a browser to see how the email will look to viewers. Snazzy!
Optional Bonus: Adding Another Event
If you have extra time, let’s add a second event to the newsletter.
- Return to your code editor.
- Select the event listing table, including the two comment tags (around lines 59–77).
- Copy the code.
- Paste a duplicate below the original table.
- Open content-events.html (Jive Factory > snippets).
- Cut the date and time paragraph for Saturday, July 14.
- Switch back to events-issue21-summer.html.
- In the second event table, replace the date and time paragraph with the new information you just copied.
-
Do the same for the band description:
- Go to content-events.html and cut the heading and paragraphs for Small Prune.
- Switch back to events-issue21-summer.html
- In the second event table’s right column (the second td tag), replace the band information with the new info you just copied.
-
You’ll want to add a band image here, as well. Add the following bold code:
<td align="left"> <h1>Acoustic Night: Small Prune</h1> <img src="images/small-prune.jpg" height="284" width="480"> <p>Small Prune sounds like Austin-flavored Link Wray on sleepytime tea, drawing influences from Tom Waits and Yoko Ono, with a knowing nod to (the criminally underrated) Stereolab.</p> <p>Free Admission</p> </td> -
Add the following code to style the new date:
<td align="right" valign="top" width="130"> <p> Saturday<br> <span class="date"> July 14</span><br> 8:30–11:00pm </p> </td> -
Finally, add the following code to style the heading intro and the ticket price:
<td align="left"> <h1><span class="intro"> Acoustic Night:</span> Small Prune</h1> <img src="images/small-prune.jpg" height="284" width="480"> <p>Small Prune sounds like Austin-flavored Link Wray on sleepytime tea, drawing influences from Tom Waits and Yoko Ono, with a knowing nod to (the criminally underrated) Stereolab.</p> <p class="tickets">Free Admission</p> </td> - Save the file.
-
Return to the browser, and reload the page to see the new content.
By making each event a separate table, it’s easier to add new events or delete old events. The new event looks good, but we could use some additional visual separation between the two different events.
- Return to your code editor.
-
Edit the background color for the table row that holds the new event (around line 78), as follows:
<tr bgcolor="#616161"> <td align="left" valign="top" width="130"> <p> Saturday<br> <span class="date">July 14</span><br> 8:30–11:00pm </p> </td> Save the file and preview the page in a browser once more. Super!
