Gain an understanding of how to create a simple HTML email using tables, images, text, and basic CSS in your preferred code editor through this comprehensive tutorial.
This exercise is excerpted from Noble Desktop’s HTML Email training materials and is compatible with updates through 2021. To continue learning HTML Email with hands-on training, check out our coding bootcamps in NYC and live online.
Topics Covered in This HTML Email Tutorial:
Working with Tables, Centering the Email, Text Styling with Inline CSS, Adding a Border, Closing the Gap Below Images
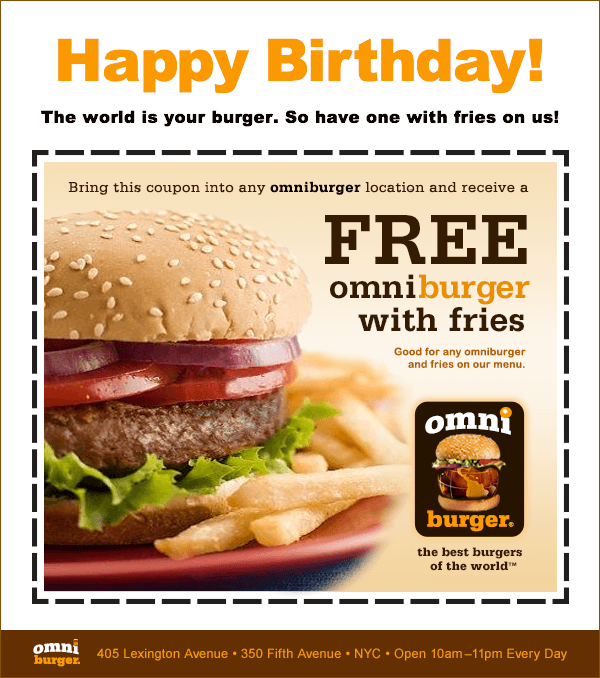
Exercise Preview
Exercise Overview
Some popular HTML email clients lack full CSS layout support, so we must use tables for consistent layout. In this exercise, we’ll create a simple email using a single table, images, text, and some basic CSS.

Getting Started
Launch your preferred code editor (such as Visual Studio Code, Sublime Text, etc.).
In your code editor, hit Cmd–O (Mac) or CTRL–O (Windows) to open a file.
Navigate to the Desktop and go into the Class Files folder, then yourname-HTML Email Class folder, then Omniburger.
Double–click on birthday.html to open it.
-
Title the document by editing the code as follows:
<!DOCTYPE html> <html lang="en"> <head> <meta charset="UTF-8"> <title>Happy Birthday from Omniburger!</title> </head> <body> </body> </html> -
Save the file.
NOTE: The title won’t be displayed in most email clients. It may be displayed in a few email clients though, and because this page can also be put online it’s best to add a title.
Coding up the Table
To see a finished design of the email you’ll be coding, navigate to Desktop > Class Files > yourname-HTML Email Class > Reference Files.
-
Double–click on birthday-coupon.pdf. Notice the Happy Birthday heading, the simple message, the burger coupon image, and the footer.
While the fastest, easiest way to send this coupon out would be to simply pop a PNG or JPEG into an email and be done with the whole job, it’s never a best practice to rely on one single image for an HTML email, for two important reasons:
- A large percentage of email recipients do not enable images. If all the content is embedded in an image, the message is—essentially—never received. If you use HTML text for a portion of the message, the email can get the point across without images.
- The balance of images to text is used as a gauge to predict whether an email is legitimate. A single-image email is more likely to be marked as spam than mixed content emails.
As a best practice, let’s create a simple 1-row, 1-column, table-based layout that includes some HTML text and a couple of images.
Switch back to your code editor.
-
To create a table, add the following bold code inside the
<body>tag:<body> <table> <tr> <td></td> </tr> </table> </body>These tags are the basic building blocks of every table. Notice that there’s a single row inside the
<table>(indicated by the open and closed<tr>tags) and a single cell, or column, (indicated by the open and closed<td>tag) inside the row. The<td>stands for table data; all the content goes inside these tags. The row tags are purely structural. -
Many people view their email through the narrow preview pane without ever opening up the email in a larger window. For best results across most email clients, the width of an HTML email should not exceed 700 pixels. Let’s set a 600 pixel width for our email. Add the following width attribute to the
<table>tag:<table width="600"> <tr> <td></td> </tr> </table> -
While we’re here, let’s remove all default cellpadding (space inside the cells), cellspacing (space between the cells), and borders. Add the following attributes (in bold) to the
<table>tag:<table width="600" cellpadding="0" cellspacing="0" border="0">NOTE: If you do not specify cellpadding and cellspacing, most email clients will add 1 pixel of padding and 2 pixels of spacing by default. Although tables do not have visible borders by default, setting the border value to 0 will eliminate any unwanted space that is reserved for a possible border in some mail clients.
Save the file.
Let’s add some content to the table cell. To save some time, we typed it for you. Navigate to Desktop > Class Files > yourname-HTML Email Class > Omniburger > snippets and open content-coupon.html in your code editor.
This is all the text for our page. Select All by pressing Cmd–A (Mac) or CTRL–A (Windows).
Copy it (Cmd–C (Mac) or CTRL–C (Windows)).
Close the file.
You should now be back in birthday.html.
-
Paste (Cmd–V (Mac) or CTRL–V (Windows)) the content inside the
<td>tag like so:<table width="600" cellpadding="0" cellspacing="0" border="0"> <tr> <td> <h1>Happy Birthday!</h1> <p>The world is your burger. So have one with fries on us!</p> </td> </tr> </table> -
Let’s next add the two images. First, the actual coupon. Add the following code (in bold) below the
<p>tag inside the table cell, like so:<td> <h1>Happy Birthday!</h1> <p>The world is your burger. So have one with fries on us!</p> <img src="img/free-burger.jpg" height="480" width="537" ALT="Free Burger Coupon"> </td> Save the file.
-
Let’s add a footer image directly below the coupon image. The footer image has the company name, logo, address, and store hours. Add the following code (in bold) to the table cell:
<img src="img/free-burger.jpg" height="480" width="537" ALT="Free Burger Coupon">
<img src="img/footer.png" height="47" width="598" ALT="Omniburger">
NOTE: We want this email to be 600px wide. Because we’ll later be adding a 1px border around the entire content area, we had to make this footer image 598px wide. 598px + 1px left border + 1px right border = 600px total.
Let’s see what we have so far. Before we preview, we must save the file. Hit Cmd–S (Mac) or CTRL–S (Windows).
Navigate to the Desktop and go into the Class Files folder, then yourname-HTML Email Class, then Omniburger.
-
CTRL–click (Mac) or Right–click (Windows) on birthday.html, go to Open with, and select your favorite browser.
Browser Preview Shortcuts
If you’re using Visual Studio Code with the open in browser extension installed, hit Option–B (Mac) or ALT–B (Windows) to open the saved HTML document in your default browser. If asked what browser you want to open it with, ideally you should choose Google Chrome (which is the most widely used browser).
-
Things look fine so far but it would be nice if the content were centered.
TIP: Leave birthday.html open in the browser. This will make it easier for you to reload the page to see the changes you make in your code editor.
Return to birthday.html in your code editor to continue editing.
-
Let’s center the content inside the table cell. Add the following code to the
<td>tag, like so:<td align="center"> <h1>Happy Birthday!</h1> <p>The world is your burger. So have one with fries on us!</p> <img src="img/free-burger.jpg" height="480" width="537" ALT="Free Burger Coupon"> <img src="img/footer.png" height="47" width="598" ALT="Omniburger"> </td>NOTE: As a rule, always declare an align attribute for table cells. In all web browsers, the default horizontal alignment for a cell is left. However, nested tables can cause confusion for some email clients and the alignment from a parent cell will take precedence. Bearing this in mind, each time you add a table cell, decide if you want the contents to be aligned left, right, or center and make the declaration in the code.
Save the file and preview the changes you made in a browser. The content is nicely centered inside the table cell but it’d be nice to center the entire table in the browser and/or the email preview pane. Return to your code editor.
-
Add the following attribute (in bold) to the
<table>tag:<table width="600" cellpadding="0" cellspacing="0" border="0" align="center"> Save the file and preview the page, once again, in a browser. Much better!
Styling the Email
Sadly, Google’s Gmail does not always support external links to style sheets (or embedded styles in the head or body of the document). Because of that, all styles in an HTML email must be inlined, element by element. Let’s start by styling the Happy Birthday heading.
Return to birthday.html in your code editor.
-
Add the following style attribute and property declaration (in bold) to the
<h1>tag:<h1 style="font-family:'Arial Black', sans-serif;">Happy Birthday!</h1> Save the file and preview the page in a browser. Nice. Let’s make the text larger and orange, per the design specification.
-
Return to your code editor and add the following two new property declarations to the style attribute in the
<h1>tag as follows:<h1 style="font-family:'Arial Black', sans-serif; font-size:58px; color:#fb9a00;"> Save the file, return to the browser, and reload the page. Looks good. Let’s edit the paragraph underneath the heading.
-
Return to your code editor and add an inline style to the
<p>tag as follows:<p style="font-family:'Arial Black', sans-serif; font-size:17px;"> Save the file and preview the page in a browser. The text closely resembles the text in the original design but the margins are way too big. Let’s tighten them up.
-
Return to your code editor and edit the style attribute in the
<h1>tag as follows:<h1 style="font-family:'Arial Black', sans-serif; font-size:58px; color:#fb9a00; margin-top:0; margin-bottom:5px;"> -
Let’s close up the space above the paragraph as well. Edit the style attribute in the
<p>tag as follows:<p style="font-family:'Arial Black', sans-serif; font-size:17px; margin-top:0;"> Save the file and preview the page in a browser. Much improved!
Adding a Border & Fixing the Image Gap
The original design calls for a border around the content. Let’s add one now.
-
Return to your code editor and add the following inline style to the
<table>tag:<table width="600" cellpadding="0" cellspacing="0" border="0" align="center" style="border:1px solid #825102;"> -
Save the file and preview the page in a browser. Looks pretty nice except for a strange gap between the footer image on the bottom and the border. What gives?
Images are displayed inline and rendered quite like text, even though they’re obviously not text. By default, text (and images) are vertically aligned to the text baseline (where the bottom of each letter is positioned as you would when writing on lined paper). The baseline makes sense for text, including lowercase characters like j and g. However, for images, which don’t have descenders, it creates extra, unfilled space below them. The following diagram illustrates this for you.
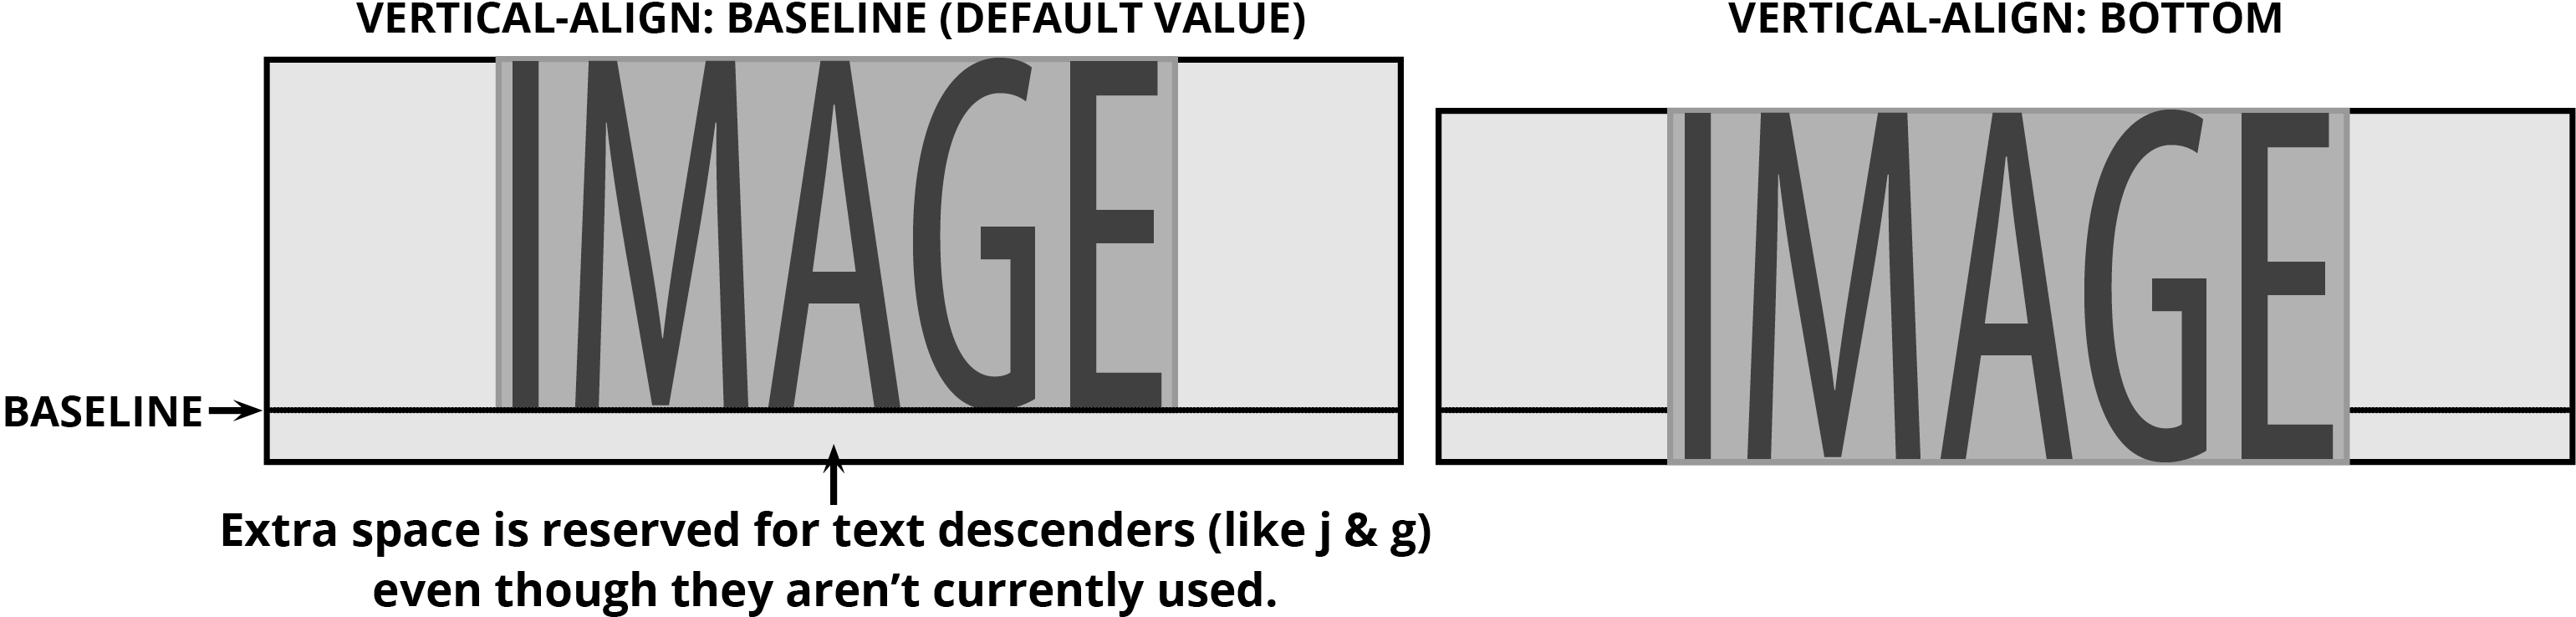
NOTE: This space below images shows up in strict DOCTYPES but not transitional DOCTYPES. We’re using HTML5, which is a strict DOCTYPE because—while many email clients will strip out the DOCTYPE or leave it out entirely—some clients impose their own DOCTYPE and, invariably, these clients use a strict DOCTYPE.
Luckily, there’s an easy fix for this issue. We can tell the browser to render images as block elements rather than inline elements. Block-level elements do not share the misfortune of being aligned to the text baseline.
-
Return to your code editor and add the following code to the
<img>tag for the footer, like so:<img src="img/footer.png" height="47" width="598" ALT="Omniburger" style="display:block;"> -
Save the file and preview the page in a browser. Fixed!
NOTE: The layout of this email is finished, but there are a few other steps required to get this ready to send out. They will be covered in the following exercises where we code and send out tests using a more complex newsletter design.
Optional Bonus: Adding a Background Color
-
Return to birthday.html in the code editor.
We’d like to make the email pop a bit more by creating a different background for the page outside the bordered content of the email. This is typically accomplished in web design by creating a style for the
<body>tag but many email clients ignore CSS background colors or strip out the<body>tag wholesale.To accomplish our goal, we need to wrap the content table with a 100% width single-row, 1-column table and give the wrapper table’s
<td>a background color. -
Wrap a new table around the current table by adding the following code (in bold):
<table cellpadding="0" cellspacing="0" border="0" width="100%">
   <tr>
      <td align="center" bgcolor="#ece2ce">
         <table width="600" cellpadding="0" cellspacing="0" border="0" align="center" style="border:1px solid #825102;">
Code Omitted To Save Space
</table>
      </td>
   </tr>
</table>
NOTE: Take a moment to notice that we have, once again, declared a table cell alignment here. Although the nested table is aligned center, Yahoo Mail, for instance, will ignore the nested table’s alignment in favor of the parent cell’s default left alignment. Always add the align attribute to the
<td>to control the alignment of content. Save the file and preview the page in a browser. It’s a little much. We need to give the coupon content a white background. Return to your code editor.
-
Around line 13, find the
<td>tag inside the 600 pixel-wide table. Edit the tag as follows (in bold):<td align="center" bgcolor="#ffffff">NOTE: Although you may be familiar with using shorthand for hexadecimal values in CSS (#fff rather than #ffffff, for instance), we recommend sticking with the longhand approach for best results across the major email clients.
-
Save the file and preview the page in a browser.
It looks better but the coupon could use a little padding around it. Let’s edit the wrapper table’s cell to add some CSS padding.
While we could have added cellpadding to the table cell to accomplish this, we don’t recommend doing so, as some email clients (Outlook.com in particular) ignore cellpadding. As odd as it seems, a safer way to add padding is to do so with CSS. Let’s add the padding with inline CSS.
Return to your code editor.
-
Edit the cell in the parent, wrapper table by adding the following code (in bold):
<table cellpadding="0" cellspacing="0" border="0" width="100%">
   <tr>
      <td align="center" bgcolor="#ece2ce" style="padding:20px;">
Save the file and preview the page in a browser.
There’s still a white gutter around the page. In the actual email’s preview pane, this won’t be there, but we can get rid of it to create a nicer preview page for clients and colleagues. Return to your code editor.
-
Edit the
<body>tag (around line 7) by adding the following style attribute (in bold):<body style="background-color:#ece2ce;"> -
Save the file and preview the page once more in a browser. Much nicer!
Remember: these styles in the body tag are not supported by many email clients. We are simply adding them to give the email a “finished” look to replicate what it will look like in most preview panes.
-
You’re finished with this simple HTML email, so feel free to close birthday.html in the browser and in your code editor.
Once again, bear in mind that there are a few more steps you’d need to take before you can actually send out an email of this nature. We’ll investigate those steps in the exercises going forward in the workbook.
