Topics: Using custom hair brushes to create a selection/mask, Refining the hair mask, Removing a color cast
Exercise Preview
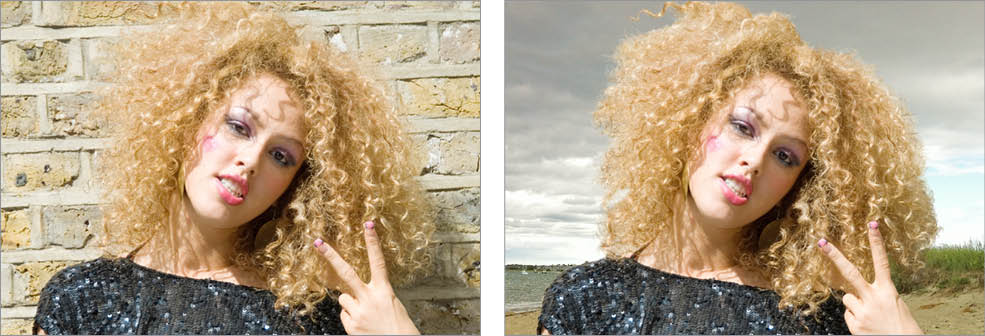
Photo courtesy of istockphoto, ProjectB, Image #5164255
Exercise Overview
In this exercise, you’ll tackle our most difficult hair-silhouetting challenge yet: a blonde with very frizzy hair standing in front of a wall that’s very close to the same color. What makes this so difficult is the lack of contrast (in both color and brightness) between the hair and the background. We won’t be able to use channels to make this selection, and Refine Edge will likely fail because the edges are so hard to define. We’re going to need a more hands-on approach because isolating the hair is virtually impossible. This time we’ll use hair brushes to paint a custom, natural-looking hair mask. This technique will require a more artistic interpretation than the ones we have previously tried.

These instructions tell you how to install the class files you’ll need to go through the exercise.
Downloading & Installing Class Files
- Navigate to the Desktop.
- Create a new folder called Class Files (this is where you’ll put the files after they have been downloaded).
- Go to nobledesktop.com/download
- Enter the code hair-1702-07
- If you haven’t already, click Start Download.
- After the .zip file has finished downloading, be sure to unzip the file if it hasn’t been done for you. You should end up with a Hair the Seminar folder.
- Drag the downloaded folder into the Class Files folder you just made. These are the files you will use while going through the workbook.
- If you still have the downloaded .zip file, you can delete that. That’s it! Enjoy.
Putting Our Image onto the New Backgrounds
-
Launch Photoshop.
-
Go to File > Open and:
- Navigate into Desktop > Class Files > Hair the Seminar.
- Open Hair3_backgrounds.tif.
-
In the Layers panel (Window > Layers) notice there are a few layers. We’ll be trying out our person on these backgrounds. Let’s bring our person into this file.
-
Make sure the top layer (Beach) is selected. We do this because when we import the photo of our person it will be placed on top of the currently selected layer.
-
Go to File > Open and:
- Navigate into Desktop > Class Files > Hair the Seminar.
- Open blonde_curly_iStock_000005164255_ProjectB.jpg.
-
There’s only one layer (the Background layer) in this file, so choose Layer > Duplicate Layer.
-
From the Document menu choose Hair3_backgrounds.tif.
-
Click OK.
-
Close this file (blonde_curly_iStock_000005164255_ProjectB.jpg).
-
You should now be back in Hair3_backgrounds.tif.
-
In the Layers panel the top layer should be the woman’s photo. It’s currently named Background which is no longer appropriate. Double–click the name and rename it original.
-
We’re going to work on a copy of the original, so with the original layer selected, hit Cmd–J (Mac) or Ctrl–J (Windows) to duplicate the layer.
-
Rename the new layer by double–clicking on the original copy layer name and change it to silo.
-
Hide the original layer by clicking on its eye icon.
-
Make sure the silo layer is selected before continuing.
Importing Some Hair Brushes
Dave Nagel created some free hair brushes that we’re going to use in a moment. They can be found at tinyurl.com/nagel-19 and we’ve included a copy in your class files for easy access. Let’s import Dave Nagel’s hair brushes now.
-
Select the Brush tool.
-
Go to the Brush Presets panel (if it’s not open, go to Window > Brush Presets).
-
At the top right of the Brush Presets panel go into the menu and select Load Brushes.
-
Navigate to the following file, and double–click it to load: Class Files > Hair the Seminar > NagelSeries_19 > NagelSeries_19.abr
-
Scroll down to the bottom of the Brush Presets panel and check out the various hair brushes included in this series. These brushes are now available for all Photoshop files (not just the current file). You will not have to load them again.
Making a Rough Selection
-
We’re going to create a rough selection and then refine the hair by hand. Let’s start with the body and face. Choose the Quick Selection tool.
-
Set the brush size to about 90.
-
Drag over the woman’s torso, arms, and face (but NOT hair) to select them. When it selects background areas you don’t want to include, hold Option (Mac) or Alt (Windows) and drag over those areas to deselect them.
-
For the hair, select only the inner part (not including the edge). Deselect any areas where the wall shows through (even partially shows through). As you paint over some of the hair, the selection will likely expand to include background you do not want. To remove the unwanted background hold Option (Mac) or Alt (Windows) and drag over those areas to deselect them.
We are not going to rely on Refine Edge to select the hair, so this time we do not want to include any background at all, only select areas of solid hair. Use the following screenshot as a rough guide:
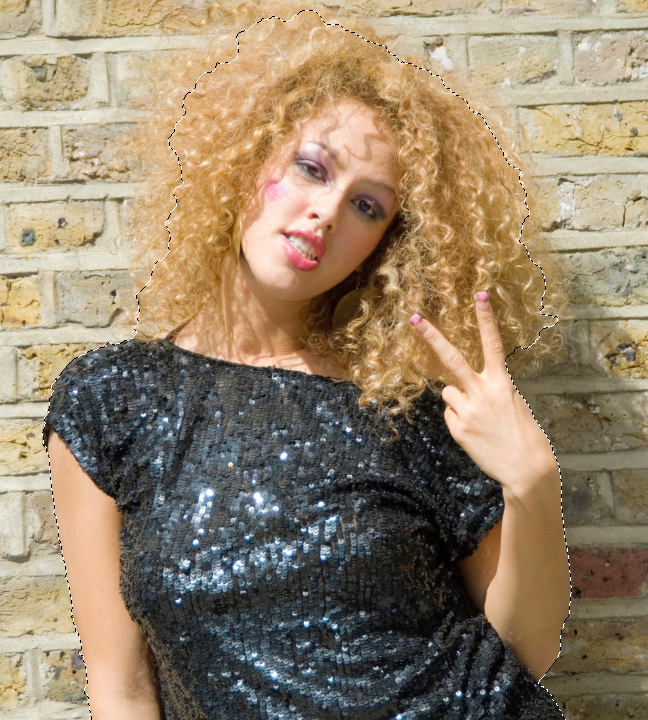
Photo courtesy of istockphoto, ProjectB, Image #5164255
-
The Quick Selection tool pretty much always leaves choppy edges, so let’s smooth them out just a bit.
To open Refine Edge, hold Shift and choose Select > Select and Mask. (If you’re using an older version of Photoshop and see Refine Edge in the Select menu, you do not have to hold Shift.)
-
We’re only going to use a light touch here, so set Radius to 1.
-
Also set the following:
- Check on Smart Radius.
- Smooth: 1
- Feather: 0.7
- Shift Edge: –10
- Output To: Selection
- Ignoring the hair and just looking at the other parts of her (like the arms), tweak the settings as you see fit. We’re only slightly trying to clean up the edge quality around the arms, etc. Then we’ll move onto the real challenge (the hair) using a new technique!
-
Click OK.
-
In the Layers panel, make sure the silo layer is selected.
-
Near the bottom of the Tools panel, double–click the Edit in Quick Mask Mode button to set its display options.
-
In the dialog that opens, set Color Indicates to Selected Areas.
-
Under Color, click the color swatch and set it to a bright lime neon green color. The default is red, but green will be easier to see on this image.
-
Click OK twice to close both windows.
NOTE: Quick Mask Mode lets you see your selection as a pixel overlay on the image, which is very useful with an image as tricky as this one. Any areas that appear green will be selected. The standard selection marquee (marching ants) can’t accurately display fine details and softness, but in Quick Mask Mode you can zoom in and accurately see the fine details of your selection. Just as importantly, it also allows you to use any pixel-based editing tools (such as brushes, filters, etc.) to create and edit your selection.
-
Select the Brush tool and set the following:
- Choose a Soft Round brush
- Size: 140 px
- Hardness: 0%
- Opacity: 100%
- Flow: 100%
-
Press the D key to set the Foreground/Background colors to Black/White.
-
Starting from the hair’s interior, paint towards the hair edge, so the colored selection gets closer to the edge. Do not paint over any areas where the brick background is partially showing through! Just get closer to the edge without touching it.
If you go too far and select some of the background, hit the X key to switch the Foreground color to White. Paint over the area you want to deselect. In this mode painting white deselects and painting black selects (appears as the colored overlay).
Using the Hair Brushes
To finish the edge of the hair selection we’re going to use the hair brushes we loaded earlier. Painting a custom hair selection can offer great results, but it takes practice to create believable and photo-realistic edges. This technique requires an artistic vision and experienced hand to look professional. A Wacom tablet really helps too. It’s hard to tell you exactly which combinations of strokes and brushes to use, but we’ll help guide you as best as we can. Don’t be discouraged if the first time you try this it doesn’t look as good as you want. Practice and experimentation with this technique will make you better. Remember that practice makes perfect!
-
Zoom in to the image’s actual size (View > 100% or Actual Pixels depending on your version of Photoshop).
-
Scroll so you’re viewing the frizzy edges of the hair.
-
Open the Brush Presets panel (Window > Brush Presets).
-
Scroll to the bottom and notice that each hair brush has an icon of its shape (on the left) and a preview of what a brush stroke will look like (on the right). There is no one correct brush, so we encourage you to play around with different ones.
It’s important to understand that these hair brushes work best additively, instead of erasing areas. That’s why we have stayed away from the background. We’ve been slowly working our way up to the hair’s edge. These brushes will go the final distance, actually defining the edge of the hair. Try to work with a light touch and don’t overshoot the edge, so you won’t have to remove any of the areas you define with these brushes.
-
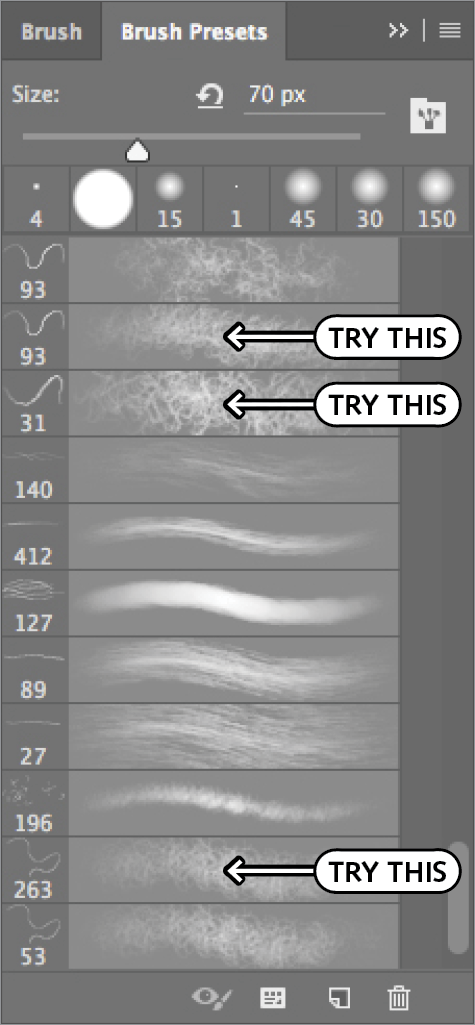
There are several brushes that work for this type of frizzy hair. As shown below, the 31, 93 (the second one because it’s denser) and 263 brushes all look good:
-
Start with the 31 hair brush.
-
It’s a bit small, so increase the brush size to about 50.
-
Try painting with the hair brush in a small area, painting from the inner hair up to the outermost edge of the hair. To avoid continuous repetitious patterning, use this brush to go over just a few different areas of the hair contour, not all of it.
Try not to go beyond the boundaries of her hair, because the dark lines of the bricks will become visible. We will use a few different brushes for a more natural look, so don’t fill in everything too densely on this first pass. Vary the brush size as you paint.
We will take a different approach to creating a mask for the larger pieces of hair; don’t try to paint over the largest curls and flyaways with the hair brushes, only the general frizzy areas. One advantage of an image like this, where the hair color and background color are so similar, is that if the mask accidentally reveals a bit of the background, it will be hard to tell whether it’s hair or not (unless you get a dark line of a brick, which won’t be too hard to fix later).
NOTE: Some of the hair brushes are directional, meaning when you move along a curve, the brush angle changes with that curve.
-
Switch things up and try the 93 (second, denser one) and 263 brushes. Don’t forget to vary the size and places you use each brush. Not all hair is the same, so you should vary the brushes and brush sizes to look more realistic.
-
These hair brushes default to scattering the hairs. But to create specific hairs, you may want to experiment with disabling the scatter in the Brush panel (Window > Brush).
- Uncheck the Shape Dynamics and Scattering categories on the left.
- Click on the Brush Tip Shape category on the top left.
- Adjust the Angle as desired.
- In the image click once to create a specific hair. Do NOT drag with these settings! You may want to click a couple times on the same hair to thicken/darken it.
Painting in Specific Flyaways
-
Scroll up to the top of the list of brush presets and select a Soft Round brush. If you have a pressure-sensitive tablet (like a Wacom tablet) you should choose either the Soft Round Pressure Size or Soft Round Pressure Opacity preset (depending on your preference) so the size or opacity will vary with pen pressure.
-
Set the following Brush options:
- Size: 10 px
- Opacity: 50%
- Flow: 100%
- Foreground color: Black
-
This can be hard with a mouse, so we highly recommend using a Wacom tablet. Carefully paint in the larger flyaways, the pieces of hair that are more complete curls than just frizzy areas (like the large curl at the top left). Vary the brush size with the bracket [ ] keys as necessary.
-
When you feel that you’re done painting the hair selection, we need to get out of Quick Mask mode. In the Tools panel, click the Edit in Standard Mode button and you should now see your selection as a marquee (marching ants) instead of a color overlay.
-
In the Layers panel make sure the silo layer is selected.
-
At the bottom of the Layers panel, click the Add layer mask button.
Cool, we immediately see the image over the Beach background! Hopefully your layer mask is already looking pretty good—however, there are some additional things we can do to improve it.
Improving the Layer Mask
The hairs made with the brushes are quite sharp, but they should be somewhat blurry and out of focus. Let’s tone down the sharpness of the mask’s edges, and have it fade out more naturally into the background. We’ll do this by decreasing the opacity of some areas of the layer mask.
-
Select the Blur tool.
-
Adjusting the Brush size as needed, brush anywhere that needs to be softened slightly, wherever the frizzy hair looks too crisp against the background. Try your best to match the softness of focus in the original photograph. Don’t just blur all the edges the same amount, the key to realism is variation. Leave some hairs sharper than others.
-
If there are any parts that you want to make more transparent, select the Brush tool and set the following:
- Choose a Soft Round brush
- Size: Around 90 px (adjust as you see fit)
- Opacity: 20%
- Flow: 100%
- Foreground color: Black
- Click around any of the edges of the hair, where the frizzy hair looks too bright, dark, or sharp against the background. (The goal is not to erase areas completely, but make the edges a bit more soft and natural by decreasing their opacity slightly.)
-
Shift–click on the silo layer mask thumbnail to view the original image. (When done you can turn the mask back on by clicking it.)
- You may see things you want to fix, such as painting in additional areas. Use any of the techniques we’ve already covered to try and improve the mask.
- It may seem like the model has more hair in the original image. There is a tendency to make hair masks too skimpy (in part because you are trying to avoid having the background show through, although with this background that is not as big a problem). You could paint in more hair using the hair brushes. If the silo’d hair is close but the edges are a bit too transparent or soft for your liking, you could do a Curves adjustment Cmd–M (Mac) or Ctrl–M (Windows) and brighten the midtones. You should see the edge of the hair become more visible, but be careful of increasing the contrast too much as this will sharpen the hair edge.
-
In the Layers panel, click the eye on the Beach layer to hide it and see what she looks like on the Brick background.
Improving the Color Cast
When the silhouette is placed against the Bricks background, it’s easier to see a slight greenish color cast in the hair near the model’s hand. Let’s even out the tone.
-
Click on the silo layer thumbnail (not the mask thumbnail).
-
Select the Brush tool and set the following:
- Choose a Soft Round brush.
- Mode: Color (VERY IMPORTANT, do not miss this!)
- Size: about 70 px
- Opacity: 30%
- Flow: 100%
-
To sample a good color, Option–click (Mac) or Alt–click (Windows) on an area of hair that has a nice color.
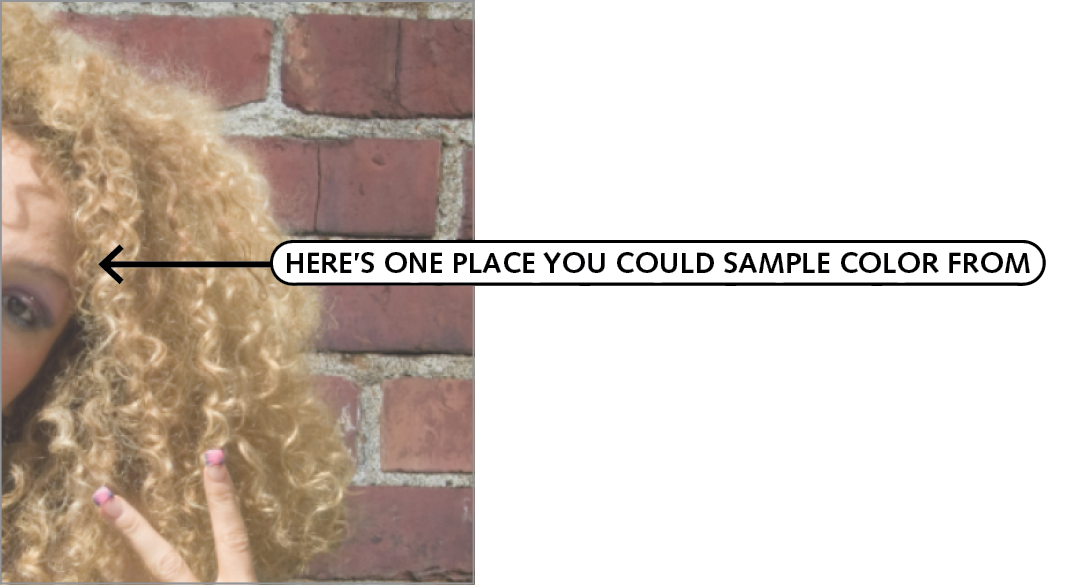
Photo courtesy of istockphoto, ProjectB, Image #5164255
-
Look at the Foreground color in the Tools panel and make sure you think it’s an appropriate match for the hair.
-
Brush over the area of hair that looks a little too green (to the right of the hand). It may take a few brushes to build up the color. If you don’t like the color you sampled, undo your work and try sampling a different color.
-
In the Layers panel, toggle the eye on the Beach layer to make it visible again. The improved color cast looks better here, too.
We’ll call it a wrap here! Are you happy with your work? If not don’t worry. Go through this exercise again and you’ll probably get better each time you do it. Hopefully working on this image provided you with even more techniques to create subtle, complex layer masks.
Learn Photo Retouching, Photography, and Graphic Design at Noble Desktop
Explore the power of Photoshop in Noble Desktop’s Adobe Photoshop courses:
- In our Photo Retouching Certificate you can improve your Photoshop retouching skills and learn Adobe Lightroom.
- Take better photographs, learn professional studio photography/lighting techniques, and much more in Noble Desktop’s photography classes in NYC.
- Noble’s graphic design classes in NYC will help you can master Photoshop, InDesign, and Illustrator as well as build a design portfolio.

