Hair Selections & the Search for the Holy Grail
Hair Selections & the Search for the Holy Grail Everyone’s looking for the easy path. The internet is filled with so-called experts doling out “tips, tricks, and techniques,” and they may sound like they are the answer, but when you try them on your photos, you just get frustrated because they don’t work. You think there’s something wrong with you or your retouching skills, but maybe that technique only worked on that one photo and background combination! It’s not as easy as learning one tip or technique. Hair is more complex than that. A blonde on a dark background must be treated differently than a blonde on a light background.
But here’s something important. Isolating hair is actually a secondary concern. The most important thing is what you’re planning to do after isolating the hair. Is the image being comped onto a new background? Are you just doing a minor color correction on the background? A major color correction? The answers to these questions are what will drive the techniques used to perform the masking and the amount of precision required in regards to the hair mask. Let’s address these individually in order of difficulty.
Let’s say you are making a minor color correction to a background. In general, when doing this, the hair mask need not be very precise. The reason for this, and what makes precise hair masking so difficult, is that individual hairs (what we call flyaways) in a photograph are not going to be the same color as the main body of hair. This is because of the way that cameras capture color and processing engines process the data. Flyaways, which may be anywhere from one to several pixels thick, are semi-translucent to the camera’s sensor and as such, the color of the hair blends a bit with the color of the background.
Some flyaway hairs will share the same color palette as the main body of the hair, but most are actually much closer in color to the background itself. This makes masking tricky. For argument’s sake, let’s say that our task here is to make a small background color shift—we want to take the color cast out and create a nice neutral gray. In that case, you would need only make a loose background mask, do your background color correction, and then you might need to brush away that mask in some small areas where you actually perceived the flyaways as the original hair color.
The next problem is, what if you want to radically change the background color, or even more difficult, comp the image into a new background while maintaining photo-realistic flyaways?
We’re sorry to say that the answer, in many cases, requires advanced illustration skills. It’s common to redraw most of the hair by hand. Why?

With many selection techniques, the edge pixels are quite rough against the new background. Furthermore, when shot against a light background, that light bounces around in the hair and in effect reduces the apparent contrast. When you then drop that image onto a dark background, the hair near the edges is as big a problem as the edges themselves. That hair looks too light and flat. Had the original been shot on a black background, the interior and shadows of the hair would be significantly darker as there would be less light bounding around. (You would have a similar problem if taking an image from a dark background and dropping it on a lighter background—except that now, the edge hair would be too dark and contrasty as opposed to too light and flat.) The solution now requires significant color correction to the interior of the hair AND flyaway painting by hand.
The painting of hairs by hand requires a sensitive and gentle hand and a good pressure-sensitive tablet. The artist must move between different-sized brushes, continually altering the edge hardness and changing the colors being painted with. Some hairs, to achieve photo-realism, must be larger and blurrier, some must be thin and hard, some should be blonds, others should be deep brown or almost black.
A user who is unaccustomed to painting with a pressure-sensitive pen and tablet will be hard pressed (sorry for the pun) to achieve professional-level results in this type of image.
What we’re trying to say is that hair selection is not only difficult, but creating believable, photo-realistic background changes is not always achievable by some magic combination of Photoshop features. We’re not trying to discourage you; these results are achievable with practice. The more practice, the better.
That’s not to say some Photoshop techniques and features can’t make decent hair masks for some photos on some backgrounds, or at least give you a start. We’re going to walk you through several techniques. We chose photos with difficult (but realistic) combinations of hair and backgrounds. Instead of trying to trick you into thinking Photoshop can perform magic, we want you to see the challenges. We’ll show you a few techniques, but we won’t claim these are the only ones. They are just a few we thought would be useful.
If you’re not satisfied with the end result of any technique (the ones shown in this book or others), you can hand-paint in some hair to make it look better. That’s also the part we can’t easily write instructions for, because it requires artistic interpretation.
Here’s a free sample exercise to get you started retouching hair in Adobe Photoshop and get a taste of Noble’s teaching style.
In this step-by-step exercise, you’ll learn how to silhouette hair in a quick and easy way. The image we’ll start with has a lot of contrast between the hair and the background, so it’s a good candidate for learning how to use the Refine Edge selection method.
Downloading & Installing Class Files
Follow the instructions below to download & install class files (make sure you do this first!):
- Navigate to the Desktop.
- Create a new folder called Class Files (this is where you’ll put the files after they have been downloaded).
- Go to nobledesktop.com/download
- Enter the code hair-1702-07
- If you haven’t already, click Start Download.
- After the .zip file has finished downloading, be sure to unzip the file if it hasn’t been done for you. You should end up with a Hair the Seminar folder.
- Drag the downloaded folder into the Class Files folder you just made. These are the files you will use while going through the workbook.
- If you still have the downloaded .zip file, you can delete that. That’s it! Enjoy.
Exercise Overview
In this exercise, you’ll learn how to silhouette hair in a quick and easy way. The image we’ll start with has a lot of contrast between the hair and the background, so it’s a good candidate for learning how to use the Refine Edge selection method.
NOTE: Photoshop CC 2015.5 replaced the Refine Edge feature with an “upgraded” version called Select and Mask. The new version doesn’t add features we need for this technique, and removed a useful feature we want to use. Luckily there’s a hidden trick that lets us still use Refine Edge in CC 2015.5 or 2017.
Putting Our Image onto the New Backgrounds
-
Launch Photoshop.
NOTE: This exercise has been tested with Photoshop CC 2017 but should work similarly in recent versions of Photoshop.
-
Go to File > Open and:
- Navigate into Desktop > Class Files > Hair the Seminar.
- Open Hair1_backgrounds.tif.
-
In the Layers panel (Window > Layers) notice there are a few layers. We’ll be trying out our person on these backgrounds. Let’s bring our person into this file.
-
Make sure the top layer (Bricks) is selected. We do this because when we import the photo of our person, it will be placed on top of the currently selected layer.
-
Go to File > Open and:
- Navigate into Desktop > Class Files > Hair the Seminar.
- Open dark_curly_iStock_000023058113_LL28.jpg.
-
There’s only one layer (the Background layer) in this file, so choose Layer > Duplicate Layer.
-
From the Document menu choose Hair1_backgrounds.tif.
-
Click OK.
-
Close this file (dark_curly_iStock_000023058113_LL28.jpg).
-
You should now be back in Hair1_backgrounds.tif.
-
In the Layers panel the top layer should be the woman’s photo. Background is no longer an appropriate name, so double–click the name and rename it original.
Creating the Selection
Because the hair and background have a high contrast (dark hair and a light background), Photoshop’s Refine Edge will likely work pretty well. As we meantioned earlier, Refine Edge has been replaced by Select and Mask. While we could use Select and Mask, it isn’t quite as nice as Refine Edge for this type of work. We’ll show you a hidden trick to access Refine Edge in CC 2015.5 or 2017!
First we must create a rough selection, and then Refine Edge will help fix it. This initial selection will not be perfect and that’s fine. Refine Edge does what it says; it refines the edge of a selection (so you don’t have to work as hard).
-
Choose the Quick Selection tool. If you don’t see it, click and hold the Magic Wand tool, then select it.
-
This tool works like a brush that paints a selection. Each drag will select more (adding to the selection). Dragging over part of an image will select it. Then dragging over another part will add to the selection without you having to hold any keys. Drag over the woman to select her body, face, and most of her hair. Do not worry about being perfect around the edge of the hair. You won’t be able to get all the hair or exclude all the background, that will fixed in a moment.
Be sure not to miss any parts of her shirt, especially around the edges. Small portions of stripes may be left unselected. Go back and drag over any missing spots!
Tips for using the Quick Selection tool:
- To subtract from a selection, hold Option (Mac) or Alt (Windows) while dragging (the cursor in the center of the circle will change to a minus).
- If you accidentally select something you don’t want, you can undo your mistake by hitting Cmd–Z (Mac) or Ctrl–Z (Windows).
-
To access the older Refine Edge, hold Shift and choose Select > Select and Mask. (If you’re using an older version of Photoshop and see Refine Edge in the Select menu, you do not have to hold Shift.)
-
It’s a good idea to work on a copy of the original, so at the bottom of the window go into the Output To menu and choose New Layer with Layer Mask. (Do NOT click OK until we tell you! We’re going to do quite a bit with this dialog open.)
-
At the top of the dialog, click on the thumbnail to the right of View.
-
In the menu that appears double–click on the On White (W) option to choose it. (As we work it will be easier to see the hair on white than on a more complex background like the bricks in our file.)
Some features of Refine Edge are not very intuitive to figure out on your own, but it’s easy to use once you know how. We’ll tweak the settings in the dialog later. The first thing we need to do is tell Photoshop the transition area (radius) between the hair and background, so it can analyze it and refine it. It will essentially make the hair selection for us.
-
In the Options bar at the top of the screen, set the Brush Size to about 125.
-
If the Refine Edge dialog is blocking the image, move it to the side so you can see the entire selection. It must stay open as we work.
-
The current view shows us the current selection. Here we can’t even see the parts of the hair that didn’t get selected. Press X on your keyboard to disable this view.
-
You should now see the entire original photo. Paint over the edges of the hair. As you drag you’ll see a green highlight. You want that green highlight to cover some of the background and some of the hair. This green area will define where Photoshop looks to figure out what should be selected (the hair) and what shouldn’t be (the background). When you stop brushing, the green highlight will go away and you won’t see anything change. Press X to switch back to the selection preview. That is where you can see what happened (on the white preview background).
-
To continue working, press X again (so you see the original photo with its yellow background) and paint more green highlight over the hair edges. Continue going back and forth between edge highlighting and the selection preview (press X to switch back and forth) until you’ve highlighted all the hair edges. We will still be able to improve the quality by tweaking the settings, but first we want to make sure the edge highlighting is done before looking at those settings. Things to keep in mind:
- Be sure to paint edge highlights over the yellow parts inside her hair to help eliminate them. Some of them are farther inside, not just at the edge.
- Don’t miss the hair around the chin.
- In the Refine Edge dialog you may want to check on Show Radius so you can see all the areas you have painted. Make sure this covers the entire hair edge and that you didn’t miss any parts. Then uncheck Show Radius before proceeding.
-
In the Refine Edge dialog try adjusting the Radius. As you increase it, give Photoshop a moment to process the results. You probably won’t see a change in the hair because you defined that radius with the brush, but watch the shirt and arms because you did not brush there.
Larger values mean Photoshop will look for edges to refine within a larger area away from the selection. Smaller values keep Refine Edge’s changes more localized and closer to the original selection.
Be careful of setting this too high because Photoshop will start going too far away from real selection edges and start making mistakes by thinking about edges it shouldn’t. It’s better to keep this fairly small and paint around edges that are larger (like we did for the hair).
-
Set the Radius to 3px, which we think works well for this image.
-
Check on Smart Radius, which in this image should ever so slightly improve the edge detection.
-
Let’s try a different preview to see the quality of our selection. At the top of the Refine Edge dialog, click on the thumbnail to the right of View.
-
In the menu that appears, double–click on the On Layers (L) option to choose it.
-
Let’s see this at 100% zoom so we can truly judge the quality. Go into the View menu (at the top of the screen) and choose 100% (or Actual Pixels).
-
If you can’t see the hair, hold the Spacebar and drag on the image to scroll to it.
-
The edge can clearly use some improving. There’s way too much yellow. Start by increasing the Contrast to 15%. This should sharpen up the selection and eliminate some yellow. (NOTE: Specific amounts will vary across photos, so we’ll recommend amounts we think work for this photo.)
-
To pull the selection in (and remove more yellow) set Shift Edge to –25%.
-
The edge could use a little softening, so set Feather to 1px.
-
You should now have the following settings:
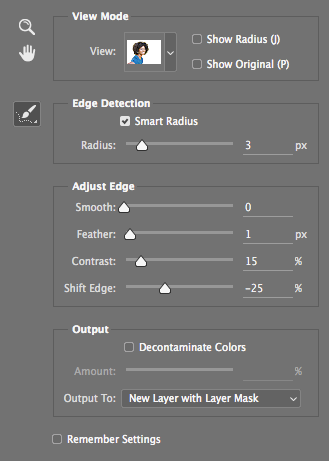
-
This is as good as we’re going to get with Refine Edge. We’ll fix the remaining issues a different way. Click OK.
NOTE: You may be wondering why we’re not using the Decontaminate Colors option. While this may work on some images, we found that it doesn’t on this image. We’ll show you another technique that offers more control (and can work when this option doesn’t).
-
In the Layers panel you should now have a new layer named original copy. Double–click the name and rename it silo.
Filling in Missing Spots in the Layer Mask
-
Let’s take a closer look at our mask. In the Layers panel, hold down Option (Mac) or Alt (Windows) and click on the silo’s black and white layer mask thumbnail.
-
In the document window you should now see a full-sized black-and-white version of the mask, which lets us see the mask details more clearly. If your mask has any black or gray spots in the middle of the face or the interior of the hair, the following steps will explain how to fill in those gaps. Depending on how you made the selection, the mask may not need to be modified.
- Select the Brush tool.
- Press D to set the Foreground color to White. (When you’re working with masks, white areas reveal the layer and black areas hide it.)
- Adjust the brush size and hardness as necessary. TIP: Press the right bracket ] key to increase brush size. Press the left bracket [ to decrease size. To adjust softness, hold Shift while pressing the left or right bracket keys.
- Paint over any black spots that you think shouldn’t be there.
-
Once you’re done, click on the silo layer’s thumbnail (not the mask thumbnail) to view the regular image again.
Removing the Yellow Color Cast
Let’s remove the leftover yellow color fringing.
-
Zoom to 100% so that you can see the detail of the hair more easily.
-
Make sure the silo layer thumbnail is selected (NOT the mask thumbnail).
-
Select the Brush tool.
-
In the Options bar, set the Mode menu to Color.
-
Also in the Options bar, set the Opacity to 35%.
-
Choose a soft brush and set its size to about 125.
-
Hold Option (Mac) or Alt (Windows) and click on a black part of the hair (that doesn’t have a yellow cast) to sample that color.
-
Paint in the fringe parts of the hair that have yellow. With each brush stroke it will remove a little more yellow. Some parts will look good with a single brush over, others will need a few swipes.
NOTE: You may wonder why we didn’t just use 100% to remove all the yellow. In retouching we try to remain true to the original photo, keeping as much of the original as possible. Using a lower opacity allows us to have more control and make subtle changes, which is especially important when there are color variations in the hair.
-
Brush over the remaining edges of the hair, adjusting the brush size as needed (like when you get near the chin).
-
We want to remove any color cast on the skin as well. Notice the yellow highlights on her nose, lips, neck, and arm. Reduce the brush size to something more appropriate for these areas. Remember that left bracket [ reduces the brush size and right bracket ] enlarges the brush size.
-
We want to sample some of her skin color to make it look more natural. While holding down Option (Mac) or Alt (Windows), click on an area of the skin that does not have the yellow color cast (we suggest a normal part of the nose for the yellow cast edge of the nose, neck for neck, etc.).
-
Paint onto the yellow cast areas:
- nose
- lips
- neck
- arm
-
Once you’re done removing the yellow, it’s a good idea to set the Brush mode back to normal (so the next time you use the tool it will be set properly). In the Options bar, set the Mode menu to Normal.
Final Refinement of the Hair Mask
If you look closely, there’s still a light halo around the hair. Let’s sharpen the edges of the hair a little more by using Curves on the layer mask.
-
Click on the silo layer’s mask thumbnail.
-
Hit Cmd–M (Mac) or Ctrl–M (Windows) to apply a Curves adjustment (this is the keystroke for Image > Adjustments > Curves).
-
Darkening up the mask will hide more of the photo. Adjust the black point and darken the mask with a curve adjustment.
-
Uncheck and re-check Preview to see the improvement. Notice that the gray halo is reduced around the edges of the hair.
-
Click OK.
-
Let’s see how the silo layer looks on the beach. In the Layers panel hide the Bricks layer by clicking the eye.
- This is looking pretty good. Here are some other things you may want to do:
- Selectively remove unwanted flyaway hairs. (Select the silo layer mask and paint black over them.)
- Fade out the edges of the hair to make them partially transparent. This depends on the look you’re going for, so it’s optional. If you want, choose a large soft brush with a low opacity (around 10%). Choose black and paint around the edges of the hair, to make them appear more transparent. You could also use the Blur tool to soften the edges of the hair mask.
-
Lastly, we want her to face the other way, so go to Edit > Transform > Flip Horizontal.
-
Choose View > Fit on Screen to see the whole image. Nice!
Final Thought: Keep in mind that Refine Edge works better on some images than others. It’s pretty quick and easy so it’s good to know, but it’s not always perfect. It may be good enough for a specific image and background, but may not be good enough to create a silo that works on any background. For example, this image is fine on these brick and beach backgrounds, but not good on a black background. There are many techniques to select hair because there are so many variables. You’ll explore other techniques in the next two exercises.
Learn Photo Retouching, Photography, and Graphic Design at Noble Desktop
Explore the power of Photoshop in Noble Desktop’s Adobe Photoshop courses:
- In our Photo Retouching Certificate you can improve your Photoshop retouching skills and learn Adobe Lightroom.
- Take better photographs, learn professional studio photography/lighting techniques, and much more in Noble Desktop’s photography classes in NYC.
- Noble’s graphic design classes in NYC will help you can master Photoshop, InDesign, and Illustrator as well as build a design portfolio.


