Explore this comprehensive tutorial on Ruby on Rails, covering starting from scratch, generating scaffolds, adding content, and testing your work in a browser.
This exercise is excerpted from Noble Desktop’s past web development training materials. Noble Desktop now teaches JavaScript and the MERN Stack in our Full Stack Development Certificate. To learn current skills in web development, check out our coding bootcamps in NYC and live online.
Topics Covered in This Ruby on Rails Tutorial:
Getting Started, Generating a Scaffold, Adding Content
Exercise Preview
Exercise Overview
In this exercise, you will learn how to create a new application with Ruby on Rails using a feature of Rails called scaffolding. While we’ll have you create a very simple web app for storing recipes, you can go on to use scaffolding to make a wiki, a blog, or even a corporate website!

Unlike other dynamic web programming languages like PHP and Java, Rails provides a host of command line tools that do really helpful things such as generating files or seeding your database with data!
Getting Started
Make sure you’re in the Finder (the Desktop).
From the Finder menu choose Hide Others to make sure no other apps are visible.
On the Desktop open the Class Files folder.
Go into the yourname-Rails Class folder and notice we’ve provided some folders and files. We will use those later, but in this exercise we’re going to use Rails to set things up for us. Notice we currently do not have a cookbook folder. We’re going to create that in a moment.
Go back to the Class Files folder so you can see the yourname-Rails Class folder icon. We’ll need it in a few steps.
Keep this window open, we’ll need to use it in a moment.
Much of Rails work happens in the Terminal (a command line interpreter). The Terminal comes ready-to-use with your Mac. Go to Applications > Utilities and launch Terminal.app.
Arrange the Terminal window and the Class Files window so you can see both at the same time.
We’re going to use Rails to create our first site, but we need to create it in the proper folder. Unix uses a
cdcommand (cd = change directory) for navigating folders, much like you navigate folders in the Desktop. We use a command such ascd folder/subfolderto change directories. While we could type out the directory structure, there is a graphical way that prevents typos! We do have to type in thecdcommand though, so in Terminal, typecdand then press the spacebar once.-
In the Class Files window you should see the yourname-Rails Class folder. Drag the yourname-Rails Class folder onto the Terminal window and release. It will enter the complete path for you! The Terminal command should now read:
cd /Users/yourUserName/Desktop/Class\ Files/yourname-Rails\ Class-
yourUserNamewill be your username on your computer - A forward slash (
/) separates each directory. - A backslash (
\) is required before a space in the folder name. The folder name is Class Files so we needClass\ Filesin the Terminal.
-
Make sure you’re in the Terminal and press Return to apply the command.
-
You’ll know it worked and that you’re in the proper directory because you should see the yourname-Rails Class folder to the left of the
username$prompt. The current command line prompt reads:yourComputerName:currentFolder userName$ Before we run the Rails command to create our site, let’s open the folder on the Desktop so we can visually watch what Rails will do. In the Finder’s Class Files window, open the yourname-Rails Class folder. Keep the window open and arranged so you can see it and the Terminal window.
-
Now we can create our first Rails site. In the Terminal type:
rails new cookbook - After typing the command, hit Return to apply it.
- In the Finder window you’ll see that a new cookbook folder gets created.
- In the Terminal window you’ll see a readout of everything Rails created and did.
-
Once Rails is done and you’re back in the command prompt, in the Terminal type the following command to go into the new cookbook folder that Rails just finished creating for you:
cd cookbookNOTE: Don’t forget to hit Return to apply the command. From now on, we won’t keep saying to hit Return after every Terminal command. Assume you should hit Return unless we tell you not to.
-
To see the contents of the folder, type the following command:
lsNOTE: That is
lswith a lowercase L. Thelscommand lists a directory’s contents.In the Terminal you’ll see a list of files/folders that Rails has automatically generated. We will look at the specifics of what these are soon enough.
If you are curious, in the Finder open the cookbook folder and you can see the same folders/files you were just looking at in Terminal. The Terminal and Finder are two ways of looking at the same thing. The Terminal is command-based and the Finder is visual, but they work with the same files and folders!
Testing in a Browser
For now, we want to make sure that everything has been installed and is working properly. To do that, we will see how things look in a browser.
-
In Terminal, type the following:
rails serverThis command invokes the web server that comes bundled with Ruby on Rails. It allows you to test your website in a browser. If you’ve ever set up a dynamic web development server on your own, you’re probably going to appreciate the ease with which Ruby on Rails makes this possible. Other platforms require quite a bit of work to get to this step!
-
The Rails server is now booted up. You can verify this in the last line of text written in Terminal, which lists the date, time, and information similar to:
=> Booting Puma
=> Rails 6.0.0.rc1 application starting in development
=> Run `rails server—help` for more startup options
Puma starting in single mode…
- Version 3.12.1 (ruby 2.6.3-p62), codename: Llamas in Pajamas
- Min threads: 5, max threads: 5
- Environment: development
- Listening on tcp://localhost:,000
Use CTRL C to stop
NOTE: Your
pid(process identifier) will be different. These are always unique. Open any web browser.
-
In the address bar—as if you’re navigating to a webpage—type localhost:,000 and hit Return.
NOTE: Local host is the default URL for a Rails development site. The colon indicates that this is a port. Normally a web application would run on port 80 for http, or port 443 for https. Rails launches on port,000 in order not to interfere with other processes on your computer.
You should see a Welcome aboard page. Congratulations on starting your first Rails site! This verifies that Ruby and Rails are installed correctly and that we are on a server. In the welcome text on this page, Rails recommends that we use
rails generateto create our models and controllers. We are about to do just that.Close the browser window.
Switch back to Terminal.
Hit Control–C. That’s the Control key, not Command! This stops the server from running. We have some work to do before we will need the server again.
Generating a Scaffold
Scaffolding is a powerful feature of Rails. It creates the basic structure of a relatively complex website with very little effort. For this website we want to set up the structure for recipes.
-
The command we’re going to write is a bit long so we’ll build it up over a couple steps. Do not hit Return until we say to! In Terminal, type the following:
rails generate scaffold recipeLet’s break that down:
-
rails generate scaffoldasks Rails to generate a scaffold. -
recipeis the name of the object being created.
-
-
In Terminal, continue writing the command by adding the bold text below. You must enter it as a single line, even though it wraps onto multiple lines below.
rails generate scaffold recipe title:string description:text prep_time:string ingredients:text directions:text- These are all basic properties that make up a
recipein the database. - The data type
stringsignifies a single-line text field in a form. - The data type
textallows a larger text area in a form.
- These are all basic properties that make up a
Double-check your command for typos.
-
Once it looks good hit Return to run it. Your database is now being generated!
NOTE: When we ran this scaffold generation, part of what Rails built was a piece called a migration. Migrations are changes to the structure of a database in Rails. In this case, the command
rails generate scaffoldcreated a table in the database so that our recipes can be stored somewhere. We will discuss migrations in more detail later on. -
In Terminal, type the following:
rails db:migrateNotice in the Terminal’s output that this command created a new table called recipes. The beauty of Rails is that it’s fast and uncomplicated. With a few simple commands we have created a complex database.
-
Let’s look at what we’ve built in a browser! Type the following:
rails server Open a web browser and navigate to localhost:,000/recipes
You should see the data fields we created listed in one line of text. Underneath that line, click on the New Recipe link. This will take us to a new recipe form. It may not be pretty, but it only took a few lines of code and a few minutes to do it!
Adding a Recipe
Let’s add a recipe! We’ve already typed out the content for you. Keep the browser window open, and switch to the Finder.
Navigate into Class Files > yourname-Rails Class and double–click recipe.txt to open it.
Copy and paste each component of the recipe into its corresponding field in the cookbook database.
- When done copying and pasting, in the browser click Create Recipe.
- A new page opens with a message at the top letting us know that we successfully created a new recipe.
- Notice the URL has changed to localhost:,000/recipes/1 Rails knows this is our first recipe!
Click the Edit link. Here you can update fields when necessary.
Change the Prep time to 25 minutes.
Click Update Recipe to save the changes.
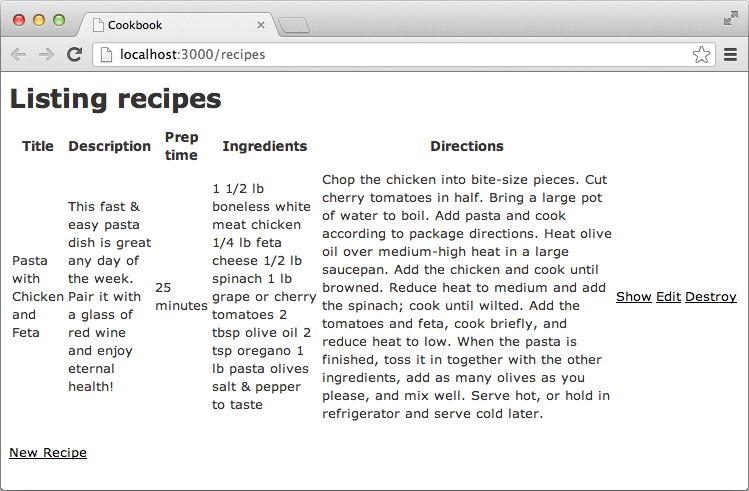
Click the Back link. This takes us to the Rails-generated table view of all the recipes.
Here, you will see three links to the right of the table: Show, Edit, Destroy. This allows you to view your work, edit it, or delete it from the site.
-
We’ll continue with this site in the next exercise, so just leave everything open and the Rails server running.
With a few simple commands in Terminal, we’ve built a new site, started a web server, created an object type called recipes, and set up a database to hold all of our information. This is incredible!
NOTE: For more info about the file structure of the website we just created, go to the Basic Structure of Scaffolding reference at the end of the workbook.