Dive into this in-depth tutorial on Ruby on Rails, exploring topics such as generating and rolling back a migration, and updating views and controllers to match an updated model.
This exercise is excerpted from Noble Desktop’s past web development training materials. Noble Desktop now teaches JavaScript and the MERN Stack in our Full Stack Development Certificate. To learn current skills in web development, check out our coding bootcamps in NYC and live online.
Topics Covered in This Ruby on Rails Tutorial:
Generating & Rolling Back a Migration, Updating Views & Controllers to Match an Updated Model
Exercise Preview
Exercise Overview
In this exercise, we will add more columns to the movie model and update the views and controllers to reflect these additions.

-
If you completed the previous exercises, you can skip the following sidebar. We recommend you finish the previous exercises before starting this one. If you haven’t finished them, do the following sidebar.
If You Did Not Do the Previous Exercises (3A–4B)
- Close any files you may have open.
- Open the Finder and navigate to Class Files > yourname-Rails Class
- Open Terminal.
- Type
cdand a single space (do NOT press Return yet). - Drag the yourname-Rails Class folder from the Finder to the Terminal window and press ENTER.
- Run
rm -rf flixto delete your copy of the Flix site. - Run
Git clone https://bitbucket.org/Noble Desktop/flix.Gitto copy the Flix Git repository. - Type
cd flixto enter the new directory. - Type
Git checkout 4Bto bring the site up to the end of the previous exercise. - Run
bundleto install any necessary gems. - Run
yarn install—check-filesto install JavaScript dependencies.
Getting Started
Close all of the files you have open in your code editor.
Open the Finder and navigate to Class Files > yourname-Rails Class
Open Terminal.
Type
cdand a single space (do NOT press Return yet).Drag the flix folder from the Finder to the Terminal window.
Make sure you’re in Terminal and hit Return to change into the new folder.
Generating & Rolling Back a Migration
We created a movie model a few exercises back—does this mean that the movie model is fixed, immutable, unable to change? Of course not! In fact, the Editorial Department at Flix has asked us to add a new field for director to the Movie Details sidebar on each of the detail pages.
We already have a model, so we’re not going to call rails generate model again. Instead, we’ll call rails generate migration. Let’s try it out.
-
Type the following, but do NOT press Return yet!
rails generate migrationWe can generate just a migration file by itself to apply changes to an existing model. Let’s give it a name that reflects the changes we’re making.
-
Add the following name and field-type to the command and press Return after typing to apply the migration:
rails generate migration add_director_to_movies director:textTerminal will reply letting you know that a new migration file has been created.
Switch to your code editor.
Open flix > db > migrate > #
_add_director_to_movies.rb (the # is a placeholder for the file’s unique timestamp).-
Take a look at this code in the file:
def change
   add_column :movies, :director, :text
end
How did Rails know that we wanted to add this to the movies model? Because we crafted the name of the migration in a certain way, naming it
add_X_to_movies. Rails is smart enough to parse theto_moviespart at the end of the string, recognize that it matches an existing model and construct a migration in such a way that the movie model will get a new column. We’re not going to change anything in this file, so let’s go ahead and apply the migration. Switch to the Terminal.
-
Type the following to apply the migration:
rails db:migrateTerminal should confirm with a message including
add_columnto let us know that the field was added successfully—except, wait! We don’t wantdirectorto be a text area, it should just be a regular string. What happens now? Are we screwed? Do we have to delete the database and start over? Of course not. All we have to do is roll back the migration and then edit it. -
Type the following in Terminal:
rails db:rollbackTerminal should reply that it is
revertingand it has performed aremove_columnaction, which is clearly the opposite ofadd_column. Let’s fix our messed-up migration. Switch to #
_add_director_to_movies.rb in your code editor.-
Make the following change shown in bold, replacing
textwithstring:def change add_column :movies, :director, :string end Save the file.
Switch to Terminal.
-
Type the following:
rails db:migrateGreat, the fixed migration (with
directornow as a string) has been applied!
Updating Views & Controllers to Match an Updated Model
Switch to your code editor.
Open flix > app > views > movies >
_form.html.erb-
Add the following code around line 14, after the
has_subtitlespart of the form:<%= f.label :has_subtitles %> <%= f.check_box :has_subtitles %> </p> <p> <%= f.label :director %> <%= f.text_field :director %> </p> Save the file.
Open flix > app > controllers > movies_controller.rb
-
Scroll down to the bottom of the file. Inside the private
movie_paramsmethod in the long line of code, add the following bold code (keeping it on one line):movie_params=params.require(:movie).permit(:title,:description,:has_subtitles,:placement,:mpaa_rating,:release_date,:ticket_price,:runtime,:poster_image,:director)If you were to forget to add these to the
movie_params, the new fields wouldn’t be saved when you saved the form. This is a common thing to forget to change when updating a form! -
Save the file.
Let’s make sure that the new fields show up in the movie details view.
Open flix > app > views > movies > show.html.erb
-
Around line 15 add the following bold code:
<div class="details"> <h4>Movie Details</h4> <div> <span></span> </div><div> <span>Subtitles:</span> -
Add the following bold code:
<div class="details">
   <h4>Movie Details</h4>
   <div>
      <span>Director:</span>
      <%= @movie.director %>
   </div>
   <div>
      <span>Subtitles:</span>
Save the file.
-
Type the following to launch the server:
rails server Switch to the browser, navigate to localhost:,000/movies/1/edit and check out the new field for director. Let’s fill in this new field.
-
Fill in the field for director as follows (or invent your own entry if you feel like it!)
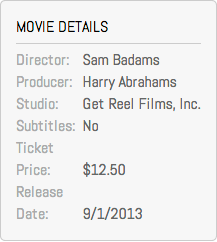
Director: Sam Badams -
Click Update Movie.
The changes should be successfully added to the Movie Details sidebar! Excellent.