Learn about the process of correcting color profiles in Photoshop, from opening the file to converting into a device-independent workspace for image editing, with our comprehensive walkthrough.
This exercise is excerpted from Noble Desktop’s past Photoshop color managment training materials and is compatible with Photoshop updates through 2018. To learn current skills in Photoshop, check out our Photoshop Bootcamp and graphic design classes in NYC and live online.
Getting Started
- Go to File > Open.
Open DKNY-wrong profile (should be sRGB).tif from the Color Management Seminar Files folder.
-
The following message will be displayed:

-
Make sure Use the embedded profile is chosen and click OK.
Explanation: We know this image was originally shot on a digital camera. Yet the software used to download the image incorrectly assigned it a different profile, Generic RGB Profile. This makes Photoshop display the image differently. Once we assign the correct profile that better describes the digital camera used to capture the image, Photoshop will be able to display the image correctly.
In the above dialog it really doesn’t matter whether you choose Use the embedded profile or Discard the embedded profile. Right now it doesn’t matter whether the image has a wrong profile or no profile at all, because the next step is to assign the correct profile!
Hopefully you won’t encounter too many images that have incorrect profiles embedded, but because it can happen, it’s important to know how to deal with it.
Assigning the Proper Profile so Photoshop Displays the Image Properly
Go to Edit > Assign Profile.
-
Like many digital cameras, the camera that took this image shoots in sRGB. As shown below, from the Profile menu, choose sRGB but do NOT hit OK until we say!

Photoshop is trying to accurately display how the camera saw this image, which was shot at dusk. You can see by the lights on buildings and cars that it was getting dark outside. It started out a bit too light, but now it is darker. Uncheck and check Preview to see the difference. It is now closer to the image the digital camera took!
Click OK.
Converting into a Device-Independent Workspace for Image Editing
This image was shot on a digital camera that we know uses sRGB. But this RGB colorspace, while suited nicely for web design, is small and is not so good to work in for print. We’ll convert to a better colorspace for editing so we aren’t limited to the capabilities of the input device (in this case the camera).

-
Go to Edit > Convert to Profile and set the following:
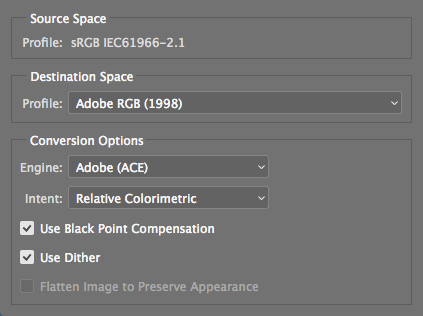
REMINDER: While Adobe RGB is a good workspace, we do not want say that everyone should use it for all their work. You will need to find the RGB workspace that is best for your workflow.
-
Click OK.
Now that you are in a good device-independent workspace, you can do your work, color adjustments, etc.
We won’t be editing it now, so close the file and don’t save changes.
