Explore the power of blending modes in Photoshop, which can dramatically alter the look of your layer compositions by creating creative effects using blend layers.
Blending modes in Photoshop allow you to blend the pixels of a layer with the layer underneath to create a new effect. The base layer is the bottom layer and the blend layer is the layer on top. The resulting effect is the blending of the two layers.
What Are Blending Modes?
Blending modes are non-destructive, which means they can always be adjusted or changed back to the Normal mode at any time. The intensity of the effect can be increased or decreased by changing the opacity of the blend layer. Adjustment layers, brushes, and some tools have their own blending modes, but we will focus on layer and adjustment layer blending modes.
How to Apply a Blending Mode in Photoshop
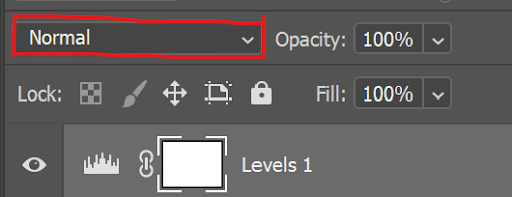
First, it’s important to know how to change a layer’s blending mode. You can find them at the top left of the Layers panel in the menu that usually says Normal.

When you have a layer selected, use the keyboard shortcut Shift + andShift - to switch through the various blend modes.
Understanding Blending Modes
It’s important to know how blending modes are organized and what the main differences are between them. Even if you don’t know exactly how each one works, you can experiment with them and still achieve interesting results, but a basic understanding will be helpful.
Blending modes are organized into 6 unlabeled sections separated by thin lines. The sections are: Normal, Darken, Lighten, Contrast, Inversion, and Component.
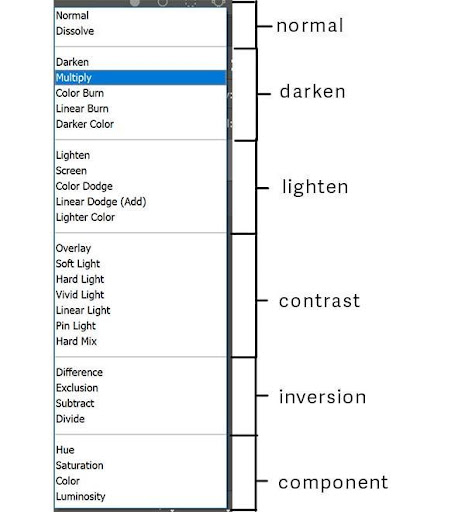
Here is a simplified explanation of these sections.
- Normal Blending Mode shows your layer as it currently is.
- Darken Blending Modes darkens dark pixels and makes white pixels transparent.
- Lighten Blending Modes lightens light pixels while making blacks transparent.
- Contrast Blending Modes makes all pixels that are 50% grey become transparent while lighter pixels get lighter and darker pixels get darker.
- Inversion Blending Modes makes the pixels in the blend layer and layer underneath become opposite of each other.
- Component Blending Modes uses hue (color), saturation (intensity of color), and luminosity (brightness) to create blending effects.
Let’s look at these 4 commonly used blending modes:
- Multiply: A darken blending mode
- Screen: A lighten blending mode
- Overlay: A contrast blending mode
- Color: A component blending mode
The Multiply Blend Mode
One of the most used blending modes is Multiply. The Multiply blend mode uses the dark pixels to darken the underlying layer, while white becomes transparent.

In the images above the compass (center) was added onto the image of the hiker and its blending mode was changed to Multiply. The resulting image on the right shows how the white background of the compass disappears while the compass remains in the image.
The Screen Blend Mode
The opposite to the Multiply blend mode is the Screen blend mode. Screen uses the light pixels to lighten the underlying layer, while black becomes transparent.
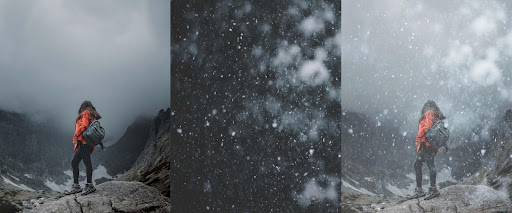
In the images above, the center image of snow falling was added to the woman standing on the mountain (left) and its blending mode was changed to Screen. The image on the right shows the resulting image. All the dark pixels in the snow image disappear making it appear as if the falling snow is part of the scene.
If the effect is too harsh you can decrease the opacity of the adjustment layer.
The Overlay Blend Mode
Overlay is a contrasting blending mode which means it makes light pixels lighter, and dark pixels darker, while 50% gray pixels disappear. This is a combination of both the Screen and Multiply blending modes.
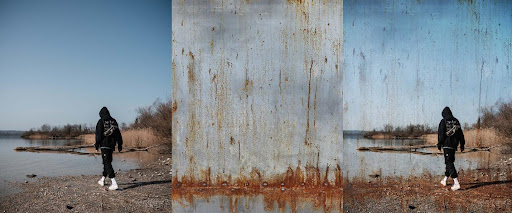
In the images above a texture (center image) was added to the photo of the person walking near water (left) and its blending mode was changed to Overlay. The image on the right shows how some of the lights and darks of the texture remain in the final image, giving it a gritty look. In this case the opacity of the texture layer was reduced to 70%, making the effect more subtle.
The Color Blend Mode
The Color blending mode affects the color of a layer while preserving the luminosity (brightness) and saturation (intensity of color) of the base layer.
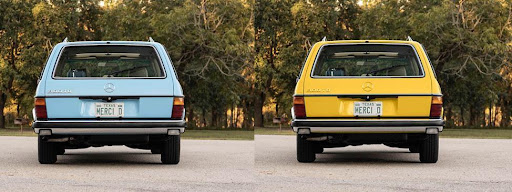
An example is changing the color of a car. First, we select the car, then fill the selection with a solid color on its own layer. This solid color is an opaque color (a single luminosity) until you change the blending mode to Color. Now the car shows the new color with varying luminosity (lights and shadows) of the original photo.
The image above on the left shows the car with its original color. The image on the right is filled with a yellow color with a Color blending mode applied to the layer.