Explore a comprehensive tutorial on using Lightroom Classic CC, covering topics such as making and saving quick collections, creating collection sets, and creating smart collections.
This exercise is excerpted from Noble Desktop’s past Lightroom training materials and is compatible with Lightroom updates through 2020. To learn current skills in Lightroom, check out our Photo Retouching Certificate and graphic design classes in NYC and live online.
Topics Covered in This Lightroom Tutorial:
Making & Saving Quick Collections, Creating Collection Sets, Creating Smart Collections
Exercise Preview
Exercise Overview
In this exercise, you’ll learn how to create Collections to better organize your photos.

Grouping Images in Quick Collections
If you have not completed the previous exercises (1A–1B), finish them before proceeding with this exercise.
Make sure you’re in the Library module.
Click the Grid View button
 at the bottom of the Library or press G to enter Grid View if you are not already there.
We’ll be using the Catalog panel located in the left side panels in this exercise. Expand the Catalog panel, if it is not already open.
Click on the first lighthouse (20090503_YourName_001) image to select it.
-
Shift–click on the field image (20090503_YourName_009) to select it and all the images in between.
NOTE: If you can’t see the filenames, go to View > View Options. Under Compact Cell Extras, make sure Top Label is checked.
Press B to Add to Quick Collection. Photos that are included in the Quick Collection will show a gray dot in their upper-right corners.
In the Catalog panel, click on Quick Collection to see all the photos we had selected are now in this Quick Collection.
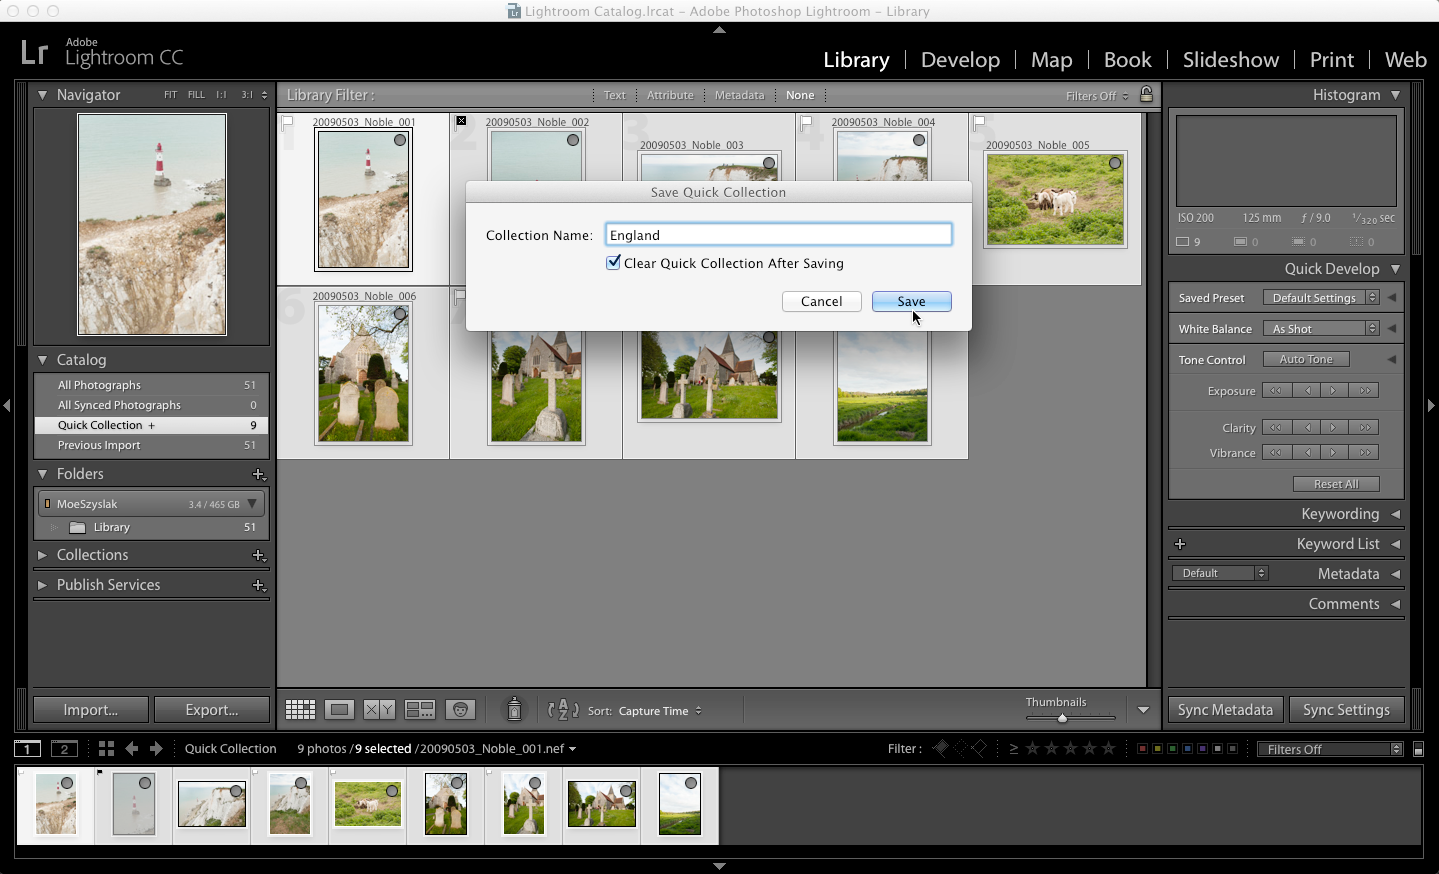
CTRL–click (Mac) or Right–click (Windows) on Quick Collection. Choose Save Quick Collection.
Set England as the Collection Name.
Make sure the Clear Quick Collection After Saving box is checked.
Click Save.
In the Catalog panel, click on All Photographs.
Scroll down and select the photo of the motel sign (20110820_YourName_010).
Shift–click on the second photo of the elk (20110901_YourName_040) to select that group of images.
Press B to Add to Quick Collection.
In the Catalog panel, CTRL–click (Mac) or Right–click (Windows) on Quick Collection and choose Save Quick Collection.
Set Wyoming as the Collection Name.
Make sure Clear Quick Collection After Saving is still checked.
Click Save.
Expand the Collections panel on the left if it is not already open.
Click on England to view the collection.
Click on Wyoming to view that collection as well. Sweet!
In the Catalog panel, click All Photographs to see all our photos.
Creating Collection Sets
Collection Sets allow for better organization of Collections. In this exercise we’ll create USA and Europe Collection Sets to store the England and Wyoming pictures.
In the Collections panel, click the New Collection button
 and select Create Collection Set.
- In the Create Collection Set dialog:
- For Name type Europe
- Uncheck Inside a Collection Set if it isn’t already.
- Click Create.
Notice a collection set named Europe has been added in the Collections panel. There aren’t currently any photos in the Europe collection set, but before we add any, let’s create a second collection set.
Next to the Collections panel title, click New Collection
and select Create Collection Set.- In the Create Collection Set dialog:
- For Name type USA
- Uncheck Inside a Collection Set if it isn’t already.
- Click Create.
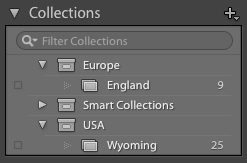
In the Collections panel, notice there are now two Collection Sets.
In the Collections panel, drag the England collection into the Europe collection set.
-
Drag the Wyoming collection into the USA collection set so the Collections panel looks as follows:
Creating Smart Collections
A Smart Collection is created automatically based on a set of specified parameters. Let’s create a Smart Collection based on the keyword Animal.
In the Catalog panel, click on All Photographs if it isn’t already selected.
Click on the photo of the sheep (20090503_YourName_005) to select it.
-
Cmd–click (Mac) or CTRL–click (Windows) each of the following images that have animals in them to select them all:
- 20110823_YourName_024
- 20110823_YourName_025
- 20110823_YourName_026
- 20110824_YourName_027
Let’s apply the keyword Animal to these photos using the Keywording panel located in the right side panels. Expand the Keywording panel, if it is not already open.
In the Keywording panel, click in the bottom smaller text field.
Type Animal.
Press Return (Mac) or Enter (Windows).
Go to Edit > Select None to deselect all the photos.
Click on the photo of the sheep (20090503_YourName_005) to select it.
In the Keywording panel, notice that this photo now has the keyword Animal.
In the Collections panel, click New Collection
. Choose Create Smart Collection.- In the Create Smart Collection dialog that appears:
- For Name type Animals.
- Make sure Inside a Collection Set is checked and Smart Collections is selected in the menu below.
- From the Match menu, choose all.
- From the first menu in the criteria box, choose Other Metadata > Keywords.
- From the second menu, choose contains.
- In the text box to the right of Contains, type Animal.
- Click Create.
In the Collections panel, expand Smart Collections if it isn’t already and notice there is now a Smart Collection (it has a different icon) called Animals. The Animals smart collection contains all of the photos with the keyword Animal.
There are some animal photos that we originally missed when we added keywords that also need to be added to the Animals Smart Collection. In the Catalog panel, click All Photographs.
Click on the photo of the grazing bison (20110822_YourName_023) to select it.
-
Cmd–click (Mac) or CTRL–click (Windows) the rest of the animal photos to select them all:
- 20110826_YourName_031
- 20110826_YourName_038
- 20110901_YourName_040
- 20110904_YourName_046
- 20121227_YourName_049
-
In the Keywording panel below the field that says iphone wallpaper*, click in the text field that says Click here to add keywords.
NOTE: The asterisk next to iphone wallpaper indicates that this keyword has already been assigned to one or more of the selected photos, but not all of them.
Type Animal.
Press Return (Mac) or Enter (Windows).
-
In the Collection panel, go back to the Animals Smart Collection and notice that these new photos have been added. Awesome! Now anytime we add a photo and give it the keyword Animal, it will automatically be added to this smart collection.
Smart Collections may be based on numerous parameters and you can add parameters to an existing Smart Collection anytime by double–clicking it.
