Learn how to program a List Items View Controller for an iOS app with our interactive tutorial and discover how to work with implicitly unwrapped properties, change UI elements based on user interaction, and become comfortable navigating and working in Xcode.
This exercise is excerpted from Noble Desktop’s past app development training materials and is compatible with iOS updates through 2021. To learn current skills in web development, check out our coding bootcamps in NYC and live online.
Topics Covered in This IOS Development Tutorial:
Implicitly Unwrapping Properties That Cannot Be Defined During Initialization, More Table View Data Source, Delegate, & UI Responsive Methods, Changing the Check Button’s Image When a User Taps It, Changing the Navigation Item’s Tint & Title
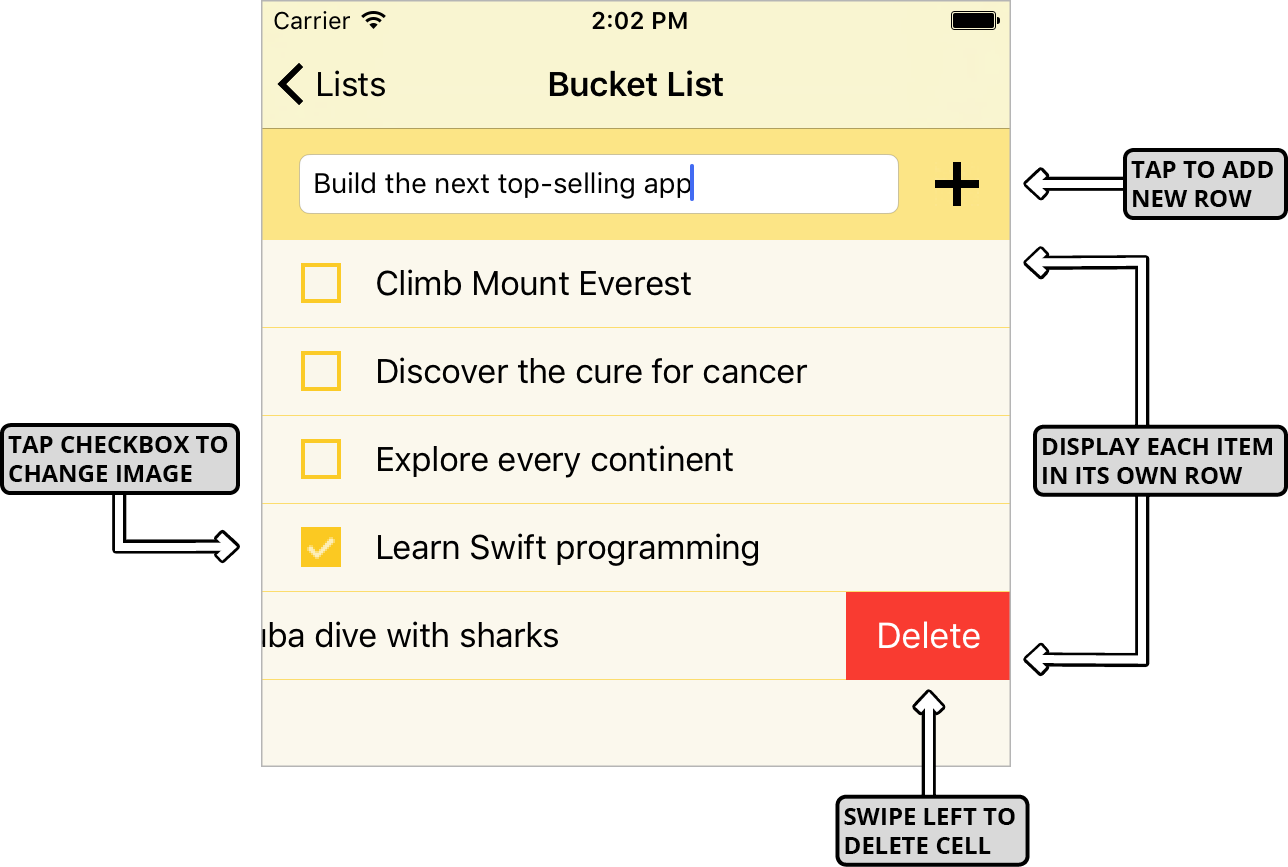
Exercise Preview
Exercise Overview
In this exercise, we’ll program the List Items View Controller that the user segues to when they want to see the individual items on one of their lists. Because this View Controller is also serving as the data source and delegate of its respective Table View, the code we need is very similar to the methods we wrote in the previous exercise. We will simply copy and paste them, and make small tweaks where needed.

We’ll also add new functionality that assigns two possible images to the Check button next to an item name. If the user taps on an unchecked item, it will change to the checked image. Otherwise the button image will change to be unchecked.
Getting Started
Launch Xcode if it isn’t already open.
If you completed the previous exercise, Lists.xcodeproj should still be open. If you closed it, re-open it now.
-
We suggest you complete the previous exercises (5A–6A) before doing this one. If you did not do the previous exercises, complete the following:
- Go to File > Open.
- Navigate to Desktop > Class Files > yourname-iOS App Dev 2 Class > Lists Ready for List Items View Controller and double–click on Lists.xcodeproj.
If you do not have Main.storyboard, Data Model.swift, ListsVC.swift, and ListItemsVC.swift open in separate Editor tabs, open them now. (Remember that the Cmd–T shortcut opens a new tab.)
Implicitly Unwrapping Properties That Cannot Be Defined During Initialization
Before we copy some methods from the first View Controller and paste them in the second, let’s take a quick look at something from the previous exercise that may have been a bit puzzling.
If you aren’t in the second View Controller’s ListItemsVC.swift file, go to the top of Xcode and click on its tab to switch.
-
Near the middle of the code, find the list variable shown below:
var list: List!This property is optional, but it’s not declared with the usual question mark (?) syntax. This property is an implicitly unwrapped optional, as indicated by the exclamation mark (!). To get a handle on the difference between these two kinds of optional, let’s do some experimentation.
-
Whenever we declare an optional constant or variable, we’re actually using the Optional type. While Swift encourages us to use the question mark (?) as shorthand, we can use the longhand syntax Optional
<Type>as well. Declare a temporary variable as shown so we can see how optionals work behind the scenes:var list: List! var wrappedOptional: Optional<String> override func viewDidLoad() {This is the same as declaring var wrappedOptional: String?
-
CTRL–Cmd–click on the word Optional to see the Swift source code for this type.
You should see an enum called Optional
<Wrapped>. This enumeration is public so anything in Swift can access it. Notice there are two cases. The none case represents a nil value. The some(Wrapped) case stores the given value (which is NOT nil) in a wrapper. When the value is initialized, it is wrapped for safety reasons.
To return to ListItemsVC.swift, go to the area above the code but below the tabs and click the Go Back button
 .
.Delete the wrappedOptional you just declared. (You can press Cmd–Z to undo, until the entire line is gone.)
-
Now that we’ve taken a peek behind the scenes, let’s break down the difference between a wrapped optional and an implicitly unwrapped one:
- In the enumeration, you just saw that the actual value is stored in a wrapper. This wrapper is like a protective shell that ensures your app won’t crash if there’s no value. That’s why when we want to access the actual value later on, we would need to explicitly remove this protection. Using an exclamation mark (!) goes into the enumeration and pulls out the stored value from its wrapper.
- Implicitly unwrapped optionals are unwrapped immediately, ensuring we never need to explicitly remove the protection later on. When declaring a constant or variable as such, we’re saying that this variable will always have a value whenever we access it.
Implicitly unwrapped optionals are a risky proposition—your app will crash if this kind of optional has a nil value! To see why we’re so confident that our list variable will always have a value, switch to the first View Controller—the ListsVC.swift tab.
-
At the bottom, locate the prepare method shown below. (Do not add any code! The list variable is displayed in bold to indicate where it is used within this method.)
override func prepare(for segue: UIStoryboardSegue, sender: Any?) {
   let listItemsVC = segue.destination as! ListItemsVC
   listItemsVC.list = lists[(listsTableView.indexPathForSelectedRow?.row)!]
}
To transition to the second View Controller, the user must click on one of the list objects (one of the titles listed here on the first screen). If there’s nothing displayed in the Table View, the user will not be able to click on a row to segue to our second screen. This prevents the list variable from having a nil value.
-
So why did we need to declare the list variable as an optional? This is because this property cannot receive the value it needs when its containing class (ListItemsVC) is initialized. Look at the following line that initializes the ListItemsVC class:
let listItemsVC = segue.destination as! ListItemsVC -
Now look at the line immediately after that:
listItemsVC.list = lists[(listsTableView.indexPathForSelectedRow?.row)!]This is when the list property gets its value. Because the first line gets called right before this second line, there’s a tiny fraction of a second between the ListItemsVC class’s initialization and the list value’s assignment.
At the top, switch back to the ListItemsVC.swift tab.
-
To see more implicitly unwrapped optionals we’ll use in this exercise, find the following code near the top:
@IBOutlet weak var newItemNameTextField: UITextField! @IBOutlet weak var itemsTableView: UITableView! -
Notice that these outlet connections are listed before the viewDidLoad method. In a previous exercise, we dragged them there to remind us that these variables will not have a value until this method gets called. This is because a View Controller is instantiated before its view (and the objects on it) load.
Outlet connections are always implicitly unwrapped because if we set up our Storyboard correctly, these outlets will always have a value. This comes in handy when testing your app. If it crashes when you first test it, you’ll know that you probably made a mistake in the Storyboard.
Copying & Pasting the Table View Data Source & Delegate Methods
-
We are using a Table View again so we need to add the protocols shown below:
class ListItemsVC: UIViewController, UITableViewDataSource, UITableViewDelegate { To get rid of the error, let’s grab the code! Switch back to the ListsVC.swift tab.
-
Highlight all of the following code (three MARK comments and the methods underneath the first two comments), and press Cmd–C to copy them:
// MARK:—TableView DataSource methods————————————Two Methods Omitted To Save Space
// MARK:—TableView Delegate methods————————————Method Omitted To Save Space
// MARK:—UI responsive methods———————————— Return to the ListItemsVC tab.
-
Press Cmd–V to paste the methods where indicated:
override func viewDidLoad() {
      super.viewDidLoad()
   }


// MARK:—TableView DataSource methods————————————
Code & Additional Mark Comment Omitted To Save Space
// MARK:—UI responsive methods————————————

   @IBAction func addItemButtonTapped(_ sender: Any) {

   }
Using the Edit All in Scope Shortcut to Quickly Edit Code
-
When editing code, you often want to replace all instances of a word (such as a variable reference) with a different word. Let’s see how we can do this. In the first TableView DataSource method (numberOfRowsInSection), highlight the word lists. It’s shown in bold below to help you find it:
func tableView(_ tableView: UITableView, numberOfRowsInSection section: Int) -> Int { return lists.count }NOTE: Remember that this method tells the tableView how many rows it has.
Cmd–click on the highlighted word, and select Edit All in Scope.
-
This will highlight every instance of the word lists. There are three. Check the following methods to make sure the bolded word is highlighted in a gray box.
- Table View DataSource cellForRowAt method:
listTitleTVCell.listTitleLabel.text = lists[indexPath.row].title- Table View Delegate commit method:
lists.remove(at: indexPath.row)NOTE: Remember that the cellForRowAt data source method draws the contents of the Table View Cell. The line we want to edit displays the title the user sees in each cell. The delegate’s commit method allows us to delete a cell. The line we want to edit removes the information from the model, before the corresponding info gets deleted from the Table View Cell in our UI.
-
Replace the highlighted text with list.items and make sure the change got applied in all three places as shown in bold:
- Table View DataSource numberOfRowsInSection method:
func tableView(_ tableView: UITableView, numberOfRowsInSection section: Int) -> Int { return list.items.count }- Table View DataSource cellForRowAt method:
listTitleTVCell.listTitleLabel.text = list.items[indexPath.row].title- Table View Delegate commit method:
list.items.remove(at: indexPath.row) Remember that the list variable is an array that contains objects of the List class—we declared it at the top of the file. The items variable is also an array, but it was declared in our model. Switch to the Data Model.swift tab so we can take a look.
-
Inside the List class, find the items variable we just referenced:
var items = [ListItem]() { didSet { items.sort() { $0.title < $1.title } } }This variable is an array of instances of the ListItem class. Like the global lists variable we just replaced, it also has a didSet property observer that makes sure any new instance of the ListItem class gets added to the array.
This variable refers to the ListItem class, but was declared in the List class. If you remember from the previous exercise, this means the List class can have many ListItems. This is why in the code we just edited, we had to go into the list variable (of type List) before we could access the items property you see now.
To edit more Table View Data Source code, switch back to the ListItemsVC.swift tab.
-
In the second TableView DataSource method (cellForRowAt), highlight the word listTitleTVCell. There are three instances. It may be easiest to find the last one, which is listed below in bold:
return listTitleTVCell Let’s Edit All in Scope so we can replace it in all three places. To speed up the workflow even more, we can use a keyboard shortcut. With the word selected, press Cmd–CTRL–E. This should highlight the other two instances.
-
Replace it with listItemTVCell so the following lines now look like:
func tableView(_ tableView: UITableView, cellForRowAt indexPath: IndexPath) -> UITableViewCell { let listItemTVCell = tableView.dequeueReusableCell(withIdentifier: "ListTitleTVCell", for: indexPath) as! ListTitleTVCell listItemTVCell.listTitleLabel.text = list.items[indexPath.row].title return listItemTVCell } -
Edit the rest of the cellForRowAt method code as shown in bold:
func tableView(_ tableView: UITableView, cellForRowAt indexPath: IndexPath) -> UITableViewCell {
   let listItemTVCell = tableView.dequeueReusableCell(withIdentifier: "ListItemTVCell", for: indexPath) as! ListItemTVCell
   listItemTVCell.itemNameLabel.text = list.items[indexPath.row].title
   return listItemTVCell
}
NOTE: Even though the identifier and the type we’re casting the cell as are the same word, Xcode will not allow you to change both at once. This is because one is a literal string and the other is a type. Context matters when editing all in scope!
Let’s next copy the code inside the interactive method that gets fired when the Plus (+) button is pressed. Switch to the ListsVC.swift tab for the first View Controller.
-
In the UI responsive methods section, highlight the three lines inside the addListButtonTapped method, and press Cmd–C to copy them:
if newListNameTextField.text == "" { return }
lists.append(List(listTitle: newListNameTextField.text!)!)
listsTableView.reloadData()
Switch back to the ListItemsVC.swift tab so we can paste the code.
-
At the bottom of the file in the addItemButtonTapped method that serves the same purpose as the method we copied from, press Cmd–V to paste the three lines:
@IBAction func addItemButtonTapped(_ sender: Any) {
   if newListNameTextField.text == "" { return }
   lists.append(List(listTitle: newListNameTextField.text!)!)
   listsTableView.reloadData()
}
Each line will have a red error because they refer to outlets that our List Items View Controller doesn’t know about. Unfortunately, that means we can’t use the Cmd–CTRL–E shortcut to Edit All in Scope.
-
Manually edit the code as follows:
@IBAction func addItemButtonTapped(_ sender: Any) {
   if newItemNameTextField.text == "" { return }
   list.items.append(ListItem(itemTitle: newItemNameTextField.text!)!)
   itemsTableView.reloadData()
}
NOTE: Remember that this method adds a new instance of the ListItem class to our data model before it syncs the Table View to match. Because of the protection in the first line, it will only add a new item if the text field outlet isn’t empty. To instantiate a new ListItem, we need to pass in its title as an argument to the itemTitle parameter. (This was declared in the init method for the class in our data model.)
Changing the Check Button’s Image When a User Taps It
The ListItem class in our data model has two attributes. In addition to the title property that gets filled in with whatever name the user inputs in the text field at the top of the UI, it has a boolean value called checked. This property models whether an item is complete or not. When a user adds a new list item, they likely have not finished that task. So it’s set to false by default.
We want to use this value to change the Check button image that gets displayed next to the item title. In order to do that, we’ll need to add a new variable.
In a previous exercise, we added an action to change the button image in the file for the Table View Cell. This means we need to declare the variable there. To open it in a new tab, press Cmd–T and in the Project navigator click on ListItemTVCell.swift.
-
Add the implicitly unwrapped optional item property as shown below:
@IBOutlet weak var checkButton: UIButton!
@IBOutlet weak var itemNameLabel: UILabel!

var item: ListItem!

@IBAction func checkButtonTapped(_ sender: Any) {
Let’s give this variable a value! Return to the ListItemsVC.swift tab.
-
In the Table View DataSource section’s cellForRowAt method, tell the item variable that it corresponds to its row number in the parent Table View. This is so it can display the title and whether the item is checked or not:
func tableView(_ tableView: UITableView, cellForRowAt indexPath: IndexPath) -> UITableViewCell {
   let listItemTVCell = tableView.dequeueReusableCell(withIdentifier: "ListItemTVCell", for: indexPath) as! ListItemTVCell
   listItemTVCell.item = list.items[indexPath.row]
   listItemTVCell.itemNameLabel.text = list.items[indexPath.row].title
   return listItemTVCell
}
Remember that implicitly unwrapped optional properties do not have a value when their containing class gets initialized. The first line with the let listItemTVCell declaration instantiates the class, then the item variable gets a value.
-
Now that we assigned the item to the value of list.items
[indexPath.row], the code right below the new line is pretty redundant. Make your code simpler and easier to understand by replacing it as shown in bold:listItemTVCell.item = list.items[indexPath.row] listItemTVCell.itemNameLabel.text = listItemTVCell.item.titleRemember that because we declared the item property in the Table View Cell file, we need to first go into that cell.
Now that the item variable has a value, let’s use it to set the row’s image! Return to the ListItemTVCell.swift tab.
-
The checkButtonTapped method will execute whenever the user taps on the Check button, which by default is not checked. Tell the method about this default:
@IBAction func checkButtonTapped(_ sender: UIButton) { item.checked =!item.checked } -
Use the predefined setImage method to assign an image to the checkButton (the outlet that corresponds to the button) as shown:
@IBAction func checkButtonTapped(_ sender: UIButton) {
   item.checked =!item.checked
   checkButton.setImage(UIImage(named: "Unchecked"), for:.normal)
}
NOTE: In the normal control state, the button is neither pressed nor selected.
-
We have two potential images, so we need to make this line into a conditional. Because we have a single condition to test and only two possible answers, we can use a ternary conditional operator. Add the condition as shown in bold:
checkButton.setImage(item.checked ? UIImage(named: "Unchecked"), for:.normal) -
We are asking if the item property is checked. The code we have specifies what will happen if it is NOT checked, so to get rid of the error we will need to add the other condition. Tell the setImage method which image to assign if it evaluates as true and the item property is checked:
checkButton.setImage(item.checked ? UIImage(named: "Checked") : UIImage(named: "Unchecked"), for:.normal)Remember that in a ternary conditional operator, there is a question mark (?) after the condition you’re testing, and a colon (:) between the if and else conditions.
Now that we’ve finished programming our second View Controller, our segue should work. To find out, go to the top left and click the Run button
 .
.On the first screen that appears, click in the Add new list text field. Type the name of a list (such as Groceries) and click the Plus (+) button to add it.
-
Now comes the moment of truth! Click on the name of your list.
Success, we can see the next screen—the one with yellow separators that corresponds to our List Items View Controller!
Click in the Add new item text field. Type the name of an item that’s appropriate for the list you clicked on (such as Ice cream or Kale for a list of groceries) and click the Plus (+) button to add it.
Add a few more items to the list.
Hover over an item name and drag to the left. Click the red Delete button to remove the list from the screen, after it’s been taken out of the data model.
Next to one of the items, click the Check button to see the image change to the Checked image
 . Click it again to see it change back to the Unchecked image
  .
.Feel free to check and uncheck more items to see their button images change.
Changing the Navigation Item’s Tint & Title
-
At the top of the screen underneath the Carrier, notice the
<Lists back button. Click it to return to the previous screen, then click back on your list name to return to the screen with List Items.This is the navigation item. We’re seeing this because we’re using a Navigation Controller. Because we set up our segue correctly, it’s working well. However, that color does not go well with our app’s color scheme. No worries—we can change it!
-
We also think the navigation item’s title in the middle of the navigation bar could use some improvement. Take a look at the following comparison:

By default, it will say List Items because that’s the title we gave the navigation item in the Storyboard. If this text stays static, the user may get confused and forget which list they are looking at! We think the user experience will be much better if the user sees the name of the list they tapped on, similar to the image on the right.
Back in Xcode, switch to the Main.storyboard tab so we can change the color of the navigation item.
Make sure the Document Outline is showing. Then go there and expand into Navigation Controller Scene > Navigation Controller > Navigation Bar.
Show the Utilities by going to the top right and clicking the button
 .
.In the Attributes inspector
 , scroll down to the View section’s Tint menu (not the Navigation Bar section’s Bar Tint menu!).
Remember that by default, buttons and other interactive elements such as our back button are tinted blue. Click on the word Default and choose Black Color.
To make the text in the navigation item’s title dynamic, we need to add a line of code to our segue’s method. That’s in the ListsVC.swift tab, so switch to it now.
-
In the prepare method at the bottom, set the title of the navigationItem:
override func prepare(for segue: UIStoryboardSegue, sender: Any?) {
   let listItemsVC = segue.destination as! ListItemsVC
   listItemsVC.list = lists[(listsTableView.indexPathForSelectedRow?.row)!]
   listItemsVC.navigationItem.title = listItemsVC.list.title
}
Remember that listItemsVC is our second View Controller (the segue’s destination). We’re setting the title of its navigationItem (the visual component) to be the same as the title of the current list—the one the user clicked on. (Remember that this list info comes from our model.)
Let’s take a look at our improved navigation item! Click the Run button
once more.Once the app loads, use the text field and Plus (+) button to add a few list names to the “list of lists” here on the first screen. In order to test the new dynamic titles that should appear on the next screen, make sure to add at least two.
-
Click on one of your lists to segue to the next screen.
The
<Lists back button is black! Additionally, you should see the name of the list you clicked on displayed to the right of the back button. Much better! Click the
<Lists button to return to the previous screen.-
Click on another list name to see the appropriate title displayed in the center of the navigation item. Nice and dynamic.
By now, you might be a bit miffed that you have to keep inputting new lists and list items every time you restart the Simulator. That’s why in the next exercise, we’ll explore a way to make the app store the data the user inputs so it maintains the same information between app launches.
Save the file and keep Xcode open so that we can continue with this project in the next exercise.