Dive into this comprehensive GreenSock tutorial and learn how to animate a rocket launch sequence using special GSAP eases like RoughEase and SteppedEase, ensuring impeccable timing and adding character to your animation.
This exercise is excerpted from Noble Desktop’s past web development training materials created in partnership with GreenSock. It is compatible with GreenSock version 2. To learn current skills in web development, check out our coding bootcamps in NYC and live online.
Topics Covered in This GreenSock Tutorial:
Animating the Rocket with RoughEase, Animating the Flames with SteppedEase, Fine-tuning the Timing & Launching the Rocket
Exercise Preview
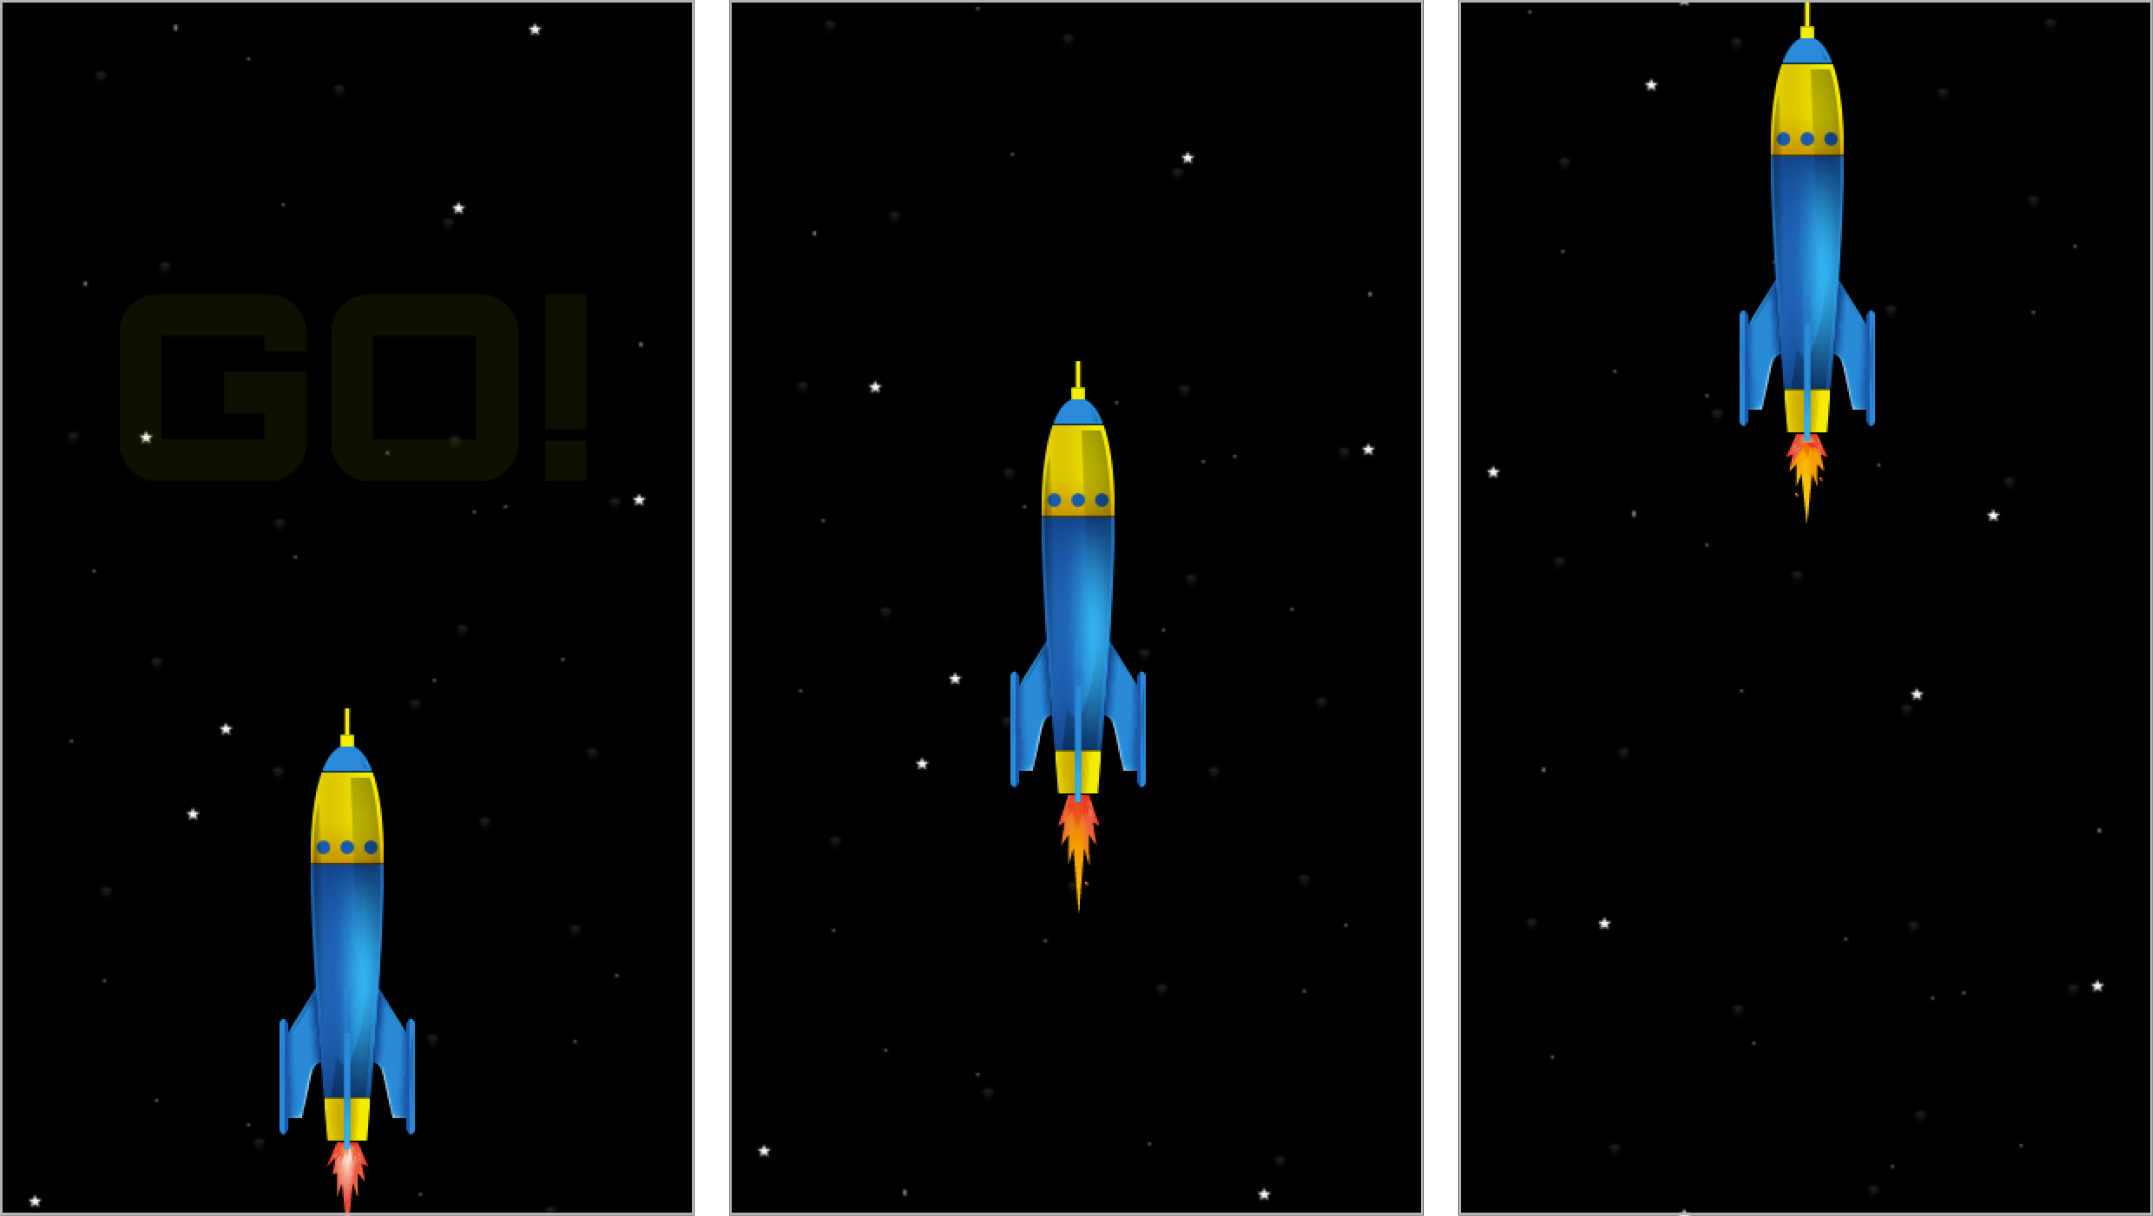
Image courtesy of istockphoto: visual go, Image #22009478

Exercise Overview
In this exercise, we will continue building the Rocket Launch sequence, incorporating some special GSAP eases like RoughEase (to make the rocket jitter and shake) and SteppedEase (to loop the four graphics of flames shooting out of the rocket).
-
If you skipped the last exercise or just feel like taking another peek at the finished file, open Desktop > Class Files > yourname-GSAP Class > Rocket Launch Done > index.html in a browser.
If you don’t feel like viewing the finished animation again, go on to the next step.
Experimenting with RoughEase
In your code editor, open yourname-GSAP Class > Rocket Launch Special Eases > index.html (or the whole folder if your code editor allows).
If you like, preview the page in the browser. It’s in the exact same condition as we left it at the end of the previous exercise.
-
Let’s get to work on the rocket animation! In your code editor, add the following bold code at the end of the timeline (around line 82):
.to($countDown, 0.5, {scale:2, opacity:0})
.to($rocket, tl.duration(), {y:-400}, 0)
The duration of this tween is equal to the entire timeline’s duration() and we have set the position parameter to 0. This means that the rocket animation will start at the very beginning of the timeline and will last as long as all the other tweens combined.
Save the file and preview in a browser. Great, as the countdown animation plays, the rocket glides smoothly upwards.
-
Return to your code editor and add the following RoughEase (without any of its optional parameters so we can see its defaults) to shake up the
$rocket animation:.to($rocket, tl.duration(), {y:-400, ease:RoughEase.ease}, 0) -
Save the file and preview in a browser.
The effect of the RoughEase is quite obvious; the rocket’s motion appears very choppy. RoughEase can be customized to produce a range of effects, from smooth pulses to wildly erratic and randomized motion.
How RoughEase Works
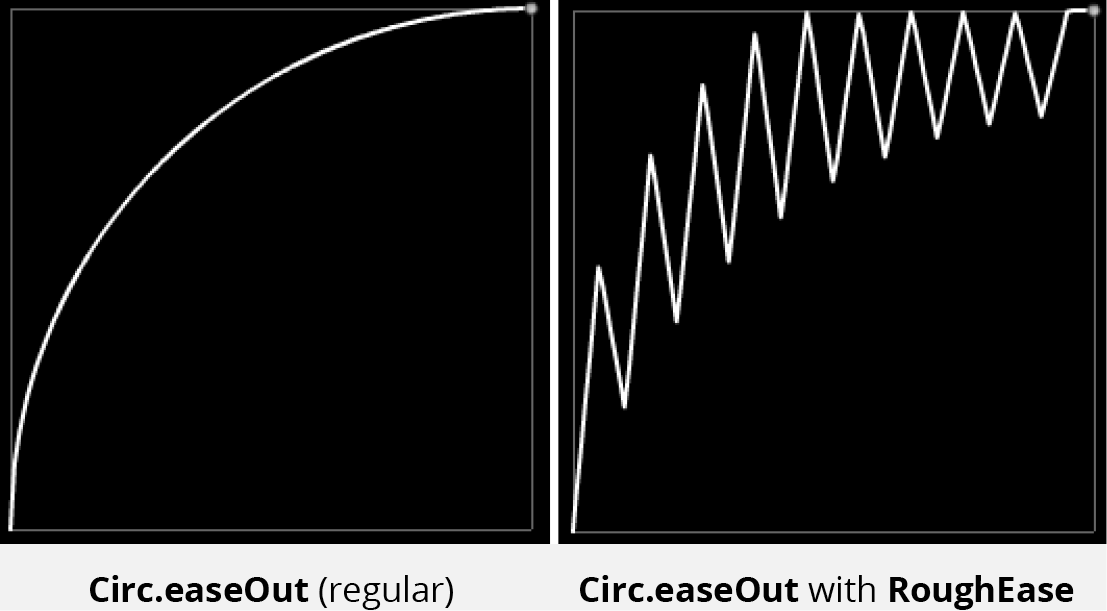
RoughEase takes a given ease (by default, Linear.easeNone) and creates irregularities in the ease’s natural curve by randomly inserting points outside the curve. These images should make that concept a bit clearer:
This ease can be configured with up to six (entirely optional) parameters:
template: The overall ease pattern that RoughEase follows. The default is Linear.easeNone but Circ.easeOut is shown above. strength: How far from the template ease the points are allowed to wander. points: The number of points to be plotted along the ease. clamp: This can be set to true or false to keep points within a certain range. taper: This can be used to increase/decrease a tween’s roughness near the beginning or end. randomize: This can be set to true or false to create an even zigzag or random values. To see RoughEase in the Ease Visualizer where you can experiment with these parameters and see the resulting graphs, visit: greensock.com/docs/Easing/RoughEase
Adding Strength & Points Parameters to RoughEase
Let’s customize the look of our animation by experimenting with two of the RoughEase parameters, strength and points.
-
Return to your code editor and add the following bold code to the
$rocket tween:.to($rocket, tl.duration(), {y:-400, ease:RoughEase.ease.config({strength:5})}, 0) Save the file and preview in a browser. Wow, that’s much more dramatic—the rocket’s range of motion is more extreme.
-
Return to your editor and experiment with the points parameter as shown in bold:
.to($rocket, tl.duration(), {y:-400, ease:RoughEase.ease.config({strength:5, points:100})}, 0)Introducing more points will create many more points on the graph of the ease’s motion, making the rocket bounce like crazy.
Save the file and preview in a browser. Wow, that’s totally bonkers. It’s interesting that we’re able to create that effect, but it’s not suited to this particular animation.
-
Return to your code editor and make the following change to make the rocket gently shudder and shake:
.to($rocket, tl.duration(), {y:1, X:2, ease:RoughEase.ease.config({strength:5, points:100})}, 0)These X and y coordinates will limit the range of motion to 1 pixel up-and-down and 2 pixels left-and-right, providing the subtlety we want.
-
Save the file and preview in a browser. The rocket now has a cool-looking randomized jitter—it really looks like it’s gearing up to take off!
Feel free to experiment with the X and y coordinates, making the tween more or less dramatic and choosing the settings that look good to you. RoughEase can provide some sophisticated-looking effects with very little work on the animator’s part!
Animating the Flames with SteppedEase
This whole time we’ve been staring at the sprite of the four states of the rocket’s flame. Let’s create an animation that displays each of these four states in rapid succession, flickering between them very quickly.
Each flame-image is 24 pixels wide, so we will have to shift the sprite 24 pixels to the left repeatedly to get the flickering effect. We will also have to make sure that only one flame is visible at a time, perfectly centered beneath the rocket (it would look really strange to see half of one state, and half of another).
Return to your code editor.
-
Check out the CSS that controls the flames element on lines 33–41:
#flames {
   position:absolute;
   top:249px;
   left:27px;
   width:96px;
   height:84px;
   background:url(img/flames.png);
   overflow:hidden;
}
The full width of the flames image is 96 pixels wide (24 pixels * 4 = 96). We will eventually change the CSS so the image is only 24 pixels wide (thus displaying one image at a time) but for now we will leave it the full 96-pixel width to fully demonstrate the behavior of a new ease: SteppedEase.
Most easing equations provide a smooth, gradual transition between start and end values. However, there are situations (like this one) where a transition should happen in abrupt steps. SteppedEase is a simple way to define a specific number of steps in a transition.
How SteppedEase Works
SteppedEase provides an easy way to define a specific number of steps that the transition should take. For example, if element is at an X position of 0 and you wanted to tween the X value to 100 with 5 steps over the course of 2 seconds, you would type:
TweenLite.to(element, 2, {X:100, ease:SteppedEase.config(5)});This code would snap the X value to 20px increments: 20px, 40px, 60px, 80px, and 100px.
To see SteppedEase in the Ease Visualizer, visit the docs at: greensock.com/docs/Easing/SteppedEase
-
Before adding the SteppedEase, add the following bold code at the end of the timeline, creating a tween that starts from the current position and shifts the backgroundPosition of the
$flames so that the fourth flame is displayed right under the rocket:.to($rocket, tl.duration(), {y:1, X:2, ease:RoughEase.ease.config({strength:5, points:100})}, 0) .to($flames, 2, {backgroundPosition:"-72px 0px", repeat:25}) Save the file and preview in a browser. Cool, there is a repeating tween that moves from frame one to frame four! Now we’re ready to add in SteppedEase.
-
Return to your code editor and add the following bold code (keep it all on one line):
.to($flames, 2, {backgroundPosition:"-72px 0px", ease:SteppedEase.config(3), repeat:25})We have created the SteppedEase with three steps. Aren’t there four flames? It’s important to understand that an ease with three steps actually has four positions, which refer to the left boundary of the visible flame image:
Start: 0 Step One: –24 Step Two: –48 Step Three: –72 -
Save the file and preview the page in a browser.
After the countdown plays, the flames cycle through all four images, and they’re all perfectly centered under the rocket. We’re on our way!
-
Return to your code editor and speed up the animation with this change:
.to($flames, 0.2, {backgroundPosition:"-72px 0px", ease:SteppedEase.config(3), repeat:25}) -
Scroll up to the CSS that controls the flames on lines 33–41 and make the following bold change to the width:
#flames {
   position:absolute;
   top:249px;
   left:27px;
   width:24 px;
   height:84px;
   background:url(img/flames.png);
   overflow:hidden;
}
Save the file and preview in a browser. Looks excellent, the image changes much faster now, and the extra states are hidden.
Fine-Tuning the Timing
-
Let’s take a moment to strategize what needs to happen next. The flames should really appear at the exact instant that the countdown says GO! In fact, several things should happen at that moment.
- The flames should appear.
- The flames should start animating.
- The rocket should launch.
- The starry background should start scrolling.
Let’s use a handy label to synchronize all these events. Return to your code editor.
-
Create a label at the beginning of the GO! tween by adding the following bold code around line 80:
.set($countDown, {text:"GO!", scale:0}, "go").to($countDown, 0.5, {scale:2, opacity:0}) -
Add the same label to the flames tween to ensure that it starts animating at the exact right moment:
.to($flames, 0.2, {backgroundPosition:"-72px 0px", ease:SteppedEase.config(3), repeat:25}, "go") -
Save the file and preview in the browser. The change is subtle; the flames start animating at the very moment the word GO! appears (not after it fades away).
Let’s add a tween that will hide the flames until that moment, and make them appear at the same label.
-
Return to your code editor and add the following bold tween:
.to($flames, 0.2, {backgroundPosition:"-72px 0px", ease:SteppedEase.config(3), repeat:25}, "go")
.from($flames, 0.2, {y:-40, opacity:0}, "go")
Save the file and preview the page in the browser. Great, the flames appear and animate at the right time, at the
"go"label. This is the sort of super-detailed and precise synchronization at which GSAP excels.
Launching the Rocket
All right, we’ve done the hard work of learning about two new eases. Let’s launch this puppy!
-
Return to your code editor and add:
.from($flames, 0.2, {y:-40, opacity:0}, "go")
.to($rocket, 1, {y:-800, ease:Power2.easeIn}, "go")
Again, we are using the
"go"label to synchronize everything. Save the file and preview in the browser. We have liftoff!
-
Let’s get the star background (
$demo) scrolling. Return to your code editor and add the new tween shown in bold below:.from($flames, 0.2, {y:-40, opacity:0}, "go").to($rocket, 1, {y:-800, ease:Power2.easeIn}, "go") .to($demo, 3, {backgroundPosition:"0px 4000px", ease:Power1.easeOut}, "go") -
Save the file and preview in the browser. Looks great!
Finally, let’s place the rocket at the very bottom of the starfield. This will give the impression that it’s resting on a launch pad off-screen. To do this, you can simply change its position in the CSS.
-
Return to your code editor and make the following change to the rule for #rocket (around line 22):
#rocket { position:absolute; top:446 px; left:160px; width:78px; height:254px; } -
Save the file and preview the page in the browser.
Perfect. All of the pieces have come together. We created 10 tweens working together in a finely-tuned sequence with impeccable timing. Additionally, we learned about two very cool eases, RoughEase and SteppedEase, which can both streamline your workflow while adding more character and complexity to your animation.