Learn to create an interactive image slider using JavaScript and jQuery with our detailed tutorial, covering topics such as jQuery's $(document).ready() function, triggering tweens with jQuery's click() method, tracking code changes in Chrome's DevTools, and using conditional logic to reset an animation.
This exercise is excerpted from Noble Desktop’s past web development training materials created in partnership with GreenSock. It is compatible with GreenSock version 2. To learn current skills in web development, check out our coding bootcamps in NYC and live online.
Topics Covered in This GreenSock Tutorial:
Using JQuery, JQuery’s $(document).ready() Function & Creating Variable References, Using JQuery’s Click() Method to Trigger a Tween, Tracking Code Changes in Chrome’s DevTools, Using Conditional Logic to Reset an Animation
Exercise Preview

Exercise Overview
In this exercise, you’ll build a basic image slider that allows you to navigate seamlessly through a series of images. We’ll introduce you to some very basic JavaScript and jQuery concepts that you’ll be using throughout the class to add interactivity and logic to your animations.

Previewing the Finished Animation
To take a look at the animation we’ll be building, open up Google Chrome.
-
Hit Cmd–O (Mac) or CTRL–O (Windows), navigate to Desktop > Class Files > yourname-GSAP Class > Image Slider, and double–click on finished.html.
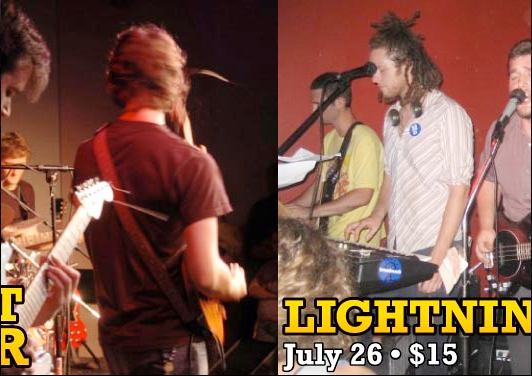
This page has a photo announcing a Battle of the Bands event. Sounds fun, but it could be a little too chaotic after a long day. Let’s find out if there are other events.
-
At the bottom right of the graphic right under the guitar, click the next button.
A photo advertising The Blast of Valor’s July 31 performance slides over, as shown in the exercise preview at the top of the page.
Hit the next button two more times to cruise through the remaining images.
-
Low Lustre’s photo is the last in this series of four images. Click next again and the image slides back to the beginning image, as shown below. Nice!

Hit next as many times as you need to get a feel for the animation.
Examining the DOM Structure
In a code editor, open start.html from the Image Slider folder.
-
Take a look at the code from lines 47–54 to familiarize yourself with the basic DOM structure. Key elements, IDs, and class names are shown in bold below:
<div class="sliderWrapper"> <div id="sliderImages"> <img src="img/scroll-battle.jpg" width="530" height="375"><img src="img/scroll-blast.jpg" width="530" height="375"><img src="img/scroll-bugs.jpg" width="530" height="375"><img src="img/scroll-lustre.jpg" width="530" height="375"> </div> </div> <div class="nav"> <div id="nextButton" class="button buttonRight">next</div> </div>- The element with a class of sliderWrapper is the parent element in which sliderImages sits. The parent is necessary as a sort of “window” through which we’ll see one image at a time.
- We’ll create a movable strip of four images by moving sliderImages within the prescribed width and height of sliderWrapper.
- The nextButton element will trigger the tween.
-
Preview start.html in a browser. All four images are displayed in a horizontal strip, as shown below. You may need to scroll to the right to see all the images.

-
Below the guitar in the first image, press the next button. Nothing happens yet.
We need to hide everything but the first image and make the next button functional. Modifying the CSS can help with the first task and adding some JavaScript will help with the latter.
Creating a 530 X 375 Window to Hide All but One Image
Return to your code editor.
Around line 10, find the CSS rule for the parent element, the .sliderWrapper. Note that the wrapper has its width set to 530px and its height set to 375px. This is the width and height of the images.
-
In order to have the browser only show what’s in the 530 X 375 area, add the following bold property to the rule for .sliderWrapper:
.sliderWrapper {
   position: relative;
   width: 530px;
   height: 375px;
   white-space: nowrap;
   margin: 50px auto 0 auto;
   overflow: hidden;
}
Save the file and preview the page. The next button does not work yet, but now we can only see one image at a time. Awesome, let’s start tweening!
Using JQuery
We will be using the popular jQuery library throughout this course because it just makes working with JavaScript so much easier and lots of developers are familiar with it.
-
GSAP has absolutely no dependencies on jQuery, but it’s a good idea to use it in our animation projects. Let’s take a moment to examine why using it will streamline our workflow. jQuery excels at the following tasks:
- Manipulating the DOM (creating new DOM objects, moving them around)
- Performing calculations on DOM elements (getting width, finding position)
- Handling mouse events and browser events (click, mousedown, mouseup, ready, load, etc.)
Everything jQuery does is battle-tested to work across many browsers. GSAP’s only mission is animation. The two work swimmingly together.
For convenience, jQuery is already being loaded into your file.
-
Scroll down to the bottom of the page and notice the final script being loaded:
<script src="js/jquery/jquery-1.10.1.min.js"></script>You can learn more about jQuery at jQuery.com
NOTE: Because we want to support IE 8, we are using an older version of jQuery. jQuery 2.0 and up no longer supports versions of internet Explorer older than IE 9, so jQuery’s developers recommend using a 1.X version like this one until you are certain no IE 6/7/8 users are visiting your site.
JQuery’s $(document).ready() Function & Creating Variable References
-
Now that we are using jQuery, we are going to use a standard coding convention in our files moving forward: jQuery’s
$(document).ready() function. Inside the provided script tag at the bottom of the document (around line 67), type the following bold code:<script> $(document).ready(function() { }); </script>The purpose of this function is twofold:
- It ensures that our code is not run until the DOM is fully constructed.
- It protects our variables and functions from conflicting with other code on the page in other script tags.
For more info about this function, go to: api.jQuery.com/ready
-
In the
$(document).ready() function, type the variables shown in bold below. Make sure both variables end with a comma as we are not finished defining them all.$(document).ready(function() { var $slider = $("#sliderImages"), $nextButton = $("#nextButton"), });In this code, we are selecting elements in the DOM that we will be using. The
$slider is the element with the ID of sliderImages.$nextButton is the element with the ID of nextButton.Creating variables as references to the elements we want to tween is the most optimal approach because the DOM is only searched once. Additionally, we have decided, as a best practice, to prefix these variables with a dollar symbol (
$). This serves the sole purpose of reminding us that we’re using jQuery. -
Next we want to add a variable for the topmost DOM element we looked at earlier, the sliderWrapper class. To keep ourselves organized, let’s add it above the two existing variables. Place the cursor directly to the left of the
$next to$slider and hit Return or Enter. Make sure your code looks as follows:var $slider = $("#sliderImages"), -
We can also use jQuery to dynamically find a CSS property of an element. Above the two existing variables, add the following bold variable:
var slideWidth = $(".sliderWrapper").width(), $slider = $("#sliderImages"), $nextButton = $("#nextButton"),$(".sliderWrapper").width() dynamically finds the width of the slider. This means that if our CSS that controls the width of.sliderWrapper ever changes, we do not need to update our JavaScript variables. -
Finish declaring variables by adding the following variable shown in bold:
var slideWidth = $(".sliderWrapper").width(),
    $slider = $("#sliderImages"),
    $nextButton = $("#nextButton"),
    clickCount = 0;
Later on in this exercise, we’ll change the clickCount variable to keep track of which slide we are on.
Using JQuery’s Click() Method to Trigger a Tween
-
Let’s configure the
$nextButton to execute an animation when it is clicked. After the clickCount variable (around line 72), hit Return (Mac) or Enter (Windows) to give yourself some space and type the following code shown in bold:clickCount = 0; $nextButton.click(function() { }); }); -
click() is a common jQuery method that executes code when a user clicks a DOM element. In the curly braces, type the following bold code to add a tween that will move the images to the left:
$nextButton.click(function() {
   TweenLite.to($slider, 2, {X:-530});
});
For testing purposes, we’re using a very long duration of two seconds. If all goes well, the
$slider element will shift left along the X (horizontal) axis to –530, the width of an image. Take note of the negative value, as it is necessary to pull the image to the left rather than push it to the right. -
Note that we are using the X property instead of left. Since CSS transforms (X and y) tend to perform better than positional properties (top and left) we will use X and y in all lessons moving forward. CSSPlugin offers many conveniences when using CSS transforms. You can simply tell GSAP to tween X instead of
"transform:translateX()", or y instead of"transform:translateY()".CSSPlugin & CSS Transforms
When animating CSS transforms (rotation, scale, skew, X, y, rotationX, etc.) CSSPlugin does a lot of work behind the scenes. To make coding easier, CSSPlugin uses custom property names for CSS transforms:
CSS Property CSSPlugin Equivalent transform: translateX() X transform: translateY() y transform: rotate() rotation transform: scale() scale transform: scaleX() scaleX transform: scaleY() scaleY transform: skewX() skewX transform: skewY() skewY transform: rotateX() rotationX transform: rotateY() rotationY The following CSS transition code:
#id {
   transform: translateX(20px) rotate(45deg) scale(2);
   transition: 2s all;
}
Becomes this in GSAP:
TweenLite.to("#id", 2, {scale:2, X:20, rotation:45});Although modern browsers are moving towards dropping vendor prefixes for CSS3 properties, CSSPlugin will add them where appropriate. You do not have to worry about adding -moz-, -ms-, -webkit-, or -o- in any of the GSAP code you write. Whew!
NOTE: To see how CSSPlugin also works behind the scenes to deliver the best performance, see the CSSPlugin reference at the end of this book.
Save the file and preview the page in a browser.
Press the next button. Great, the next image scrolled!
-
Click the next button again. Nothing happens. Because we used the absolute value of –530, the animation already ran its course once the $slider’s X property tweened to that end value.
Each time we click the next button, we want to move an additional 530 pixels. You may remember that in a previous exercise we used relative values where we could set our end values relative to the current position of an element.
-
Seems like a decent enough solution—let’s try it out! In your code editor, change the X value in the TweenLite.to() method as shown in bold below:
TweenLite.to($slider, 2, {X:"-=530"});The relative value of
"–=530"means that every time we press the next button, we will subtract 530 pixels from the current X position. Save the file and preview the page in a browser.
Press the next button and wait two seconds for the tween to stop. Looks all right so far, but let’s see if the next image will show up.
Hit the next button again, and wait the full two second duration of the tween before hitting next again. The final image, Low Lustre, shows up just fine. Great!
This so-called solution isn’t as good as it first appears. Once the final image (Low Lustre) is showing, click the next button once more. Oops, there’s no image—only the background is showing.
Reload the browser by hitting Cmd–R (Mac) or F5 (Windows).
-
To see what happens if the user is a fast clicker and advances the animation before a tween is complete, click the next button and immediately click it again. The slider will pause in between images and look something like the screenshot below. Yuck!
Let’s do this the right way. We created a clickCount variable earlier. Return to your code editor so we can put this variable to good use.
Incrementing & Tracking ClickCount in Chrome’s DevTools
-
Before we can force the tweens to land on increments of 530, we first need to increase the clickCount variable each time the $nextButton is clicked. Inside the $nextButton.click function, before the tween, add the following bold code:
This code works as follows:$nextButton.click(function() { clickCount++; console.log(clickCount); TweenLite.to($slider, 2, {X:"-=530"});- clickCount++ tells the browser to increase the value of the variable by 1.
- console.log(clickCount) tells a browser’s JavaScript Console to keep track of the value of clickCount.
Save the file.
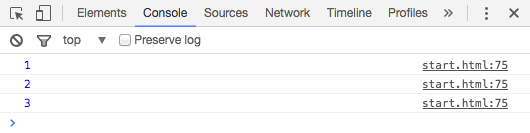
We will use the Console from Chrome’s DevTools. Switch back to Chrome or open (Cmd–O (Mac) or CTRL–O (Windows)) start.html in Chrome.
Hit Cmd–Opt–J (Mac) or CTRL–Shift–J (Windows) to bring up the Console tab of Chrome’s DevTools.
-
Hit next three times, paying attention to the Console below the slider. Every time you press the button, the number increases by one, as shown below:
Let’s use these values to shift the slideshow correctly. Switch to your code editor.
-
Replace the X value in the TweenLite.to() method (around line 77) with the following bold calculation:
console.log(clickCount);
TweenLite.to($slider, 2, {X:-clickCount * slideWidth});
By multiplying the current value of –clickCount (note the negative value, which pulls the slideshow left) by the slideWidth (530), we will be able to generate the correct end values of –530, –1060, and –1590.
-
Before we test this, let’s also speed up the duration of the tween. It was pretty sluggish before. Edit the TweenLite.to() method as shown in bold below:
TweenLite.to($slider, 0.5, {X:-clickCount * slideWidth}); Save the file and preview the page in a browser. No matter how fast you click, it works! Except for when we reach the last image—the first image does not reappear. In fact, we just see empty space.
Using Conditional Logic to Loop a Tween
We need to make sure clickCount never gets too big. We only want people to be able to click the next button three times to get to the final, fourth image.
To accomplish this, right after we increment clickCount, let’s write a conditional statement that says, “if clickCount is greater than 3, reset it back to zero.”
-
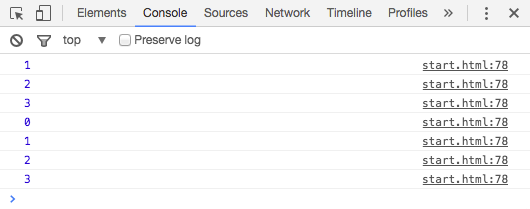
Input the following bold conditional statement directly under the clickCount increment operator (clickCount++) like so:
clickCount++;
if (clickCount > 3) {
   clickCount = 0;
}
console.log(clickCount);
NOTE: We left the console.log(clickCount) line of code in there so we can track the progress of clickCount and watch the conditional statement in action.
-
Save the file and preview the page in Chrome, watching both the slideshow and the Console.
-
In the Console, notice that the numbers you are generating for clickCount are always 0,1, 2, or 3. Great, this is exactly what we want!
While watching the slideshow, you’ll see that when we get to the last image, the slideshow rewinds back to the beginning because when you multiply zero by 530, you get a value of zero and this is the new X position we’re tweening to.
Well done!