Improve your GreenSock skills with our comprehensive tutorial, covering topics such as loading scripts, TweenLite, Tweening multiple properties, and easing. Learn how to incorporate the GreenSock Animation Platform into a project and animate basic CSS properties of an image. This tutorial will guide you step by step as you explore the features of the platform and put them into practice.
This exercise is excerpted from Noble Desktop’s past web development training materials created in partnership with GreenSock. It is compatible with GreenSock version 2. To learn current skills in web development, check out our coding bootcamps in NYC and live online.
Topics Covered in This GreenSock Tutorial:
Loading Scripts, Anatomy of a TweenLite Tween, the TweenLite.to() Method, Tweening Multiple Properties, Easing
Exercise Preview

Exercise Overview
In this exercise, you’ll learn how to incorporate the GreenSock Animation Platform (GSAP) into a project and animate some basic CSS properties of an image. We will explore the basic syntax of a TweenLite tween and show you just how easy and hassle-free animation can be with GSAP.

TweenLite, the core of the GSAP engine, handles animating just about any property of any object. It is relatively lightweight yet full-featured.
GSAP’s architecture lets you load just the files you need to keep overall file size small, or if you favor convenience, you can just load TweenMax which packages many of the core components into one file. For now we will focus on loading just what we need and as our projects require more features, we’ll jump over to using TweenMax.
Previewing the Finished Animation
To take a look at the animation we’ll be building, open up Google Chrome.
To open a file, hit Cmd–O (Mac) or CTRL–O (Windows).
-
Navigate to Desktop > Class Files > yourname-GSAP Class > Tweening Basics.
NOTE: All the folders you need for the exercises in this workbook are located in the yourname-GSAP Class folder.
-
Double–click on finished.html.
You will see the Noble Desktop icon rotating across the screen. Cool!
To see the transition again, you can hit Cmd–R (Mac) or F5 (Windows) to reload the browser. Feel free to do this until you get a solid feel for the animation.
Close Chrome.
Loading Scripts
In this exercise, we’ll be using three components of GSAP to enable the tweening of the CSS properties of a DOM element. We’ll animate using the core component TweenLite and two plugins: the CSSPlugin and EasePack.js.
-
In a code editor (such as Sublime Text, Dreamweaver, TextMate, Coda, etc.) open start.html from the Tweening Basics folder.
NOTE: You may want to open the Tweening Basics folder in your code editor if it allows you to (like Sublime Text does).
-
Let’s first get acquainted with the basic HTML and CSS in start.html. Look inside the body tag and around line 18 you will see:
<img id="icon" src="img/noble-icon.png" width="210" height="211"> -
Note that it has an ID of icon. We are going to be using that ID to identify this element as a target of our TweenLite tweens.
Before we start animating, we’ll need to link to the GSAP JavaScript files. Although in your actual production site, you can just paste a CDN link into your page, you’ll use local versions of the scripts that have already been downloaded and included with your Class Files. This will allow you to work offline if necessary.
-
Notice that there are two sets of script tags in the file—one for the CDN links and one for the tween you’ll add soon. Around line 20, find the following comment:
<!—load scripts after DOM has been rendered—> -
Below that comment, add the following bold code to load the scripts we need:
<!—load scripts after DOM has been rendered—>
<script src="js/gsap/TweenLite.js"></script>
<script src="js/gsap/plugins/CSSPlugin.js"></script>
<script src="js/gsap/easing/EasePack.js"></script>
These three lines of code are used to load TweenLite.js, CSSPlugin.js, and EasePack.js. This lightweight combo is a very common setup.
TweenLite is GSAP’s core engine, including basic easing equations: Power0, Power1, Power2, Power3, Power4, Linear, Quad, Cubic, Quart, Quint, and Strong.
CSSPlugin enables TweenLite to animate almost any CSS-related property of DOM elements. This includes the obvious properties (width, height, margin, padding, top, left) and more interesting ones like transforms (rotation, scaleX, scaleY, skewX, skewY, X, y, rotationX, and rotationY), colors, opacity, and lots more.
EasePack adds more advanced eases like: Elastic, SlowMo, Bounce, SteppedEase, RoughEase, Sine, Circ, and Expo.
Save your file.
Anatomy of a TweenLite Tween
-
In order to get up and running with any animation we need to know:
- What object is being animated
- How long the animation will last
- Which properties that are being animated and the end values of those properties
-
All these details of the animation are going to be passed into TweenLite’s to() method as (do not type this code—it is just an example):
TweenLite.to( target:Object, duration:Number, vars:Object )target: The object or objects that are being tweened. duration: How long (in seconds by default) our animation will run. vars: A JavaScript object containing property:value pairs and special properties like eases, callbacks, and delays. The TweenLite.to() API docs: greensock.com/docs/TweenLite/static.to() contain more details, but we’ll walk through it step-by-step below.
Using the TweenLite.to() Method
-
Let’s first create a variable for the element we want to tween. In the script tag under the add your own script comment, add the following code as shown in bold:
<!—add your own script—>
<script>
   var icon = document.getElementById("icon");
</script>
Our variable is called icon because that is the ID of the image we will tween.
Now that we have selected the item we want to tween, let’s tween it!
After the line of code you just wrote, hit Return (Mac) or Enter (Windows) three times to create some space.
-
In the second line of whitespace, type the following method shown in bold:
var icon = document.getElementById("icon"); TweenLite.to(); </script> -
Input the following bold parameters to the TweenLite.to() method:
TweenLite.to(icon, 2, {opacity:0}); -
The TweenLite.to() method takes three parameters. Let’s break that down:
- The first parameter in the TweenLite.to() method must always be the target (the object(s) you want to tween), in this case icon.
- The second parameter is always the duration over which the animation takes place, in this case 2 seconds.
- The third parameter, the vars object {}, is an object defining the end values for each property that should be tweened. In this example the opacity property is being tweened to a value of 0.
The vars object {} can contain multiple tweenable properties as well as special properties like callbacks, eases, delays and more. We’ll discuss each of these in depth as we progress.
Save the file by hitting Cmd–S (Mac) or CTRL–S (Windows).
-
Preview start.html in a web browser.
NOTE: Most code editors have a shortcut to make previewing a page in a browser easier (some are shown below). If your code editor doesn’t have a shortcut, go to your browser, hit Cmd–O (Mac) or CTRL–O (Windows), navigate to yourname-GSAP Class > Tweening Basics and double–click start.html to open it.
Browser Preview Shortcuts
If you are using Sublime Text with SideBarEnhancements installed and have set your user key bindings in the Before You Begin section at the beginning of the workbook, hit F12 (or fn–F12 depending on your keyboard settings) to open the saved HTML document in your default browser.
This typically does not work on a Mac unless you disable/change the Show Dashboard keyboard shortcut in System Preferences > Mission Control (or Keyboard).
If you are using Dreamweaver, go to File > Preview in Browser.
-
Notice that the opaque icon takes two seconds to fade out and become completely transparent. The icon is shown mid-fade in the screenshot below:

If you need to see the animation again, remember that you can hit Cmd–R (Mac) or F5 (Windows) to reload the browser.
We recommend leaving start.html open in your browser as you work, so you can simply reload the page to see the changes you make in your code.
Tweening Multiple Properties
You can input any number of CSS properties within the curly braces (within reason). Let’s keep the opacity tween and add a rotation tween.
-
Return to your code editor and type the following bold code. Remember to add a comma to separate the properties!
TweenLite.to(icon, 2, {opacity:0, rotation:360});NOTE: The order in which properties are listed doesn’t matter. You may also notice that we did not need any pesky vendor-prefixes to rotate an element in GSAP. For a contrast with CSS transforms, see the sidebar at the end of the exercise.
Let’s see what this looks like now. Save the file and preview the page in a browser.
-
Over the course of two seconds, the object tweens to an opacity of zero AND rotates 360°. Spiffy!

Return to your code editor.
-
Delete the opacity property so that the TweenLite.to() method looks like this:
TweenLite.to(icon, 2, {rotation:360});This will make it easier to see some of the changes to the animation we’ll try next.
-
Let’s make the icon slide to the right, as seen in the finished file. To do that, we want to animate the left property. Type the bold code as shown below:
TweenLite.to(icon, 2, {rotation:360, left:400}); -
Save the file and preview the page in a browser.
While the object is rotating, the left position isn’t budging. This is because the icon element does not have a CSS position property.
Return to your code editor.
-
In order to tween a positional property of an element, that element MUST have a CSS property of absolute, relative, or fixed. Around line 12, add the following bold code to the CSS rule for #icon:
#icon {
   position: relative;
}
Save the file and preview the page in a browser. The icon is rotating and moving to the right, just like we intended. Awesome!
Easing
An ease alters the rate of change during a tween, giving the movement a different feel. There are many different eases we can add to the tween. TweenLite includes eases like the Power series, Quad, Cubic, and more. The EasePack file adds more advanced easing options to your repertoire.
To get an idea of the eases that are available in GSAP, check out the Ease Visualizer tool on GreenSock’s website: greensock.com/ease-visualizer
-
You will see the following interface. There is a menu of eases on the right which allows you to select an ease and preview its animation.
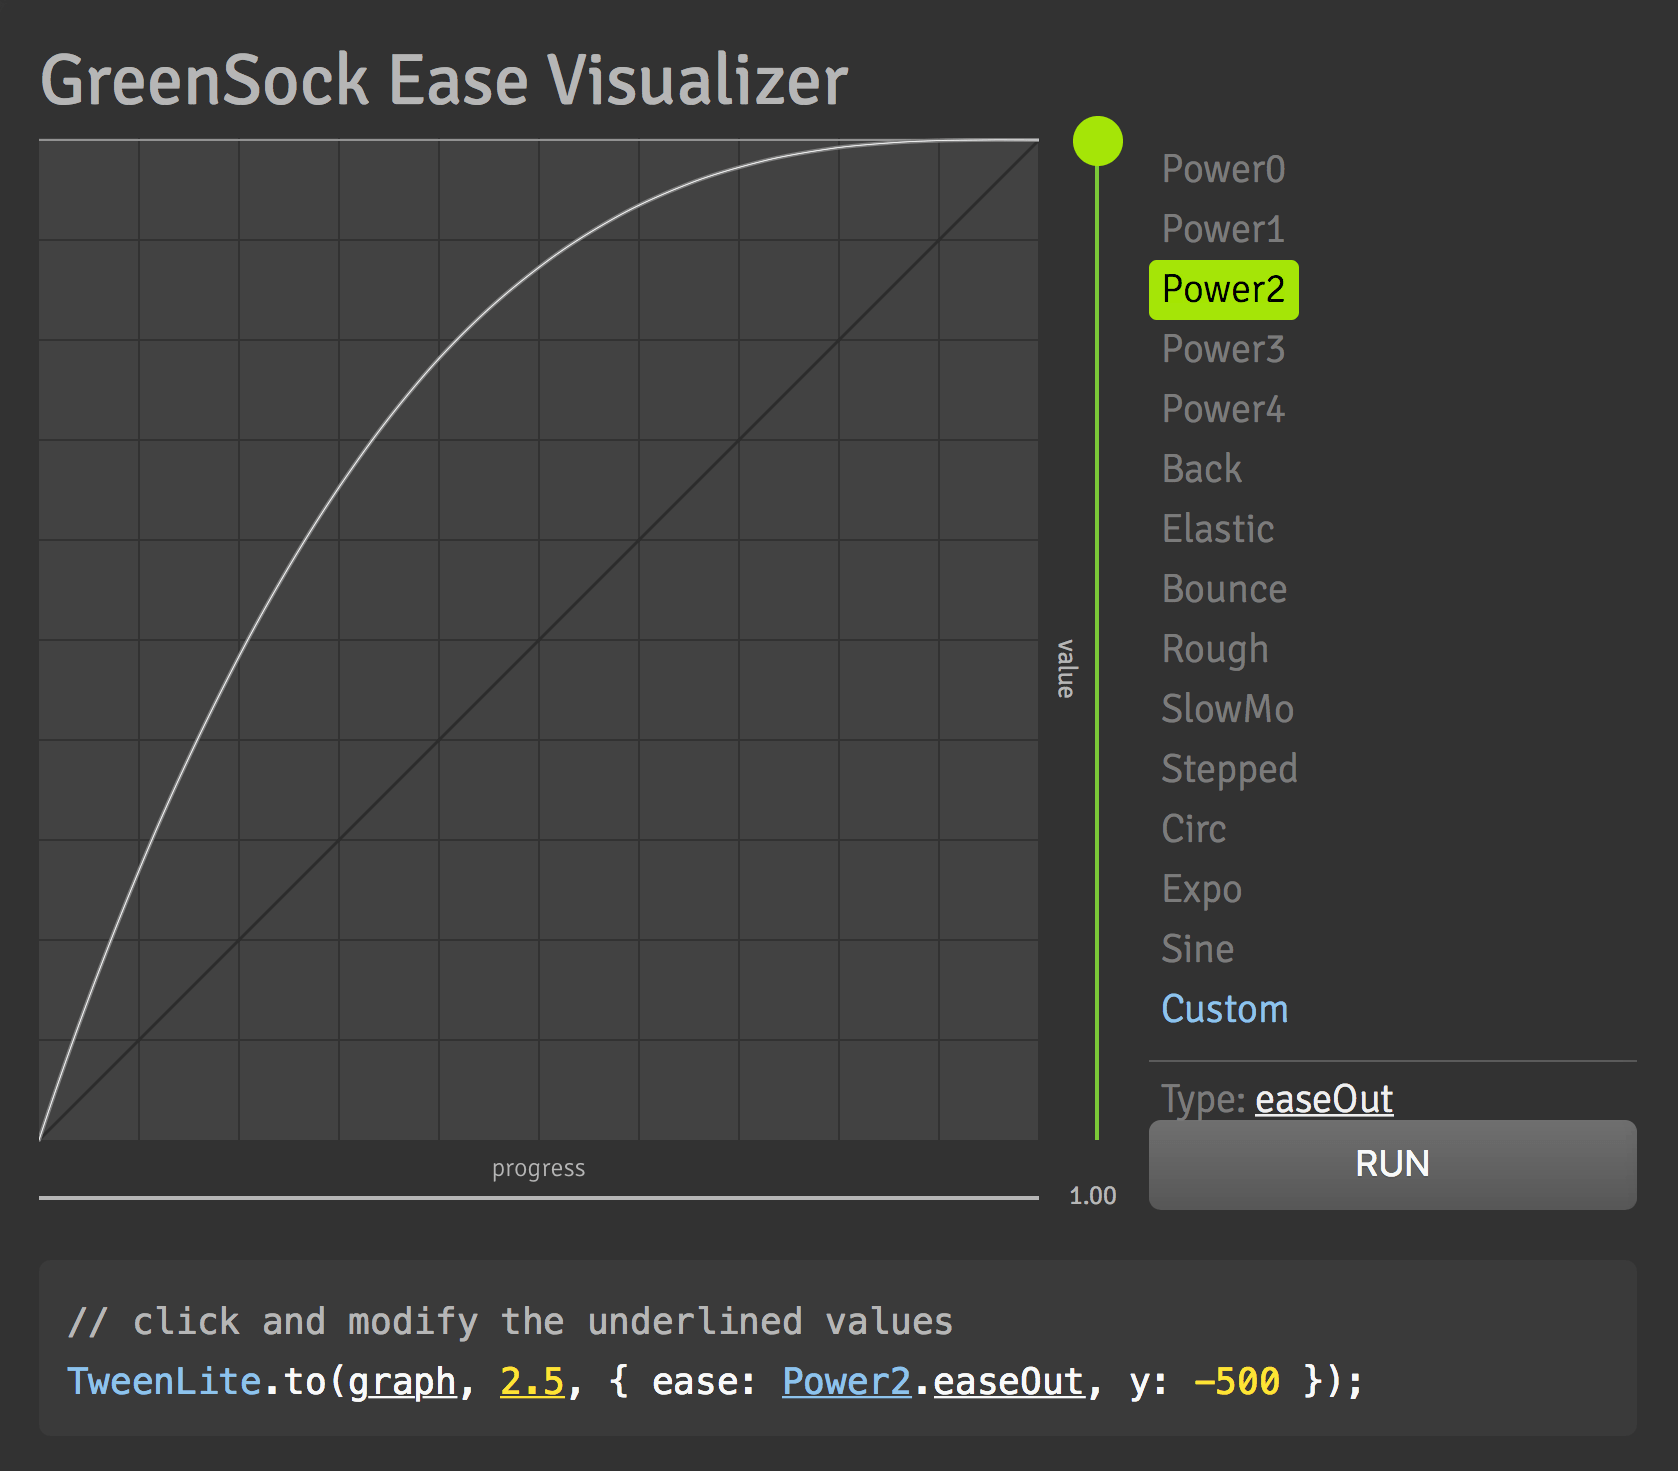
-
Below the ease graph there is a line of code that updates based on your selection. Notice that you can click on any of the underlined text in the code preview to configure the ease further.
NOTE: There is also a short video on the Ease Visualizer page that will explain how it works in more detail.
Return to your code editor. Let’s try out the Bounce.easeOut ease.
-
After the left property type a comma, then type the bold ease as shown below:
TweenLite.to(icon, 2, {rotation:360, left:400, ease:Bounce.easeOut});The name Bounce.easeOut is pretty straightforward: the element will bounce at the end of the tween (as signified by Out).
Save the file and preview the page in a browser. Notice the bit of bouncing motion at the end of the tween.
-
Let’s experiment with a different ease. Back in the code, delete the word Bounce, and in its place type the following bold code:
TweenLite.to(icon, 2, {rotation:360, left:400, ease:Back.easeOut}); -
Save the file and preview the page in a browser.
As you can see with the logo, the Back ease overshoots the end values before settling back into its final position.
If you’re one of the people who zones out when a page is loading, this tween is too easy to miss. We don’t want the animation to start at the same time the page loads. Return to your code editor.
-
To add a delay of one second, type the bold code below.
TweenLite.to(icon, 2, {rotation:360, left:400, ease:Back.easeOut, delay:1}); -
Save the file and preview the page in a browser. As expected, the animation starts a second after the page loads.
If you have time, feel free to experiment with other eases!
Additional Notes on Easing
Eases are traditionally named after the mathematical equations that are used to generate their smooth curves. Unfortunately names like Quad, Cubic, and Quart do very little to help animators understand which ease is stronger than the next. GSAP’s Power ease names, on the other hand, make it very easy for animators to experiment with and adjust the strength of the ease they are using. Start with Power1 and work your way up to Power4.
| Power0: | No easing, same as Linear.easeNone |
| Power1: | Same as Quad |
| Power2: | Same as Cubic |
| Power3: | Same as Quart |
| Power4: | Same as Quint |
GSAP’s Ease Pack (included in TweenMax.js or separately in easing/EasePack.js) additionally includes:
- Special effects eases like Back, Bounce, and Elastic
- More legacy eases like Circ, Sine, and Quad
- Proprietary eases like SlowMo and RoughEase
No Vendor-Prefixes Needed Thanks to GSAP!
When handling transforms with CSS, you typically need to write an inordinate amount of code to handle various vendor-prefixes. Take a look at the following CSS needed to rotate an element 90° for modern browsers:
-webkit-transform: rotate(90deg);
-moz-transform: rotate(90deg);
-ms-transform: rotate(90deg);
-o-transform: rotate(90deg);
filter: progid:DXImageTransform. Microsoft. BasicImage(rotation=1); /* Legacy IE */
Using GSAP, you just need to write rotation:90 and GSAP’s handy CSSPlugin handles all the browser prefixes for you behind the scenes. Furthermore, 2D transforms work back to IE 6, which is quite a feat!