Learn how to leverage Figma in this comprehensive tutorial that covers how to publish a Team Library, use components and styles in a Team Library, swap Team Libraries, and create a shared team library for use across multiple files and devices.
This exercise is excerpted from Noble Desktop’s Figma training materials and is compatible with Figma updates through 2023. To learn current skills in Figma with hands-on training, check out Noble Desktop's Figma Bootcamp, web design classes, and graphic design classes in-person or live online.
Topics Covered in This Figma Tutorial:
Publishing a Team Library, Using Components in a Team Library, Using Styles in a Team Library, Swapping Team Libraries
Exercise Preview
Exercise Overview
In this exercise, you’ll learn how to reuse assets (colors, text styles, components, etc.) across multiple documents and even across multiple people/computers!

Creating a Team Project & Importing Files
-
In Figma, if you’re not on the homescreen (file browser), do the following:
- In the Desktop app: Click the
 Home tab (Mac users can also choose File > Open File Browser).
 - In the Web app: At the top left, click the Main menu button
 and choose Back to files.
- In the Desktop app: Click the
-
Let’s create a new Team project. As shown below, on the left, hover over your team name (whatever it is) and click the Plus(+).
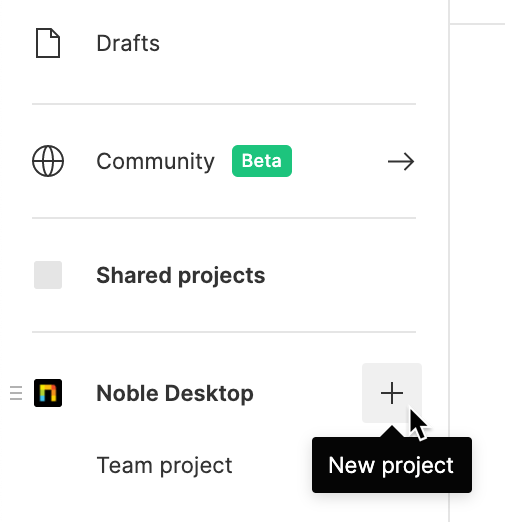
Name the new project Pulse and click Create project.
- To open a local file, click
 Import file (may be an icon near the top right).
 -
Navigate into Desktop > Class Files > Figma Class and:
- We want to select all 3 files (Women.fig, Pulse Design System.fig, and Pulse Design System Alternate.fig) so click on whichever file is on top, then Shift click the bottom file.
- Click Open.
- When the files are done uploading click Done.
Double–click on Pulse Design System to open it.
Looking at the Components & Styles
We can create a shared team library that can be used across files. It can be shared with other people for them to use as well. When the original library is updated, all files (and across everyone’s computers) will be updated!
- Click in an empty area to make sure nothing is selected.
-
In the Design panel on the right, notice all the different kind of styles we’ve created in this file:
• Text Styles • Color Styles • Effect Styles • Grid Styles
- At the top of the left panel, click on Assets to switch to that panel.
If needed, expand Local components, then Pulse Components to see all the components we’ve created in this file.
Publishing a Library
IMPORTANT: Publishing styles is available to free Starter Teams, but publishing components requires a Professional team, Education team, or Figma Organization. In other words, if you’re using the free Starter plan you will NOT be able to publish components, but you will be able to publish styles.
- Click in an empty area to make sure nothing is selected.
- In the middle of the toolbar, click the down arrow to the right of the file name.
- From the menu that appears, choose Publish styles and components.
- In the dialog that appears, everything should be selected. Click Publish.
Loading the Team Library into a Design File
Now that we have a library, let’s see how to use it in other files.
-
We need to open another file.
- In the Desktop app: Click the Home tab (Mac users can also choose File > Open File Browser).
- In the Web app: At the top left, click the Main menu button and choose Back to files.
- In the Desktop app: Click the
- In the Pulse project, double–click on Women to open it.
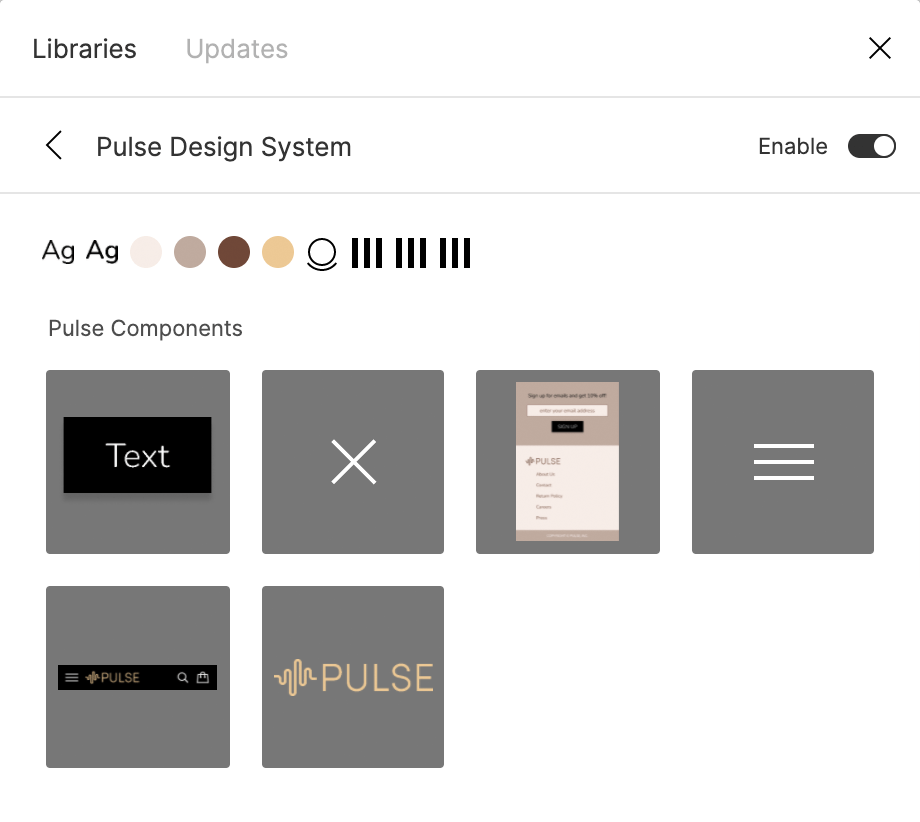
- At the top of the left panel, click on Assets to switch to that panel.
- At the top right of the Assets panel, click the Team library button
 .
. - In the list of libraries, click the toggle
 next to Pulse Design System.
 Close the Libraries dialog.
Using Components in a Team Library
Now that our file has access to our library, let’s use assets from that library.
In the Assets panel, expand Pulse Design System (our team library), then Pulse Components to see all the components from the library.
- Drag the nav component to the top of the frame.
Drag the footer component to the bottom of the frame.
Using Styles in a Team Library
-
Select the New Autumn Attire text and:
- In the Design panel, to the right of Text click the Style button

- Under Pulse Design System click on the Heading style to apply it.
- In the Design panel, to the right of Text click the Style button
-
To the right of Fill click the Style button
- Under Pulse Design System click on 3. Dark (a dark brown). You may have to scroll down if you’re in the list view.
-
Select the text cozy women’s styles for the fall season and:
- In the Design panel, to the right of Text click the Style button
- Under Pulse Design System click on the Subeading style to apply it.
- In the Design panel, to the right of Text click the Style button
-
To the right of Fill click the Style button
- Under Pulse Design System click on 2. Medium (a medium brown).
Updating a Team Library
-
In the Assets panel, CTRL–click (Mac) or Right–click (Windows) on the navbar component and choose Go to main component.
You should now be back in the library file.
- Click in an empty area so nothing is selected.
- In the Design panel, notice there’s a list of Text Styles.
- Hover over the Heading style and click the Edit Style button
 on the right.
 -
In the Edit style panels that opens:
- Change Regular to Black.
- Change the font size (to the right of the font name and is currently 29) to 34.
Close the Edit style panel.
In the Pulse Components frame on the right, double–click on the navbar’s black background color.
-
In the Design panel:
- To the right of Fill click the Style button
- Click on 3. Dark (a dark brown).
- To the right of Fill click the Style button
- Click in an empty area to make sure nothing is selected.
-
Click once on the navbar to select it.
- In the Design panel, notice there’s a button for Publish changes.
- In the left panel, notice there’s a black dot next to Assets, which indicates the same thing.
- At the top of the left panel, click on Assets.
- At the top right of the Assets panel, click the Team library button .
- Next to Pulse Design System click the Publish 2 changes button.
Click Publish.
Accepting Library Changes in a File
-
Let’s go back to the Women file:
- In the Desktop app: Click the Women tab at the top.
- In the Web app: Click the Women—Figma tab at the top of the browser.
-
At the bottom right of the window, you should see a Component updates available message. Click Review.
NOTE: If you dismiss the message, you can get to the same place by going to the Assets panel, clicking on Team library
and clicking Updates (at the top). -
In the Updates window, you’ll see a list of changes:
- We could click Update for each change, but let’s click Update all.
-
Notice the following changes:
- The heading is now thicker (a black weight) and larger.
- The navbar background has changed to brown.
Optional Bonus: Swapping Team Libraries
You can swap out libraries, which can be useful if you need to use a different version of a library, or switch to a library provided by someone else (internal vs. external design agency).
To see how this works we must first publish another library.
-
In Figma, if you’re not on the homescreen (file browser), do the following:
- In the Desktop app: Click the Home tab (Mac users can also choose File > Open File Browser).
- In the Web app: At the top left, click the Main menu button and choose Back to files.
- In the Desktop app: Click the
- In the Pulse project, double–click on Pulse Design System Alternate to open it.
- Click in an empty area to make sure nothing is selected.
- In the middle of the toolbar, click the down arrow to the right of the file name.
- From the menu that appears, choose Publish styles and components.
Click Publish.
-
Let’s go back to the Women file:
- In the Desktop app: Click the Women tab at the top.
- In the Web app: Click the Main menu button and choose Back to files. In the Pulse project, double–click on Women to open it.
- At the top of the left panel, click on Assets.
At the top right of the Assets panel, click the Team library button
.- This file currently uses the Pulse Design System, so click on its name.
- Click Swap library.
- At the top right, click on Choose library and select Pulse Design System Alternate. You may have to go into a Team submenu (whatever the name of your team is) to choose it.
- Click Swap library.
-
The file should now look very different!
For more about swapping libraries, refer to tinyurl.com/fig-swap-lib
