Learn how to effectively utilize Figma in this comprehensive tutorial that covers topics such as creating a new file, setting up frames, adding text, and creating colored backgrounds for text columns.
This exercise is excerpted from Noble Desktop’s Figma training materials and is compatible with Figma updates through 2023. To learn current skills in Figma with hands-on training, check out Noble Desktop's Figma Bootcamp, web design classes, and graphic design classes in-person or live online.
Topics Covered in This Figma Tutorial:
Creating a New File, Setting up Frames (other Apps Call These Artboards), Adding Text, Creating Colored Backgrounds for Text Columns
Exercise Overview
In this exercise, you’ll learn how to create new files as well as how to design on a grid (such as the popular Bootstrap).

NOTE: This book has been tested with the version of Figma available at the time of this writing. Figma can release new features or change existing ones at any time, but most things should still work the same or similarly. To see what’s new in Figma, visit tinyurl.com/figma-new
Creating a Blank New File
If you don’t have a Figma account (free or paid), go to figma.com and create one.
-
Launch the Figma desktop app (recommended) or visit figma.com
NOTE: Figma can be used in a web browser, or in the Figma desktop app. For more info about the differences refer to the Introduction at the beginning of this book.
- log in to your Figma account (if you’re not already logged in).
-
At the top left click on Drafts.
Drafts is where your personal files go, versus a Team project (a folder). Free accounts get unlimited files in Drafts, but only 3 files in a Team project (you only get one).
-
You should be on a welcome page showing Recent files. At the top there should be options to create new files or import files:

- Click New design file.
- We need to create a frame (other apps call these artboards) to put our design in. In the Toolbar at the top left of the window, click on the Frame tool
 .
. - In the Design panel on the right is a list of common sizes. Expand the Desktop category, and click on Desktop to choose it.
- Let’s add frame for a different device size. In the Toolbar at the top left, select the Frame tool again.
-
In the Design panel on the right expand the Tablet category, and click on iPad mini.
TIP: To duplicate a frame, hold Option (Mac) or ALT (Windows) while dragging the frame’s name (at the top left).
- At the top left of the frame, double–click on the name iPad mini and change the name to Tablet.
- Hit Return (Mac) or Enter (Windows) to apply the name change.
- Click once on the Desktop—1 frame name to select it.
-
In the Design panel on the right change the width (W) to 1280 and hit Return (Mac) or Enter (Windows) to apply.
NOTE: All measurements in Figma are in pixels, which is what we use in web and UI design. 1280–1440 pixels is a common range for the width of desktops/laptops, but we wanted you to see how to change a frame size.
Deselect the frame by clicking on the gray area outside the frame.
Navigating Around a File
- Zoom in by holding Cmd (Mac) or CTRL (Windows) and pressing the Plus(+) key a couple times.
- Hold the Spacebar (the cursor will change to a hand icon
 ) and drag anywhere in the canvas to scroll around.
 -
Zoom out by holding Cmd (Mac) or CTRL (Windows) and pressing the Minus(–) key a couple times.
NOTE: You can Zoom by hitting Plus(+) or Minus(–) without holding Cmd (Mac) or CTRL (Windows), but that does not work when typing text. Holding Cmd (Mac) or CTRL (Windows) always works.
- In the Layers panel on the left, you should see a list of frames.
- Figma lets us quickly navigate between frames in this panel. Double–click on the frame icon
 to the left of Desktop – 1 to go that frame and zoom to fill your screen! Do not double–click on the name, because that is how you would rename it.
 Double–click on the frame icon
to the left of Tablet to go there.To view all frames again, at the top right of the window click the Zoom percentage (such as 100%) and choose Zoom to fit (or hit Shift–1).
Designing on a Grid
Designers often use grids to align elements and create a consistent visual structure for the layout. Web developers can use a grid system to code the website. While grids are not required, they are especially helpful when designing responsive sites (sites that are optimized for phones, tablets, and desktops). Grids can streamline the workflow so the design is easier to create, and then easier to code.
- The Layers panel, double–click on the frame icon to the left of Desktop—1 go to that frame and zoom to fill your screen.
- In the Design panel on the right, to the right of Layout grid click the Plus(+) button.
- To the left of Grid click the Layout grid settings button

-
In the panel that opens:
- At the top left of the panel, click on Grid and choose Columns.
- Set Count to 12
-
Set Gutter to 30 and hit Return (Mac) or Enter (Windows) to apply it.
Notice the space between columns increased a bit.
- Change Type from Stretch to Center.
Set Width to 60.
Using the Bootstrap Grid
Grid systems typically used by web developers have specific gutter amounts and column widths for specific screen sizes. If the developer you’ll be working with is using a particular grid system, it’s best to use a matching grid. For our design we want to use the popular 12-column Bootstrap grid. You can learn more about Bootstrap and its grid at getbootstrap.com/docs/5.3/layout/grid/#grid-options
To save you time we’ve created a Bootstrap grid template you can use, so you won’t have to measure out all the layouts grids (and add some guides that Figma’s layout grid does not make).
-
Go to the file browser:
- In the Desktop app: Click the
 Home tab (Mac users can also choose File > Open File Browser).
 - In the Web app: At the top left, click the Main menu button
 and choose Back to files.
- In the Desktop app: Click the
-
To upload a local file, click
 Import file.
If you don’t see Import file shown above, look for the
button near the top right of the window. - Navigate into Desktop > Class Files > Figma Class.
- Double–click on Bootstrap 5 Grid Template.fig to choose it.
- Once the file has uploaded, click Done.
- In the file list, CTRL–click (Mac) or Right–click (Windows) on Bootstrap 5 Grid Template and choose Rename.
- Name it About Page and hit Return (Mac) or Enter (Windows) to apply the name.
- Double–click on About Page to open it.
Notice there are frames with pink columns for a layout grid sized to match Bootstrap’s specs for phone, tablet, and desktop.
- In the Layers panel on the left, you should see a list of the 3 frames.
Double–click on the frame icon
to the left of Desktop to make it fill the screen.
Why 12 Columns?
Text and images usually span multiple columns in the grid. 12-column grid layouts are popular because designs are usually broken down into 2,3, or 4 columns. 12-column grids can be evenly divided in half, thirds, or fourths.
Adding Text
- We need to create a heading at the top left of the page. In the Toolbar at the top, choose the Text tool
 .
. - Click anywhere on the frame to create some text. Don’t worry about being exact, we’ll position it in a moment.
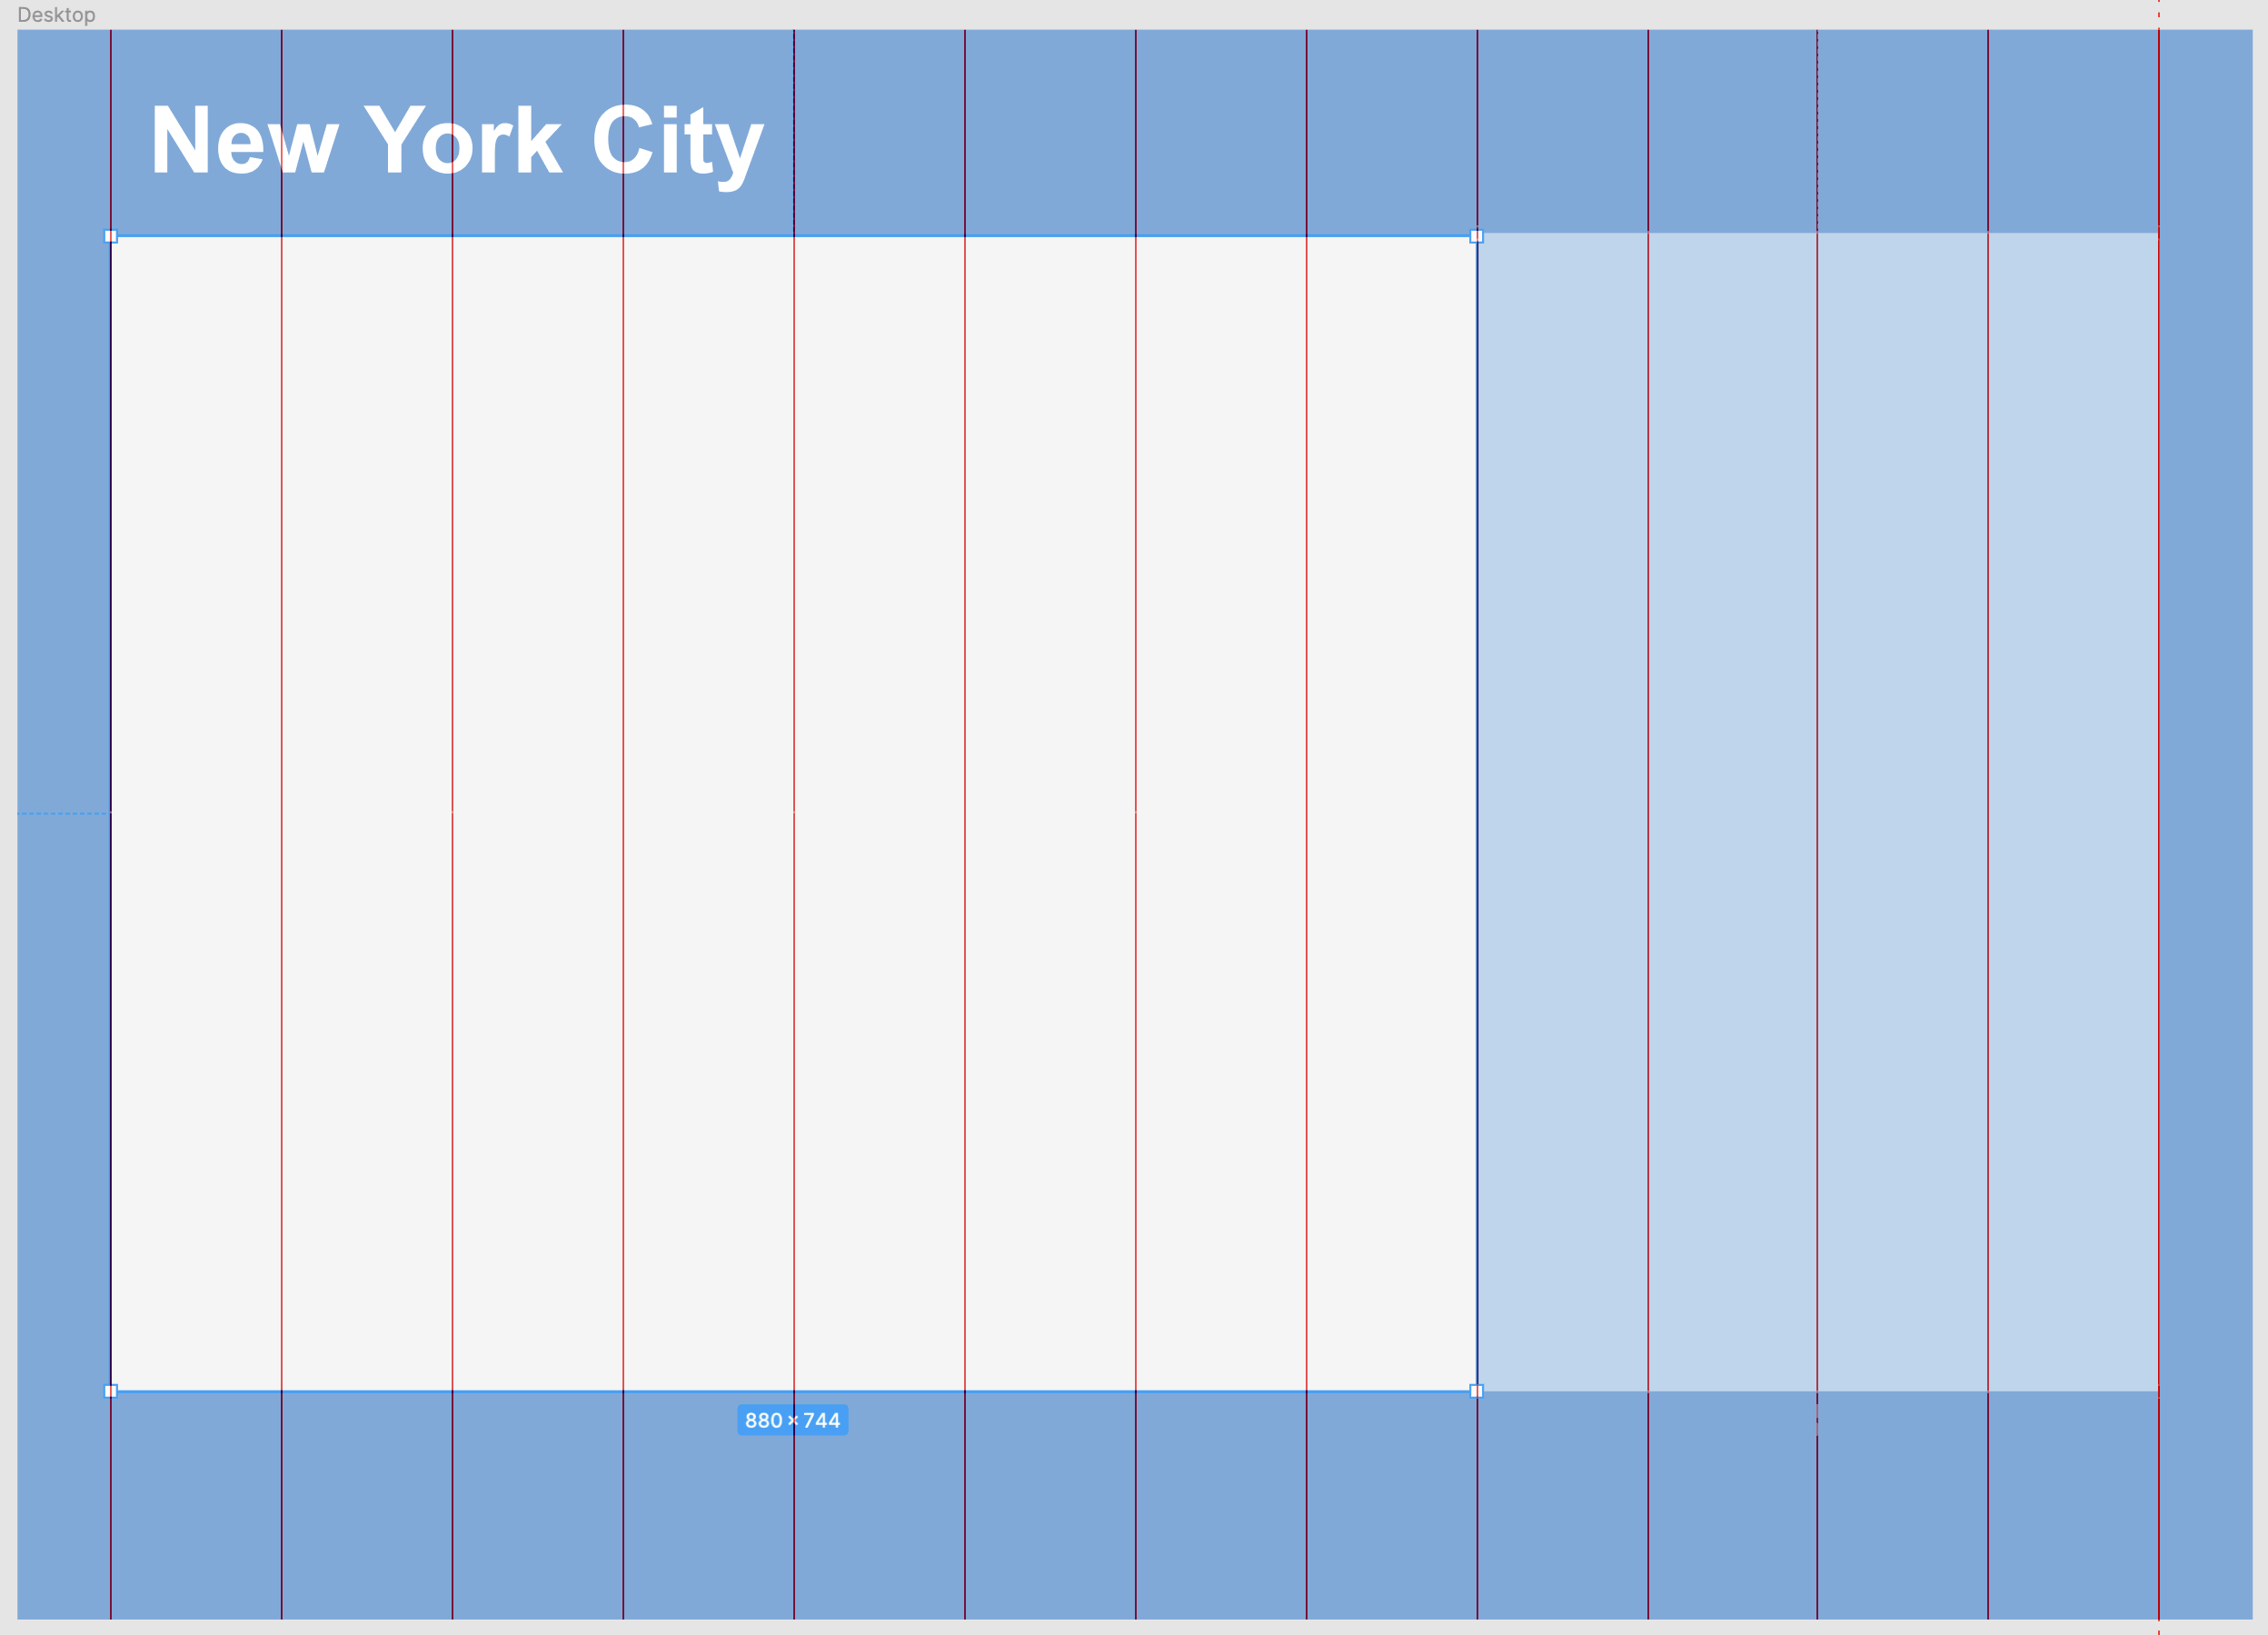
- Type New York City
- Press Esc to select the text box.
-
In the Design panel on the right:
- In the Text section, set the font to Arial Bold (if you don’t have Arial, choose any bold font you want, or just use the default font).
- Set the font size (to the right of the font) to 60
NOTE: The Figma Desktop app can access the fonts installed on your Mac or PC (local fonts) as well as Google Fonts. Figma.com can only access Google Fonts, unless you either install the Figma Desktop app or the Figma font service. To learn more about accessing local fonts from Figma visit tinyurl.com/figma-local-fonts
-
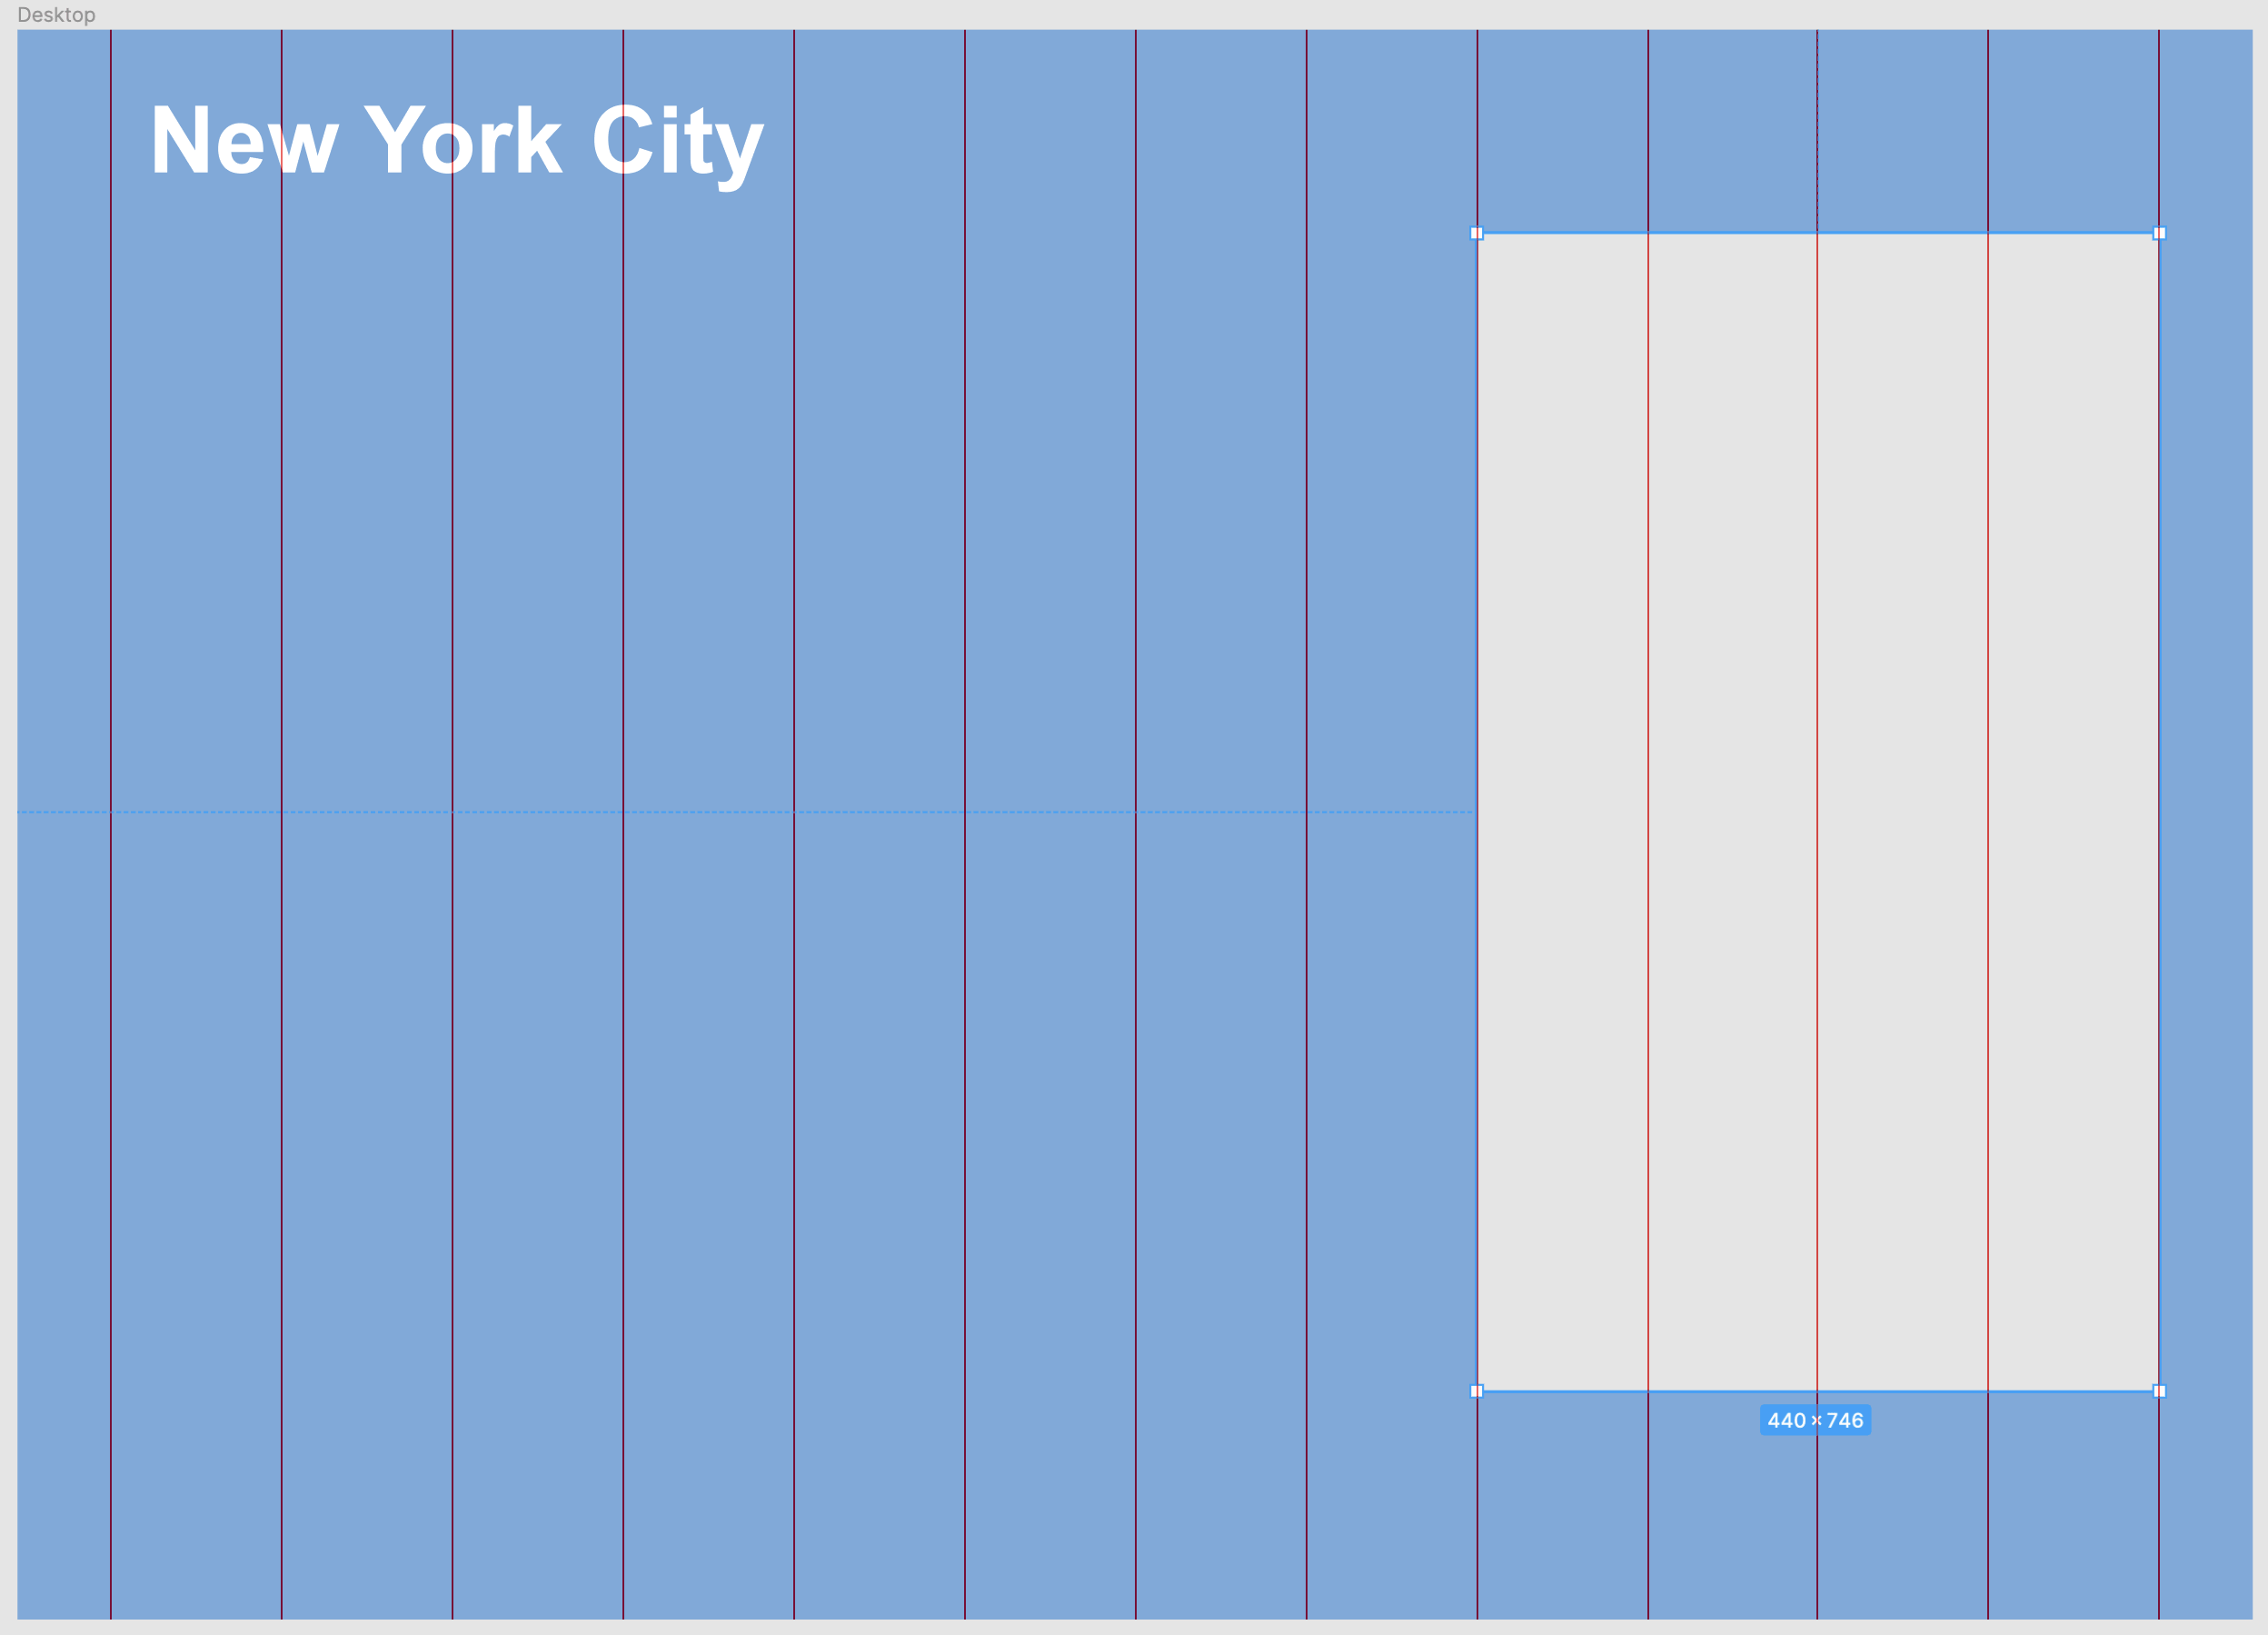
As shown below, drag the text into position so the left edge aligns with the first solid pink column. It won’t snap to the column, but you can line it up visually.

Changing the Frame’s Background Color
Let’s change the background color for all of the frames.
- To zoom in/out so you can see everything, at the top right of the window click the Zoom percentage and choose Zoom to fit (or hit Shift–1).
- Click on a blank area of the canvas to make sure nothing is selected.
- In the Layers panel on the left, click once on the Phone frame to select it.
- In the Layers panel, Shift–click on the Desktop frame to select all three frames.
-
In the Design panel on the right:
- Click on the Fill color’s hex code (FFFFFF) to make it editable.
- Type 77aadd and hit Return (Mac) or Enter (Windows) to apply it.
The frame backgrounds should become blue.
- Click on a blank area of the canvas to deselect the frames.
- In the Layers panel, double–click on the frame icon to the left of Desktop to zoom into only that frame.
- We’ll be adding colored backgrounds behind the columns of text, but not the page heading, so let’s lighten it. Click on the New York City text to select it.
- In the Design panel, click on the Fill color swatch to open the color picker.
Choose white and hit Esc to close the pop-up.
Adding Colored Backgrounds for Text Columns
The desktop will have two columns: a main column on the left and a sidebar column on the right. Let’s create background colors for them, starting with the sidebar.
To show the rulers, hit Shift–R or at the top left click the Main menu
and choose View > Rulers (Mac users can choose View > Show Rulers).-
Text and image content typically align with the pink columns. Backgrounds (such as colors, borders, etc.) typically align with the midpoint between the columns (marked by guidelines in our template).
The gutters (empty space between the grid’s 12 columns) are 48 pixels, so there’s 24px from the pink content column to the gutter midpoint line. This provides some padding around the content of each column.
Hit Control–G (Mac) or CTRL–Shift–4 (Window) to hide the layout grid or at the top left click the Main menu
and choose View > Layout grids (Mac users can choose View > Show Layout grids).- In the Toolbar, select the Rectangle tool
 .
. -
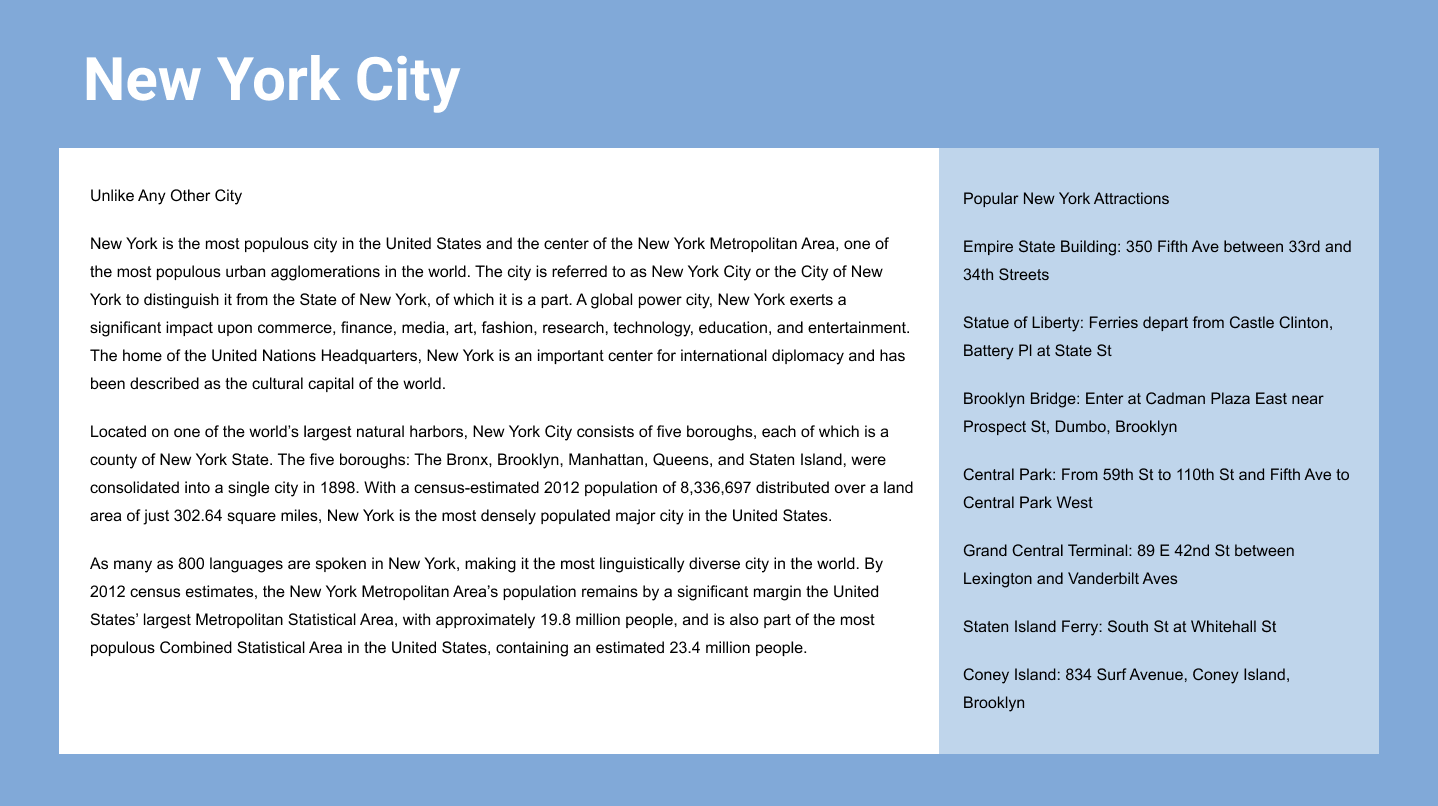
As shown below, draw a rectangle over the 4 columns of sidebar text.
-
In the Design panel:
- Click on the Fill color swatch to open the color picker.
- Choose white and hit Esc to close the pop-up.
- To the right of the Fill color, change Opacity from 100% to 50%.
- In the Layers panel, double–click on Rectangle 1 and rename it to sidebar bg.
- In the Toolbar, select the Rectangle tool .
-
As shown below, draw a rectangle over the remaining column for the main text.
-
In the Design panel:
- Click on the Fill color swatch to open the color picker.
- Choose white and hit Esc to close the pop-up.
In the Layers panel, double–click on Rectangle 1 and rename it to main col bg.
Importing & Styling Text
We want to make two columns of text (a main column and a sidebar). We’ve saved each column’s text as a plain text file (.txt) so you can copy and paste into Figma.
- To show the rulers, hit Shift–R or at the top left click the Main menu and choose View > Rulers (Mac users can choose View > Show Rulers).
- Hit Control–G (Mac) or CTRL–Shift–4 (Window) to hide the layout grid or at the top left click the Main menu and choose View > Layout grids (Mac users can choose View > Show Layout grids).
- Hide or minimize Figma, so you can see the Desktop.
- On the Desktop, go into Class Files > Figma Class > NYC and open Text—main.txt.
- Hit Cmd–A (Mac) or CTRL–A (Windows) to select all the text.
- Copy it by pressing Cmd–C (Mac) or CTRL–C (Windows).
- Close the text file and go back to your Figma file About Page.
- In the Toolbar at the top left of the window, click on the Text tool .
-
As shown below, drag a text box over the pink columns in the main column.

- Hit Cmd–V (Mac) or CTRL–V to paste the text.
Press Esc to highlight the text box (instead of highlighting the text in the box).
-
With the text box selected, In the Design panel set the following:

TIP: You can hold Option (Mac) or ALT (Windows) and drag left/right over a number like text size to adjust it!
-
Click in an empty area to deselect the text.
NOTE: Line height
 is the same thing as leading in print design.
TIP: To return to the default (Auto) line height
, delete the value that’s there and hit Return (Mac) or Enter (Windows).
Optional Bonus: Making the Sidebar
- Let’s get the sidebar text we prepared for you. Switch to the Desktop.
- Open Text—sidebar.txt (in Class Files > Figma Class > NYC).
- Hit Cmd–A (Mac) or CTRL–A (Windows) to select all the text.
- Copy it by pressing Cmd–C (Mac) or CTRL–C (Windows).
- Close the text file and go back to your Figma file About Page.
- In the Toolbar, click on the Text tool .
-
As shown below, drag a text box over the pink columns in the sidebar column.

- Hit Cmd–V (Mac) or CTRL–V to paste the text.
- Click on a blank area a couple times to deselect.
-
Let’s reuse the text settings from the main column on the sidebar. Click once on the main text column to select it.
At the top left click the Main menu
and choose Edit > Copy properties (Mac users can choose Edit > Copy Properties). -
Click once on the sidebar text column to select it.
At the top left click the Main menu
and choose Edit > Paste properties (Mac users can choose Edit > Paste Properties). - Let’s see how this looks without the layout grid. Hit Control–G (Mac) or CTRL–Shift–4 (Windows) or click the Main menu and choose View > Layout Grids (Mac users can choose View > Show Layout Grids).
To see the design at the size it will be in a web browser, at the top right of the window click the Zoom percentage and choose Zoom to 100% (or hit Shift–0).
-
That’s it for now. Figma Files are automatically saved. To close the file:
- In the Desktop app: Close the tab for the file.
- In the Web app: At the top left, click the Main menu button and choose Back to files.
NOTE: Keep in mind that when designing on Bootstrap’s grid, your design will be easier to code when you stick to the grid. You can break off the grid and do something custom, but that will require custom coding by a developer. Don’t feel restricted by the grid. Use it when you can, and break from it if needed.
Figma’s Frame Width Versus Bootstrap’s Container Width
On screens 1400px and larger, Bootstrap’s grid is 1320 pixels wide. Each column has gutter space on the left and right sides to ensure the columns of content (such as text) won’t touch each other, or the edge of the screen.
The Desktop frame in our template is 1440 pixels wide (a common desktop/laptop size) which is wider than Bootstrap’s 1320px container. If you keep content inside Bootstrap’s grid container, it will have the standard gutter space on the left and right plus extra. Feel free to break out of the grid container and make content (such as photos) cover the entire width of the frame.
