Learn how to set up your Cinema4D and After Effects preferences for optimal functionality with our comprehensive guide, including a step-by-step walkthrough of resetting and setting preferences in both applications.
This exercise is excerpted from Noble Desktop’s Cinema 4D Lite training materials and is compatible with Cinema 4D updates through 2023. To learn current skills in Cinema 4D with hands-on training, check out our Cinema 4D in After Effects Bootcamp, Motion Graphics Certificate, and video editing classes in-person and live online.
Complete the following setup prior to beginning any exercises.
Exercise Preview
Exercise Overview
In this exercise you’ll set some preferences to make sure that Cinema4D and After Effects will function as this book expects. It’s important to do this exercise first, or some things later will not work correctly!

Resetting After Effects Preferences
Let’s reset to the default preferences so we know how your app will be set up.
-
If After Effects is open, quit the app.
NOTE: This book has been tested with After Effects 2022. If you’re using an older or newer version, most things should still work the same or similarly.
-
Launch After Effects and then immediately hold Cmd–Shift–Option (Mac) or CTRL–Shift–ALT (Windows) until the reset preferences dialog appears.
If you don’t see a dialog appear, you didn’t hold the keys down fast enough. Quit the app and try it again. If you still can’t get it, refer to the Manually Deleting Preferences sidebar below.
- Click OK to reset your preferences and After Effects will continue launching.
If you get a warning about disk cache, click OK.
Manually Deleting Preferences
Instead of using the keystroke, you can manually delete the preferences files:
- In After Effects, go into the After Effects menu (Mac) or Edit menu (Windows) and choose Preferences > General.
- At the bottom click the Reveal Preferences in Finder button (Mac) or Reveal Preferences in Explorer button (Windows).
- Delete the file that is revealed (and selected). Then restart After Effects.
Setting After Effects Preferences
If After Effects is not already open, launch it.
If you’re seeing the Home screen, close it.
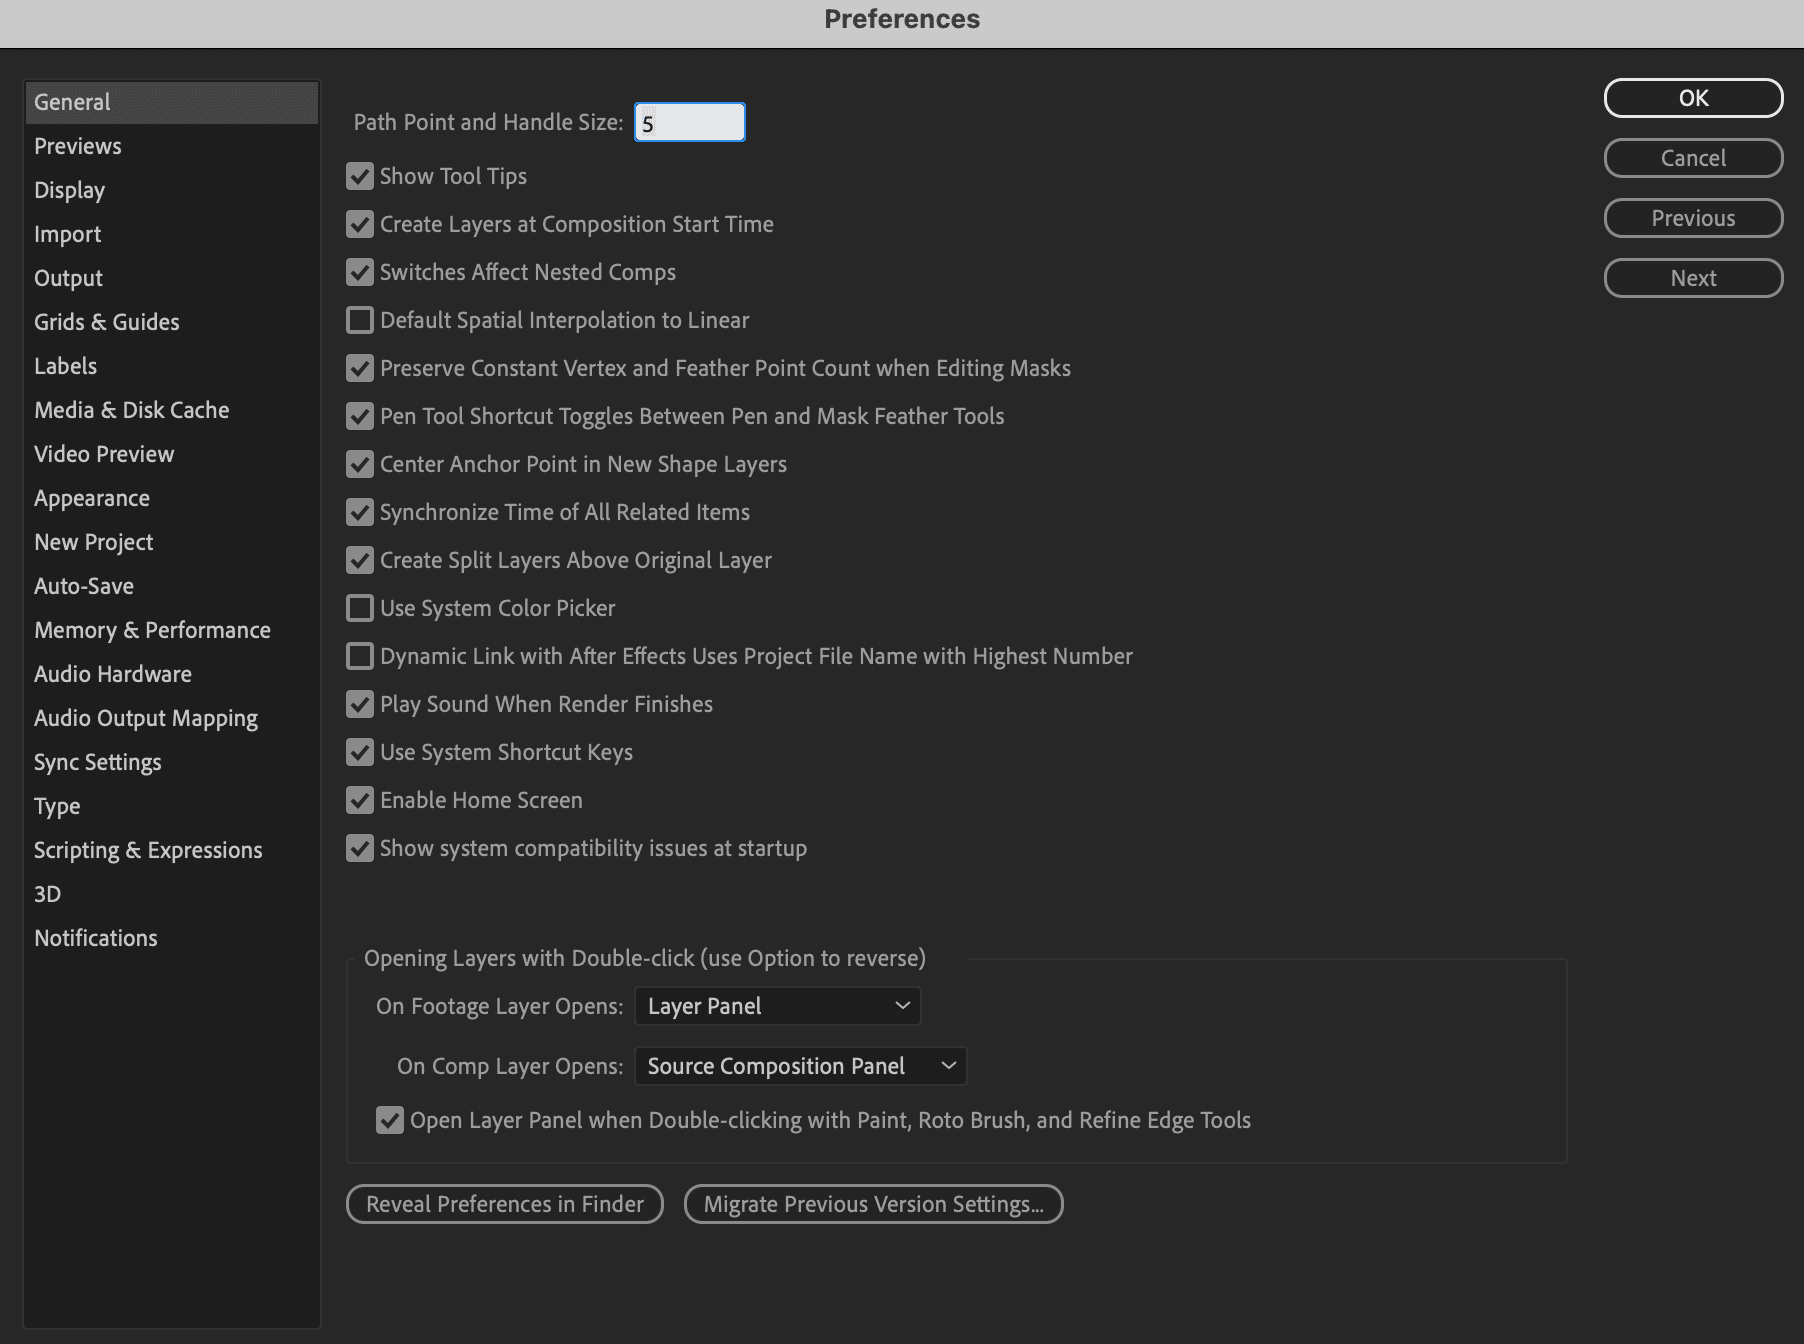
Go into After Effects menu (Mac) or Edit menu (Windows) and choose Preferences > General.
-
Click on Center Anchor Point in New Shape Layers.
This makes it easier to control the positioning of native After Effects shape layers by placing their anchor point in the center of the shape instead of the center of the composition.
-
Uncheck Enable Home Screen.
This is a purely personal preference, we just don’t find it useful. Everything it does can be accomplished elsewhere.
On the left of the window, click on the Previews section.
-
Under Audio, check on Mute Audio When Preview is Not Real-time.
After Effects need to build a preview of your timeline before it can play it back in real–time. In effect, individual frames of video and audio must rendered into the computer’s RAM before they can play. Audio sounds distorted when it loads frame by frame, so we don’t want to hear it unless it’s real-time.
On the left of the window, click on the Display section.
-
Under Motion Path, select All Keyframes.
Motion Paths help us see the journey that our layers take as they change position. We want to see the path of all our keyframes whenever we select a layer.
On the left of the window, click on the Output section.
-
Uncheck Use Default File Name and Folder.
This ensures the files you export out of After Effects will save to a folder that you choose each time.
On the left, click on the Auto-Save section.
Make sure Save every is checked on and set it to 10 minutes.
-
Next to Maximum Project Versions, set it to 20.
After Effects Auto–Save will automatically back–up your project file to a folder next to your project file. This back–up copy can be opened like any other After Effects project in case your main file becomes corrupted, After Effects crashed, or you just want to return to an older version.
- On the left, click on the Memory & Performance section.
-
To the right of RAM reserved for other applications hover your cursor over the blue number.
In one motion, drag to the left to reduce the number. Stop dragging when it reaches the lowest number possible (it might already be set to that, so it might not change).
NOTE: The lowest number depends on how much RAM your computer has. This preference does NOT get reset when resetting your After Effects preferences.
You’re done setting After Effects preferences. Click OK.
Learn More About After Effects Preferences
For more about After Effects preferences, feel free to read Adobe’s reference at helpx.adobe.com/After Effects/using/preferences.html
Resetting Cinema 4D Preferences
Cinema 4D preferences can be reset from inside the application using the Preferences dialog.
With Cinema 4D open, in the top menu go to the Cinema 4D menu (Mac) or Edit menu (Windows) and choose Preferences.
At the bottom of the dialog box click Open Preferences Folder.
-
When the file window opens CTRL–click (Mac) or Right–click (Windows) on the highlighted folder and choose Move to Trash (Mac) or Delete (Windows).
Note: on Windows a secondary menu may ask you to confirm deleting the folder.
-
Close Cinema 4D and restart it.
NOTE: This book has been tested with Cinema 4D Lite S24 If you’re using an older or newer version, most things should still work the same or similarly.
Setting Cinema 4D Preferences
With Cinema 4D open, in the top menu go to the Premiere Pro menu (Mac) or Edit menu (Windows) and choose Preferences.
- In the menu on the left click Files and:
- In the Auto–Save group, click on the switch next to Save
We’ll leave the rest of the settings at default. This will automatically backup your file every 5 minutes and give you 10 copies before it overwrites the first.
-
Click the Units group and change the Animation Units to SMPTE
Note: This will give us the same timecode display that After Effects uses by default.
-
Click the Memory group and:
- In the Project category change the Undo Depth to 50.
You’re done setting preferences. Close the dialog box.