Delve into the practical application of Cinema 4D in this tutorial, where you will create a 3D bowling alley scene, including model creation, texturing, and lighting.
This exercise is excerpted from Noble Desktop’s Cinema 4D Lite training materials and is compatible with Cinema 4D updates through 2023. To learn current skills in Cinema 4D with hands-on training, check out our Cinema 4D in After Effects Bootcamp, Motion Graphics Certificate, and video editing classes in-person and live online.
Topics Covered in This Cinema 4D Tutorial:
Creating Models, Texturing, Lighting
Exercise Preview

Exercise Overview
In this exercise you will create a 3D scene in a bowling alley.

Previewing the Final Image
Let’s see a preview of what you’ll be making. If you’re in Cinema 4D Lite, keep it open but switch to your Desktop.
On the Desktop, navigate to Class Files > C4D in AE Class > Bowling Alley > Preview Movie and double–click Bowling Alley—with Shadows.png.
-
Notice the following:
- The scene is composed of multiple bowling pins each with the Noble Desktop logo on it and a single bowling ball.
Close the image when done.
Getting Started
If it isn’t already open, you should open Cinema 4D Lite.
If you are just opening the application close the Quick Start Dialog.
In C4D Lite, if you have a project open, choose File > Save.
Choose File > Close All Projects.
Choose File > Save Project As
Navigate to C4D in AE Class > Bowling Alley
Name the file Your Name—Bowling Alley.c4d
Press Save. We’re now ready to begin.
Setting Output Size
When you create a new project C4D assigns it a default size and length. You can change these “Render” settings whenever you like.
Click on the Edit Render Settings button or Choose Render > Edit Render Settings
In the Output section use the menu to change the preset to HDTV 1080 29.97
Close the Render Settings dialog box.
-
In the time controls click in the end timecode field:
- Type 15 (fifteen).
- Press Return (Mac) or Enter (Windows) on your keyboard to finalize the change.
Press Cmd–S (Mac) or CTRL–S (Windows) or choose File > Save Project.
Creating a Reference for Modeling
When modeling it is usually helpful to have some type of drawing as a reference. A helpful technique is to use your reference as the texture on a plane and then use that as your reference.

-
In the Create Menu press and hold the Cube button to reveal the other primitive shapes.
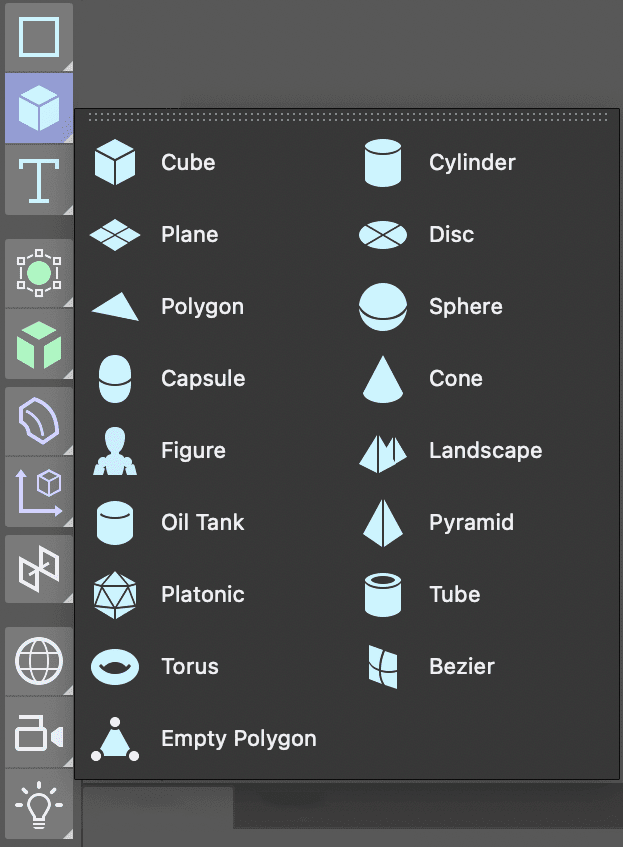
Select the Plane object from the list.
In the Perspective viewport click on the Toggle Active View
 button to reveal all four viewports.
In the Object Manager double–click on the Plane and rename it Model Reference.
With the Model Reference object selected click on the Coord. tab in the Attribute Manager.
-
Rotate the plane until it is facing forward in the front viewport.
You are going to model the bowling pin in the front viewport so you need to be able to see it there.
-
Still in the Attribute Manager click on the Object tab and change:
- Width to 1080
- Height to 1920
NOTE: Why are we using 1080 X 1920 for the size of the plane. Those are the dimensions of the image we are going to use as a reference.
-
Click in the Front view and press H or choose View > Frame Geometry.
- Repeat this for the other viewports.
In the Front viewport choose Display > Gouraud Shading. This will allow us to see the texture in the Front viewport once we apply it.
Click on the Material Manager
 button to open it.
Click on the New Default Material
 button.
-
Double–click on the new material’s name and rename it Model Reference.
- Press Return (Mac) or Enter (Windows) or click on any empty space to finalize the name change.
Double–click on the material’s icon
 to open the Material Editor.
In the Material Editor turn off the switch next to Reflectance.
Click on the Color map to make sure it’s active.
Click the arrow next to texture and choose Load Image.
Navigate to C4D in AE Class > Bowling Alley > Media > references.
-
Double–click on Bowling Pin.png.
Click No in the dialog that appears.
NOTE: Becasue this image isn’t in the same root folder as our C4D file the application gives us the opportunity to make a copy of it there. This way we are less likely to misplace or move the files which would result in problems rendering later.
Close the Material Editor.
Drag the material from the Material Manager onto the Model Reference plane in the Object Manager.
Click the Material Manager button again to close it.
In the Object Manager click on the Model Reference object to select it.
In the Attribute Manager click on the Coord. tab.
-
Change the P.Z attribute to 100
This places the plane behind the spot in the scene where new objects are created and should make tracing it later a bit easier.
In the Front viewport, click the Toggle Active View
to hide the other views. We are going to create our model entirely in the front view.-
For better organization we are going to place the reference image on its own layer.
- In the Object Manager CTRL–click (Mac) or Right–click (Windows) on the Model Reference object.
- Choose Add to New Layer. Notice that the little shape to the right of your object’s name lights up.
-
Locate the Layer Manager, it’s the panel named Layers.
- Double–click the new layer and rename it Reference.
- Click on the lock located beneath the L label.
NOTE: Each of the letter labels controls a diffrent property of the layer, the S solos the layer content, the V controls its visibility, etc. To see what each label represents choose open the View menu in the Layer Manager.
Click back on the Attribute Manager tab to reveal it. When a layer is selected this panel allows you to set its options.
Press Cmd–S (Mac) or CTRL–S (Windows) or choose File > Save Project.
Creating a Bowling Pin with a Lathe
A Lathe object is a type of 3D model used to create rotational symmetrical objects such as vases, cups, and bottles. The Lathe tool allows you to create a 3D object by spinning a 2D profile around an axis.
To use the Lathe tool, you start by creating a 2D profile, which is a shape that defines the cross-section of the 3D object you want to create. You then specify the axis around which you want the profile to be spun and the number of segments you want the resulting object to have. The Lathe tool will then generate a 3D object by spinning the profile around the specified axis.
Click on the Spline Pen
 tool to the left of the viewport.
In the Front view, adjust the viewport until you can comfortably see the reference image.
Continue to create a series of straight lines until you have the rough contour of the reference created.
Press the Esc key on your keyboard to finalize the spline.
Press the Spacebar on the keyboard to switch to your last used Selection
 tool.
tool.Select any vertex you want to convert from Hard Tangents (corners) to Soft Tangents (curves).
CTRL–click (Mac) or Right–click (Windows) on one of the selected vertices and choose Soft Interpolation.
Press E to activate the Move tool.
-
Drag this vertex’s tangent lines until the curves looks more like your reference image.
NOTE: You can also use the Move tool to move vertices around.
-
Continue to adjust vertices and tangents until you are happy with the results.
NOTE: To break Tangents so they are no longer linked together hold the Shift key while dragging. To delete a vertex, select it and press Delete (Mac) or Backspace (Windows) on your keyboard.

-
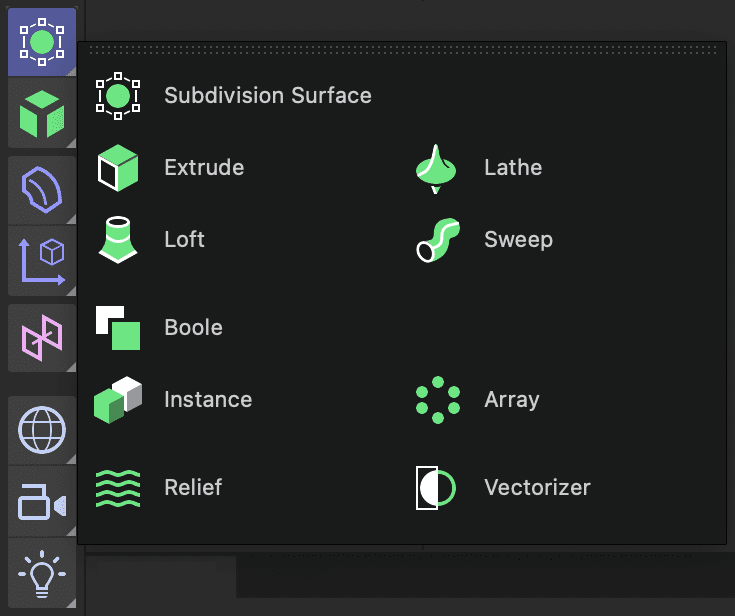
In the Create menu long–press on the Subdivision Surface button.
- Choose Lathe from the menu.
Drag the Path you created into the Lathe object.
Double–click on the lathe object and rename it Bowling Pin.
Press Cmd–S (Mac) or CTRL–S (Windows) or choose File > Save Project.
Adding Images As Textures
In Cinema 4D the Material Manager is the panel where you can create and organize all of the textures used in your 3D scene while the Material Editor is where you can edit and adjust the attributes of the materials themselves.
Click the Material Manager
button to open it.Click the New Default Material
button three times.-
Change the material names to:
- Pin Base
- Pin Crown
- Noble Logo
Double–click on the icon for Pen Crown to open the Material Editor.
Click on the Color map to make sure it’s active.
Click the arrow next to texture and choose Load Image.
Navigate to C4D in AE Class > Bowling Alley > Media > mats.
-
Double–click on Bowling Pin Skin.psd.
Click No in the dialog that appears.
NOTE: Becasue this image isn’t in the same root folder as our C4D file the application gives us the opportunity to make a copy of it there. This way we are less likely to misplace or move the files which would result in problems rendering later.
-
In the Material Manager click on the Noble Logo material to make it active.
The Color map should still be active.
Click the arrow next to texture and choose Load Image.
Navigate to C4D in AE Class > Bowling Alley > Media > mats.
-
Double–click on Noble Icon.psd.
Click No in the dialog that appears.
Close the Material Editor.
Press Cmd–S (Mac) or CTRL–S (Windows) or choose File > Save Project.
Controlling Textures on 3D Objects
Objects in C4D can have any number of materials applied to them. This is very helpful especially when you want to apply things like labels or decals.
-
Drag the Pin Base and Pin Crown textures onto the Bowling Pin lathe object in the listed order.
NOTE: Adding a material to an object will automatically add a material tag to it. An object can have multiple materials on it but they will cover each other if left with their default attributes.
In the Object Manager click on the Material Tag for the Pin Crown texture.
In the Attribute Manager change the Projection type to Cylindrical
Turn off the switch next to Tile.
-
Change the Offset V attribute until the texture is located on the neck (thinnest area) of the bowling pin.
The only problem now is that the Pin Crown texture doesn’t have a transparent background, but this can be fixed.
Press Cmd–S (Mac) or CTRL–S (Windows) or choose File > Save Project.
Making a Material Transparent with an Alpha Channel.
An alpha channel is an additional channel that stores information about the opacity or transparency of a pixel. This channel is used to create images with transparent or semi-transparent areas, allowing graphics to be layered and blended together. The alpha channel typically has a grayscale value between 0 and 255, where 0 is completely transparent and 255 is completely opaque.
In the Material Manager double–click on the Pin Crown material to open the Material Editor.
In the Material Editor, click on the Alpha map to reveal it’s properties and then click on the checkbox to enable it.
Make sure the switch next to Image Alpha is clicked on.
Click on the arrow next to texture and choose Bitmaps > Bowling Pin Skin.psd
Click on the Noble Logo material and click on the Alpha map to reveal it’s properties and then click on the checkbox to enable it.
Make sure the switch next to Image Alpha is clicked on.
Click on the arrow next to texture and choose Bitmaps > Noble Icon.psd
In the Material manager click on the Pn Base material.
Set the Color map to white
Close the Material Editor.
Press Cmd–S (Mac) or CTRL–S (Windows) or choose File > Save Project.
Adding Another Material to an Object
Drag the Noble Logo material onto the Bowling Pin lathe.
Close the Material Manager.
In the Object Manager click on the Material Tag for the Noble Logo texture.
Turn off the switch next to Tile.
Experiment with different Projection options. Both the Flat and cylindrical options can produce some interesting results.
Resize the material using the Length U and Length V attributes.
-
Reposition the material using the Offset U and Offset V properties.
NOTE: If you switch to Texture mode you can transform the texture on the material using the Move, Rotate and Scale tools.

Press Cmd–S (Mac) or CTRL–S (Windows) or choose File > Save Project.
Duplicating Objects
Making one object is great but you can also clone objects to create more of them. In this lesson you will use the Duplicate tool to make nine more bowling pins.
-
If you are not in the 4 view display choose Panel > Arrangement > 4 Views.
If necessary change your view back to the default ones; Perspective, Top, Right, and Front

Zoom out in the Top viewport so you see the area around your bowling pin.
Make sure the Attributes Manager is visible.
In the Object Manager, select the object you want to duplicate.
Choose Tools > Duplicate.
-
In the Attribute Manager:
- Change Copies to 3
- Change Mode to Linear
In the Position attributes uncheck the switches for Y and Z
-
Change the Move attribute for X to ,000

In the Object Manager, CTRL–click (Mac) or Right–click (Windows) on the group created by duplicate and select Delete Without Children.
Select the first three Bowling Pin and choose Tools > Duplicate.
-
In the Attribute Manager:
- Keep Copies at 3
In the Position attributes check the switches for X and Z.
Change the Move attribute for X to 500
-
Change the Move*8 attribute for z to ,000

-
In the Object Manager select the groups that have been created by the duplicate tool:
- CTRL–click (Mac) or Right–click (Windows) and select Delete Without Children.
Activate the Selection tool and delete any extra pins in the Top viewport so that you end up with the 10 pin triangle found in bowling.
Press Cmd–S (Mac) or CTRL–S (Windows) or choose File > Save Project.
Creating a Bowling Ball with a Sphere
C4D has a series of primitive objects that you can use to create many types of 3D artwork. Primitive objects are basic 3D shapes that can be used as a starting point for creating more complex objects. Primitive objects include common shapes such as spheres, cubes, cylinders, cones, and planes. These objects can be manipulated and transformed in various ways such as scaling, rotating, and translating, to create more complex objects.
-
In the Create menu long–press on the Cube object to reveal the other primitive objects you can create.
Click on the Sphere object.
Activate the Move tool and drag the sphere away from the bowling pins.
In the Object Manager double–click on the Sphere and rename it Bowling Ball.
With the Bowling Ball selected hover your cursor over each viewport and press S. This will frame just the selected object in each view.
In the Attribute Manager click on the Object tab.
Change the Radius until the ball is a little shorter than the pins. We used 450
To smooth the ball off raise the Segments attribute. We used 32.
Press Cmd–S (Mac) or CTRL–S (Windows) or choose File > Save Project.
Cutting Holes with a Boole
In Cinema 4D, a Boole object is used for Boolean operations. Boolean operations are a type of mathematical operations that allow you to create complex shapes by combining or subtracting simple shapes. To use the Boole object, you start by creating two or more objects in your scene. You then place a Boole object in the scene and use its properties to specify the type of Boolean operation you want to perform. The Boole object supports a range of Boolean operations, including union, difference, and intersection.
In the Create menu long–press on the Cube object to reveal the other primitive objects you can create.
Click on the Capsule object.
Move the capsule object so that it intersects with the Sphere.
In the Object Manager change the capsule’s Rotation Segments to 32.
-
Duplicate the capsule two times and reposition the copies to form the area to cutout the finger holes for the bowling ball.

-
Select all three capsules in the Object Manager.
- CTRL–click (Mac) or Right–click (Windows) on one of the selected capsules and choose Group Objects.
NOTE: The keyboard command for Group Objects is Opt–G (Mac) or ALT–G (Windows).
- Rename the group Finger Holes.
-
In the Create menu long–press on the Subdivision Surface object and then choose Boole from the menu.
In the Object Manager change the name of the Boole to Ball
Drag the Finger Holes group into the Ball boole object and then drag the Bowling Ball sphere into it.
Creating a Marble Texture
Cinema 4D comes equipped with many procedural texture that you can add to your models.
Open the Material Manager.
Click the New Default Material button and then rename it Bowling Ball.
Double-click on the material icon to open the Material Editor.
Click on the Color map to view it’s properties.
-
Click on the arrow next to Texture and choose Surfaces > Marble.
NOTE: You can edit the colors of the shader by clicking on the image below the Texture property.
Close the Material Editor.
Drag the new material onto the Ball boole object.
Close the Material Manager.
Press Cmd–S (Mac) or CTRL–S (Windows) or choose File > Save Project.
Creating a Floor with a Plane
A Plane object is a flat, two-dimensional object that can be used as a starting point for creating more complex objects or as a surface for texturing and shading. A Plane object is defined by its width and height, and it has no depth or thickness.
Create a Plane.
Adjust it’s Width and Height until it is long and wide enough to cover all the bowling pins and the ball. This object will form the “floor” of the scene.
Rename the new object Floor.
-
Move the bowling pins and ball so they all sit on top of the plane. Arrange them to form a pleasing scene.

Open the Material Manager.
-
Create a New Default Material
.- Double–click on the new material’s name and rename it Alley Floor.
Double–click on the material’s icon to open the Material Editor.
Click on the Color map to make it active.
Click the arrow next to texture and choose Load Image.
Navigate to C4D in AE Class > Bowling Alley > Media > mats.
-
Double–click on Alley Material.psd.
Click No in the dialog that appears.
Close the Material Editor.
Drag the new material onto the Floor plane and then close the Material Manager.
In the Object Manager click on the Material Tag for the Alley Floor texture.
This texture was designed to repeat so make sure the switch next to Tile is turned on.
Experiment with different Projection options. We used the Flat setting in our tests.
Resize the material using the Length U and Length V attributes. We used a very high Length U when creating the sample images
-
Reposition the material using the Offset U and Offset V properties.
NOTE: If you switch to Texture mode you can transform the texture on the material using the Move, Rotate and Scale tools.
Press Cmd–S (Mac) or CTRL–S (Windows) or choose File > Save Project.
Creating the Gutters with an Extrusion
An Extrusion object is a 3D modeling tool that allows you to create 3D objects by extruding or extending a 2D profile along a path. An Extrusion object starts with a 2D profile, which defines the cross-section of the object you want to create and Cinema 4D will generate a 3D object by extending extruding the profile along the path like toothpaste from the tube.
Click in the Right viewport to make it active.
-
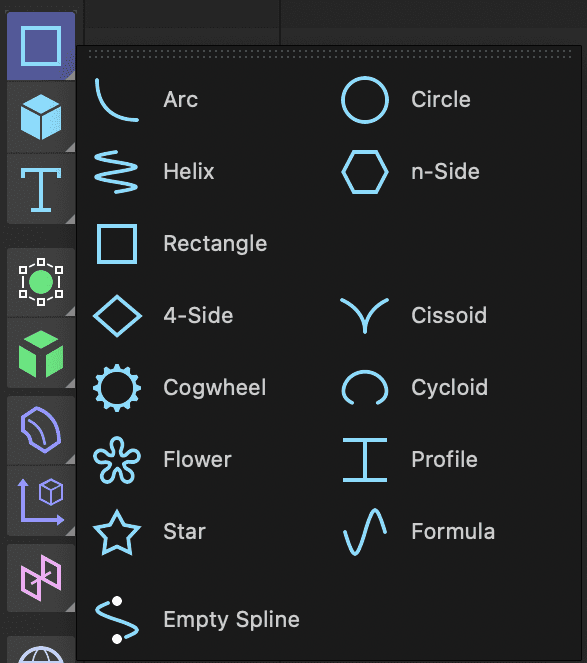
Long–press on the Rectangle tool and select Circle from the menu.
-
In the Object Manager click on the new circle to select it.
- CTRL–click (Mac) or Right–click (Windows) on the circle and choose Make Editable to convert it into a simple spline.
NOTE: The keyboard shortcut for Make Editable is C.
Double–click on the circle and rename it Gutter Shape.
Click on the Point
 button. This mode allow you to edit the vertices and line segments that make up all splines.
Activate the Spline Pen
tool.-
Click on one of the line segments at the top of the circle to select it.
- CTRL–click (Mac) or Right–click (Windows) on the line segment and choose Delete Edge.
-
Repeat the previous step for the other edge at the top of the circle until you have only the bottom half circle remaining.1

Click on the Create Outline
 tool.
tool.-
In the Right viewport, click and drag on the half circle to offset the path and create the shape seen here.

-
Click on the Model
 button.
- If your splines corners become beveled, change the spline’s Number attribute to 10.
Create an Extrude generator and add the spline to it.
In the Attribute Manager set the extrude object’s Offset to the same length as your floor plane.
In the Object Manager double–click on the extrude object and rename it Gutter 1.
In the viewports, move Gutter 1 so that it is positioned to one side of the floor.
-
Duplicate Gutter 1 and move it to the opposite side.

Press Cmd–S (Mac) or CTRL–S (Windows) or choose File > Save Project.
Informational: Procedural Vs. Image Textures
Procedural textures and image textures are both used to add color and detail to 3D objects in software, but they work in different ways.
An image texture is a 2D image that is applied to the surface of a 3D object. The texture is mapped onto the object using UV coordinates and can be a photograph, drawing, or other image file. Image textures are often used for realistic rendering and can add a high level of detail to a model. Image textures can be created by hand or sourced from image libraries.
Procedural textures, on the other hand, are generated by algorithms within the 3D software itself. They are created by combining different types of noise patterns and mathematical functions to create a texture. Because they are generated by code, procedural textures can be infinitely scaled and modified without losing resolution. This means that they can be used for things like creating repeating patterns, generating textures on the fly, or applying effects like displacement or bump mapping.