Explore this detailed AutoCAD tutorial that covers key topics such as Quick Select and the Properties Palette, providing a step-by-step exercise that will help you understand how these tools work together.
This exercise is excerpted from Noble Desktop’s past AutoCAD training materials and is compatible with Photoshop updates through 2020. To learn current skills in AutoCAD, check out AutoCAD Bootcamp and AutoCAD classes in NYC and live online.
Topics Covered in This AutoCAD Tutorial:
Quick Select, the Properties Palette
Exercise Preview
Exercise Overview
In this exercise you will use Quick Select to select a range of objects by their properties and use the Properties Palette to make corrections on all the selected objects at the same time.

Using the Properties Palette & Quick Select
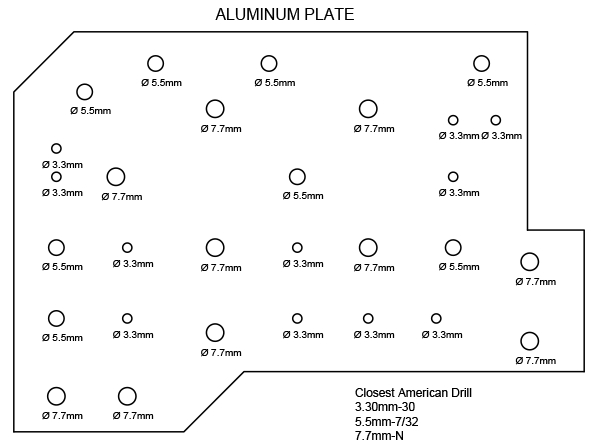
Open the file Properties Palette-Drill Plate.dwg.
-
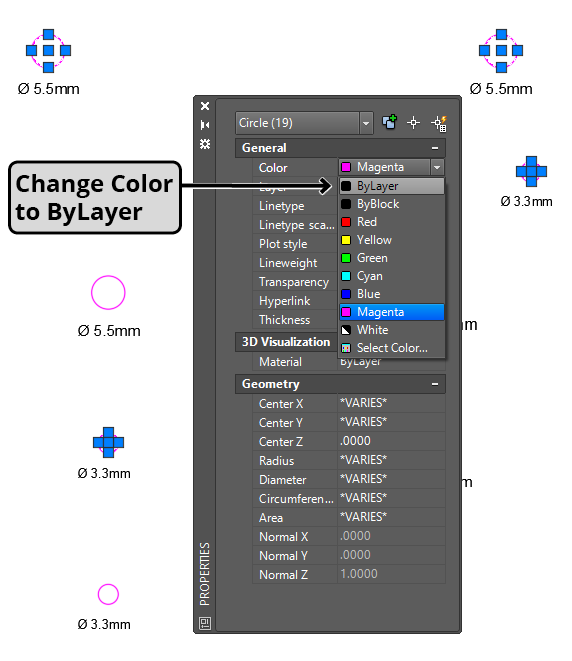
All of the drill holes are magenta. Expand the Layer Control and you will see that the Drill Holes layer is magenta, so you might assume that all the drill holes are on that layer. Select the 5.5 mm magenta drill hole in the upper-right corner of the plate. Right–click and choose Select Similar from the menu. Only some of the circles will be selected. This is because they are not all on the same layer, as they should be. Press CTRL–1 to open the Properties Palette. The Properties Palette will display information about the properties of the selected objects and allow you to change them. It’s one of the most useful tools in AutoCAD. In the palette, the Color is set to Magenta. This means that the cColor property has been assigned by object, and not layer, so the circles will be magenta no matter what layer they are placed on. This often leads to objects being mistakenly placed on the wrong layer. Change the Color in the Properties Palette from Magenta to By Layer. This will make it so that the layer will determine the color of the selected objects. The circles will turn black, because they are on the Object layer. The Properties Palette will also display what layer the holes are on. Change the Layer to Drill Holes and the circles will be magenta again, because magenta is the color of the Drill Holes layer. Press Escape to deselect the drill holes.
Select any of the magenta circles and use Select Similar again. This time all the circles will be selected because now they are all on the same layer. The color field in the Properties Palette will say
*VARIES*. Change the color to By Layer. Now all the drill holes will be set to Color by Layer, so if any of them get placed an the wrong layer they will change color so you can be alerted and change them back to the Drill Holes layer. Press Escape to deselect the holes.Select any of the holes that are labeled with a diameter of 7.7 mm. Look at the Diameter reading in the Properties Palette. The Diameter is 6.1 mm, not 7.7 mm. You can see that all of the circles labeled 7.7 mm are the same, so they are all wrong. You can use Quick Select to select only the circles that need to be changed. Press Escape to deselect the circle.
-
Right–click in any open area of the Drawing Window and choose Quick Select from the menu, or press the Quick Select button
 on the Properties Palette. For Object Type, select Circle. Note that the list of objects types are for objects that are actually in the drawing. You will see that the list of Properties will change to properties relevant to circles. Select Diameter from the Properties list. Keep the Operator set to Equals. Enter a Value of 6.1 and click OK. All of the circles with a diameter of 6.1 mm will be selected. They are all labeled 7.7 mm, which is the correct diameter. In the Properties Palette, change the diameter to 7.7 mm. You will see that all of the circles are corrected at the same time. Press Escape to deselect the circles.
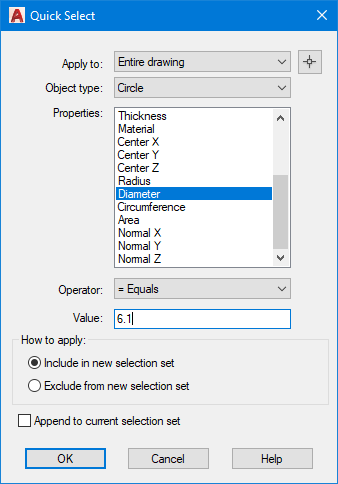
-
All the text should be on the Text layer, but you can tell that all the text is on the Object layer because it’s all black. Use Select Similar to select all the text and change the layer to Text in the Properties Palette. Now all the Text is on the correct layer, but all of the diameter labels are different sizes. You will want to make them all the same size without affecting the text above and below the plate. Once again, start the Quick Select command. For Object Type select MText (Multiline Text), for Operator, select
<Less than, and for Value, enter 3.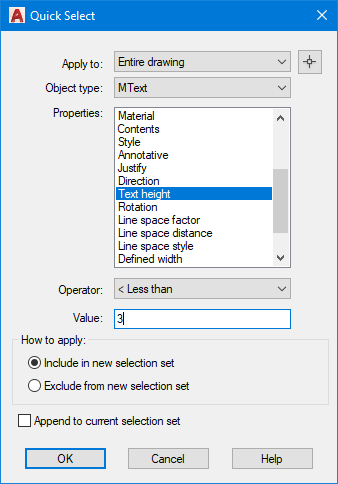
-
In the Properties Palette, the Text height will read
*VARIES*, because the selected text objects are multiple sizes. Enter a new Text height of 2.5. All of the diameter labels are now the same size.
-
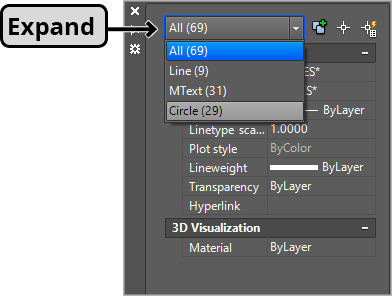
Another useful thing the Properties Palette does is display a count of the selected object types. You will see the count at the upper-right corner of the Properties Palette. Press CTRL–A to select all the objects in the drawing. Expand the count drop down menu in the upper-right corner of the Properties Palette as shown below. You will see a count of all the object types in this drawing. Note that there are 29 circles, which can be useful information for this drawing because that means there are 29 total drill holes. If you select Circle from the list, you will see properties pertaining only to circles in the palette, allowing you to make changes to all the circles if desired. Press CTRL–1 to close the Properties Palette.
Close and save the drawing.