This exercise is excerpted from Noble Desktop’s past front-end web development training materials and is compatible with updates through 2022. To learn current skills in web development, check out our coding bootcamps in NYC and live online.
Note: These materials are provided to give prospective students a sense of how we structure our class exercises and supplementary materials. During the course, you will get access to the accompanying class files, live instructor demonstrations, and hands-on instruction.
Topics covered in this HTML & CSS tutorial:
The HTML, head, title, & body tags, Headings, paragraphs, & lists, The strong & em tags, The doctype, The lang attribute, The meta tag & the unicode character set
Exercise Preview
Exercise Overview
In this exercise you’ll learn the syntax of HTML and the most essential tags needed to create a webpage.
Getting Started
Launch your code editor (Visual Studio Code, Sublime Text, etc.). If you are in a Noble Desktop class, launch Visual Studio Code.
All the files for a website are stored in a folder. We’ll be working with files in a folder named News Website. Open the folder as follows (this should work in most code editors such as Visual Studio Code):
- Go to File > Open (Mac) or File > Open Folder (Windows).
- Navigate to Class Files > Web Dev Class > News Website and hit Open (Mac) or Select Folder (Windows).
- If you get a message about trusting the author, check on Trust the authors of all files in the parent folder and click Yes, I trust the authors.
- On the left you should see a panel showing files in the folder you just opened. Click on microsoft.html to open it.
We’ve typed out some text, but it doesn’t have any HTML tags yet. Add the required tags shown below. The code you need to type is highlighted in bold throughout this book.
NOTE: As you begin typing a tag, your code editor may display a list of suggested tags. For now, we recommend ignoring those code hints. Also, when you type the
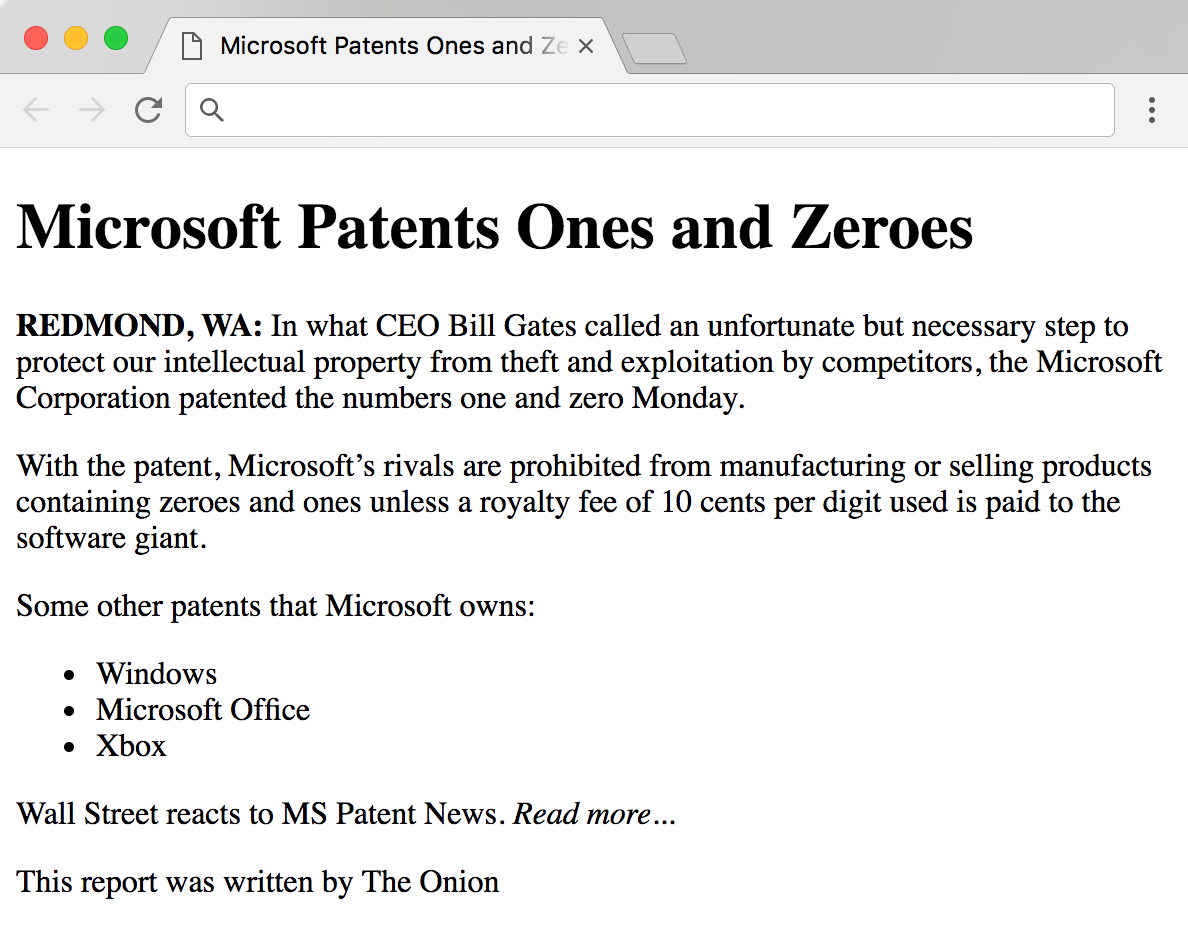
</part of an ending tag, your code editor may automatically finish the closing tag for you. This is a nice time-saver, but be sure to double-check your code.<html> <head> <title>Microsoft Patents Ones and Zeroes - The Onion</title> </head> <body> Microsoft Patents Ones and ZeroesScroll to the bottom and add the following closing tags highlighted in bold:
   Wall Street reacts to MS Patent News. Read more...
   This report was written by The Onion
</body>
</html>
Let’s break this code down:
- HTML tag names are enclosed in less-than (
<) and greater-than (>) signs. - Each tag wraps the content it describes, so there is a start and an end tag.
- The end tag has a slash (
/) before the tag name.
Notice that the
<html>tag wraps around the entire document. Inside that, there are two sections: the<head>and the<body>. The head contains information about the document, such as its title and other data that the visitor to the site will not interact with, whereas the body contains the document’s actual content that a visitor will see and interact with.The
<title>should be a concise description of this page’s content. That is important for Search Engine Optimization (SEO), as the title plays an important role in most search engines’ ranking. Additionally, it’s often the text search engines display in their search results. Titles appear in the current browser tab, as well as a browser’s bookmarks (if a user bookmarks the page). Because the title is inside the head tag, we indented it to make it easier to see the structure.- HTML tag names are enclosed in less-than (
- Let’s see what this page looks like in a browser. Note that when you preview this file, the text is going to be one big blob of text because we haven’t formatted it yet. Before we preview, we need to save the file. Hit Cmd–S (Mac) or Ctrl–S (Windows).
- Keep this file open in your code editor, but switch to the Desktop (the Finder on Mac or Windows Explorer on Windows).
- Go into the Class Files folder, then Web Dev Class folder, then News Website.
- Ctrl–click (Mac) or Right–click (Windows) on microsoft.html, go to Open with and select your favorite browser.
- In the browser’s tab (at the top of the window), you should see the text you put the
<title>tag. (In Safari you may not see the title unless the tab bar is visible.) Next, take a look at the page. The actual content of the page—which is what is wrapped inside the
<body>tag—looks like one long paragraph of text. That’s because line breaks in the code are ignored by web browsers.NOTE: We recommend leaving microsoft.html open in the browser as you work, so you can reload the page to see the changes as you make them in the code.
Return to microsoft.html in your code editor.
Headings
Headings help organize content, so visitors can quickly skim a page. They also make the page more accessible (visually impaired visitors using a screen reader can hear the headings, and jump between them using keystrokes). Headings also help search engines (like Google) to better understand what the page’s content is about. There are six levels of headings from h1 (the main topic) to h6 (the most nested subtopic).
Our page has a single heading, with no subtopics. In your code editor, at the top of the body section, wrap the heading text in an h1 tag as shown below in bold:
<body> <h1>Microsoft Patents Ones and Zeroes</h1>- Save the file.
- Return to the browser and click the Reload button to refresh the browser window with the new code.
Notice that the heading is bold. More important headings would also be larger than less important ones. These defaults, along with the space around the heading, can be modified using Cascading Style Sheets (CSS). For now, we are just focusing on the markup, so we won’t change their appearance.
Paragraphs
Even though there appear to be paragraphs in the provided text, the browser doesn’t know where the paragraphs start and end. We have to code that.
- Return to microsoft.html in your code editor.
For the first paragraph, add the following opening and closing tags shown in bold:
<h1>Microsoft Patents Ones and Zeroes</h1>

<p>REDMOND, WA: In what CEO Bill Gates called an unfortunate but necessary step to protect our intellectual property from theft and exploitation by competitors, the Microsoft Corporation patented the numbers one and zero Monday.</p>
Wrap the remaining paragraphs, as shown below:
<p>With the patent, Microsoft's rivals are prohibited from manufacturing or selling products containing zeroes and ones unless a royalty fee of 10 cents per digit used is paid to the software giant.</p> <p>Some other patents that Microsoft owns:</p> Windows Microsoft Office Xbox <p>Wall Street reacts to MS Patent News. Read more...</p> <p>This report was written by The Onion</p>- Save the file.
Return to the browser and click the Reload button. You should now see multiple paragraphs that are separated by some vertical space.
Lists
To create a bulleted list, we must use two tags: <ul> and <li>:
- The
<ul>tag creates an unordered list, which is a bulleted list. There is also an<ol>tag for an ordered list, which uses numbers or letters (1, 2, 3 or A, B, C). - The
<li>tag is wrapped around the contents of each list item.
Return to microsoft.html in your code editor. Mark up a bulleted list of Microsoft’s patents by adding the following code highlighted in bold:
<p>Some other patents that Microsoft owns:</p> <ul> <li>Windows</li> <li>Microsoft Office</li> <li>Xbox</li> </ul> <p>Wall Street reacts to MS Patent News. Read more...</p>- Save the file.
Return to the browser and click the Reload button to refresh the browser to see a bulleted list with three items.
Strong & Em (Bold & Italic)
The <strong> tag is rendered as bold and <em> (short for emphasis) is rendered as italic in a browser. These tags may change the speaking style of a screen reader, which is an app used by people who are blind or visually impaired.
Return to microsoft.html in your code editor and add the following tags to make some text bold:
<p><strong>REDMOND, WA:</strong> In what CEO Bill Gates called an unfortunate but necessary step to protect our intellectual property from theft and exploitation by competitors, the Microsoft Corporation patented the numbers one and zero Monday.</p>Near the bottom, add the following tags to italicize some text:
<p>Wall Street reacts to MS Patent News. <em>Read more...</em></p>
<p>This report was written by The Onion</p>
Save the file.
Return to the browser and click the Reload button to see the bold and italic text.
Adding the Doctype, Lang Attribute, & Meta Tags
Return to microsoft.html in your code editor.
Place the cursor at the very beginning of the code—directly before the html tag—and hit Return (Mac) or Enter (Windows) to get a new line on top.
Now add the following code highlighted in bold:
<!DOCTYPE html>
<html>
This doctype is for HTML5 and beyond. It tells the browser to render the page according to the latest HTML and CSS specifications (which is called “standards mode”). Using older doctypes (or omitting a doctype) can render the page in “quirks mode”, which emulates the nonstandard behavior of old browsers.
Next, add the following attribute (highlighted in bold) to the html tag:
<!DOCTYPE html>
<html lang="en">
Take a moment to review the code and check for typos. Notice that
lang="en"is written inside the html element’s start tag, after the tag name but before the greater-than (>) sign.The lang attribute is used to declare the language of the page and en is the international standard code for English. Including this information is helpful for Search Engine Optimization (SEO) and accessibility.
Attributes
Many HTML tags can be enhanced with attributes, modifiers of HTML elements. Most attributes have a name and a value. Attributes are only added to a start tag and are written like this
<tag attribute="value">Finally, add the following new line of code highlighted in bold:
<!DOCTYPE html>
<html lang="en">
<head>
   <meta charset="UTF-8">
   <title>Microsoft Patents Ones and Zeroes - The Onion</title>
</head>
Meta tags can do various things, but this one says that special characters are encoded as Unicode (UTF-8). This means that special characters (like ©, ™, etc.) can be typed into the code and they’ll display properly across platforms and devices.
This particular meta tag must occur within the first 512 bytes of the file, so it is considered good practice for this to be the first child of the
<head>element.- Unlike most of the tags we’ve used so far, notice that the doctype and the meta tags do not have an ending tag. That’s because they do not wrap around content.
- Save the file.
Congratulations, you’ve made a webpage! You can leave the file open so you can use it in the next exercise.