This exercise is excerpted from past Adobe Bridge training materials and is compatible with InCopy updates through 2016. To learn current skills in Adobe Creative Cloud and graphic design, check out our graphic design classes in NYC and live online.
Note: These materials are provided to give prospective students a sense of how we structure our class exercises and supplementary materials. During the course, you will get access to the accompanying class files, live instructor demonstrations, and hands-on instruction.
Topics covered in this Adobe Bridge tutorial:
Making edits with Adobe Camera Raw, Synchronizing raw settings, Batch processing images, Benefits of working with raw files
Exercise Preview
Exercise Overview
Instead of processing Camera Raw files in Photoshop, we can use the same process in Adobe Bridge so that we don’t have to jump back and forth between two apps.
Setting Preferences
Adobe Bridge previews Camera Raw images as thumbnails or in slideshows. But the default setting is that a double–click will open the RAW file in Photoshop to edit the Camera Raw settings. We don’t want to have to switch back and forth between Bridge and Photoshop, so we’ll set Bridge to directly edit the Camera Raw settings.
In Bridge, go to the Adobe Bridge CC menu (Mac) or Edit menu (Windows) and choose Preferences—not the Camera Raw Preferences as some would guess!
On the left, click on General.
On the right, check on Double-Click Edits Camera Raw Settings in Bridge.
Click OK.
Navigating to a Folder
To make sure we are looking at the same thing:
- Go to Window > Workspace > Essentials.
- Then go to Window > Workspace > Reset Workspace.
At the top left of the window in the Favorites panel, click on Desktop.
The icons are fairly small and close together. At the bottom right of the window drag the zoom slider a little to the right to make it easier to read the longer names.

In the main section of the window, double–click on the Class Files folder to open it.
Go into the Bridge Files folder.
Go into the Camera Raw Pics folder.
Adjusting a Raw Image: White Balance & Straightening
Double–click on noble desktop.cr2.
At the top of the window that opens, click on the White Balance tool
 .
.Try clicking on different places on the white wall and white column to see how the color balance changes. Stop clicking when you find a decent color balance.
If you want to manually adjust the white balance, use the Temperature and Tint sliders on the right.
We think a good white balance is around Temperature: 3150 and Tint: –4 but you can adjust to your tastes.
The camera was slightly tilted when taking this picture. To fix it, at the top of the window select the Straighten tool
 .
.Find a line in the image that should be perfectly vertical or horizontal, such as the white column on the right or the corner where the red wall meets the white wall. Drag from the top of the line to the bottom of the line.
When you release the mouse part of the image will be grayed out to indicate the new crop for the image.
At the bottom right of the window click Done and watch the thumbnail update when you return to the Bridge window.
TIP: To remove a crop you applied in Camera Raw, click and hold the Crop tool
 at the top of the Camera Raw dialog and choose Clear Crop.
NOTE: The Straighten tool in Camera Raw crops off part of the photo. If this is a problem you may want to straighten the image in Photoshop instead of Camera Raw.
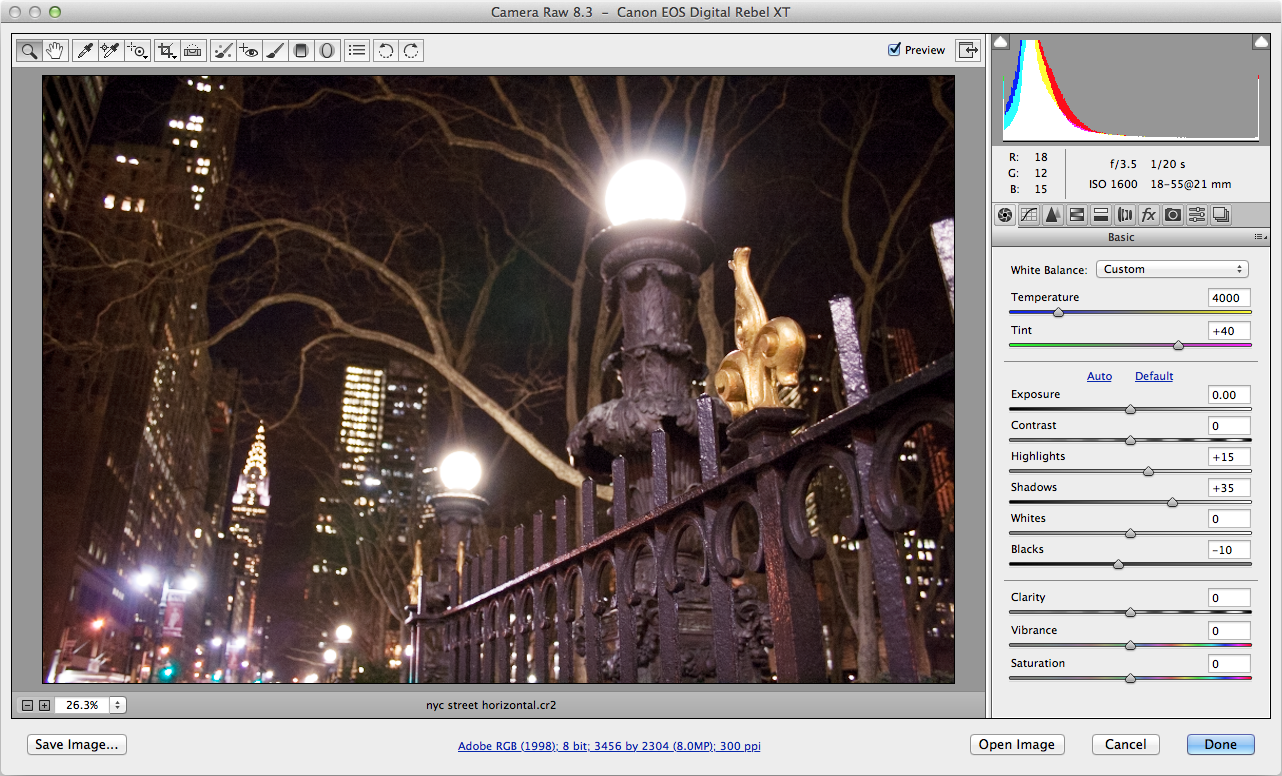
Adjusting a Raw Image
Double–click on nyc street horizontal.cr2.
Do not click Done till we say!
The white balance is close, but a little yellow and green. Set the following:
Temperature: 4000 Tint: +40 Let’s adjust the highlights. Drag the Highlights slider to the right to see the highlights get brighter. Drag the slider to the left to see them get darker.
NOTE: Holding Option (Mac) or Alt (Windows) while you drag the slider lets you see what highlights in the image will be clipped.
Set the Highlights to +15.
The shadows could also use some brightening. Set the Shadows to +35.
NOTE: The same Option–dragging (Mac) or Alt–dragging (Windows) technique mentioned earlier can be used to see what shadows are clipped.
Set the Blacks to –10 to darken them a bit.
Click Done to save the changes.
Copying Raw Settings from One File to Another
Often a series of images will all need the same adjustment. If you’ve already adjusted one properly, you can copy the settings and reuse them on the other images in the series.
If it isn’t still selected, select nyc street horizontal.cr2.
To copy the Camera Raw settings do one of the following:
- Ctrl–click (Mac) or Right–click (Windows) on the image and choose Develop Settings > Copy Settings.
- Hit Cmd–Opt–C (Mac) or Ctrl–Alt–C (Windows).
Select nyc street vertical.cr2.
To paste the Camera Raw settings do one of the following:
- Ctrl–click (Mac) or Right–click (Windows) on the image and choose Develop Settings > Paste Settings.
- Hit Cmd–Opt–V (Mac) or Ctrl–Alt–V (Windows).
In the Paste Camera Raw Settings window that opens:
- Make sure the Subset menu at the top is set to Settings.
- Make sure Crop at the bottom is UNchecked.
Click OK.
Adjusting Multiple Raw Files at Same Time
Click on snow 1.cr2.
Shift–click on snow 3.cr2.
Now that all three snow pictures are selected, double–click on any of them to open up the Camera Raw window.
We want to make the same change to all of these pictures, so at the top left of the window click the Select All button.
On the right side of the window under Saturation, drag the slider all the way left to make it –100. This removes all colors to make them black and white.
Notice all three of the thumbnails on the left are now black and white. You may notice as you drag the slider it takes a moment to update all the thumbnails on the left. While it’s updating them an
 icon appears in the thumbnail. That goes away when the preview is finished updating.
Click on the snow 2.cr2 thumbnail (the second picture).
Drag the Blacks slider to the left and darken this picture so the building in the background just about disappears. -65 seems to be a good setting.
We want to apply this change to the other pictures. Click the Select All button at the top left of the window.
Notice that all the images are highlighted, but snow 2.cr2 has a darker border around it. That means it’s the “master” that the others will sync with.
Click the Synchronize button.
From the Synchronize menu at the top choose Settings and click OK.
Batch Processing Multiple Raw Images
Now that all the images have been fixed, we’re ready to export them for use in a page layout program.
If all the images are not still selected in this Camera Raw window, click the Select All button at the top left of the window.
These files have already had their exposure, etc. settings tweaked, and all we want to do is create some TIFFs from them for use in a print design.
At the bottom of the window, click where it says Adobe RBG (1998); 8 bit…etc.

This opens the Workflow Options. Make sure the following are set:
Space: Adobe RGB (1998) Depth: 8 Bits/Channel Image Sizing: Make sure Resize to Fit is UNchecked. The menu next to it will say Default (8.2MP), but that amount depends on the resolution of the digital camera on which the photo was taken. Resolution: 300 pixels/inch Click OK.
At the bottom left of the window, click the Save Images button.
Under Destination choose Save in New Location.
If you aren’t already in the Camera Raw Pics folder, navigate into Class Files > Bridge Files > Camera Raw Pics.
Create a new folder named Output files for Print Layout and click Select to choose it.
Under File Naming the first box should already say Document Name.
If it doesn’t, from the menu choose Document Name.
Under File Extension choose .tif.
Under Format, Compression choose LZW. (This reduces file size without loss of quality. Some programs don’t work with LZW compressed tiffs, but many do.)
Click Save.
While it’s saving the TIFF files, the bottom left of the Camera Raw window will count down the number of files remaining. You can go ahead and click the Done button. It doesn’t matter if it is not done saving the images yet. The Bridge will keep processing them in the background even if you close the Camera Raw window.
What Is Camera Raw & Should I Use It?
When a digital camera takes a picture, settings such as sharpening and white balance affect the look of the final image. If the camera saves it as a JPEG these settings must be applied to the image in a “destructive” manner which can’t be changed after the picture is taken. If the camera saves it as a RAW file, all the raw data from the image censor is saved, along with those settings. Since the raw data is all there, the image must be processed (using a program like Adobe Bridge) and at that time you can adjust the amount of sharpening, white balance, etc. It does this nondestructively because it is referring back to the original raw data. This yields a better image and allows more flexibility. For instance, you set your camera to a tungsten white balance and shoot some pics, then “forget” to set it back to the right setting when you walk outside and shoot some pics in daylight. With a JPEG you’d have a problem because the colors would be permanently affected. But with RAW you just open in the Bridge and adjust the color balance. Using the original data, it adjusts the color as it would have in the camera. That’s just one example of how RAW has a huge advantage for quality and flexibility.
The downside of RAW files is they are huge. RAW files can easily be 4 times bigger than their JPEG equivalents. That means cameras take longer to save images and memory cards hold fewer shots. Also JPEGs are ready to go, but RAW files must be “processed” and turned into a JPEG, TIFF, or something else before use. This adds an extra step to a photographer’s workflow. Not all cameras can shoot as RAW. Usually it is found on higher-end cameras, but more lower-end cameras are starting to add this feature as well.
Camera Raw’s features can also be used on JPEG files. You get to use all the color correction tools that work on RAW files, with the benefit of the smaller JPEG file size. However, this method does not give you the full benefits of RAW since the camera will have already “processed” the photo with its own internal calculations (in a “destructive” way). So, if you still want the best quality, RAW is the way to go.
To edit JPEGs with Camera Raw you can select a JPEG and choose File > Open in Camera Raw. If you want to double–click JPEGs and have them automatically open in Camera Raw, go to the Adobe Bridge CC menu (Mac) or Edit menu (Windows) and choose Camera Raw Preferences. In the JPEG menu near the bottom, choose Automatically open all supported JPEGs.